Photoshop Plugin to Convert PSD's To Wordpress Themes Easily
There are automatic translators from English into French, right? Why can’t there be software that translates the artistic language of effects, brushes and filters into HTML code? It is not a simple task to Create a Nice Looking Wordpress Theme with vaild XHTML-CSS code. It takes a lot of hours for web designers to complete this task. There is a lot of hard work done behind the creation of a professionally looking Wordpress Theme. Most of us prefer a nice and clean looking theme for our site. Dont we ? It is hard for a beginner to create a good looking Wordpress theme without having and knowledge in HTML, CSS, PHP etc. But most of the users know to use Adobe Photoshop well. Atleast to a great extent. It is easier to create design in a PSD format. So here is some thing good for all the newbie website owners. You can now Convert a PSD file to a Wordpress Theme which is clean, widget-ready and valid XHTML-CSS code .
Divine is a Photoshop Plugin to Convert PSD files to Wordpress Themes. The codes produced by Divine is SEO (Search Engine Optimized)friendly and optimized for getting the top positions in the search engines.
What makes Divine really helpful is that you don't require any CSS coding skills to create clean and valid CSS wordpress themes.

Despite of its greatness there are some small limitations for Divine too.
There can be only up to 5 user specified items.
The images are saved in GIF format only.
A “Built with Divine” link will be displayed at the themes footer. You can remove it manually.
Layout size must not exceed 1000×2000px or be smaller than 750×1000px.
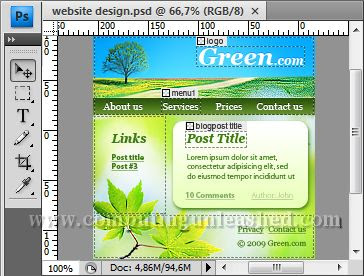
To start creating a Wordpress Theme we need to first load the required PSD file which we created into Photoshop ( You can create a PSD by yourself or get a Free PSD from the web). Then using the available Divine tools we need to assign the respective wordpress elements like header, post title, sidebar, footer etc. in the PSD image.
Divine will then automatically generate the required HTML / PHP codes for them. After all the elements have been assigned properly, Just Press the Publish button.
If you have provided the FTP details for your server in Divine, the theme will be automatically uploaded.
If you love creating nice wordpress themes Divine is a must try Tool.
If you have read this post Don't forget to say a few words about this Wonderful Plugin!
Divine is a Photoshop Plugin to Convert PSD files to Wordpress Themes. The codes produced by Divine is SEO (Search Engine Optimized)friendly and optimized for getting the top positions in the search engines.
What makes Divine really helpful is that you don't require any CSS coding skills to create clean and valid CSS wordpress themes.

Despite of its greatness there are some small limitations for Divine too.
There can be only up to 5 user specified items.
The images are saved in GIF format only.
A “Built with Divine” link will be displayed at the themes footer. You can remove it manually.
Layout size must not exceed 1000×2000px or be smaller than 750×1000px.
How to Use Divine To convert PSD to Wordpress Themes
To start creating a Wordpress Theme we need to first load the required PSD file which we created into Photoshop ( You can create a PSD by yourself or get a Free PSD from the web). Then using the available Divine tools we need to assign the respective wordpress elements like header, post title, sidebar, footer etc. in the PSD image.
Divine will then automatically generate the required HTML / PHP codes for them. After all the elements have been assigned properly, Just Press the Publish button.
If you have provided the FTP details for your server in Divine, the theme will be automatically uploaded.
If you love creating nice wordpress themes Divine is a must try Tool.
Download Divine Plugin for Photoshop
If you have read this post Don't forget to say a few words about this Wonderful Plugin!
Labels: Adobe Photoshop, Themes, Wordpress


