Saturday, May 30, 2009

Download Leopard Transformation Pack 2 to Transform Vista To Mac OS X

Download Leopard Transformation Pack 2 to Transform Vista To Mac OS XMac Operation system has very appealing user interface. How about getting Mac OS X interface in Windows Vista? Leopard Transformation Pack 2 will transform Windows Vista To Mac OS X Interface. Leopard Transformation Pack 2 can give the look and feel of Mac OS X interface in Windows Vista.


Before You install the Leopard Transformation Pack 2 for Windows Vista you need to have the uxtheme.dll file to be patched and for an added safety create a system restore point too (will be handy if any thing goes wrong). Install the Leopard Transformation Pack 2 in the Safe Mode with Administrator rights for a successful installation.


Screenshot of Leopard Transformation Pack 2 Installed in Widows Vista


Download Leopard Transformation Pack 2 to Transform Vista To Mac OS X

Before Transforming Windows Vista to Mac OS X Leopard Read this too


You must read these important instructions given by the author before installing the Leopard Transformation Pack 2 for Windows Vista.
Currently the Leopard Transformation Pack 2 is only available for Windows Vista (32 bit) with SP1 installed. If you haven’t installed Windows Vista (32 bit)  SP1 then install the Leopard Transformation Pack 2 only after upgrading to windows vista sp1.


Download Leopard Transformation Pack 2 for Windows Vista (32-bit)SP1

Labels: ,

Friday, May 29, 2009

Take Complete Screen Shots of WebPages Easily

You might have experienced a trouble when taking the screen shots of websites in your browser that you don't get the complete  screen shot of that website. Only the part you see on the screen could be captured. The olden days of taking screen shots using the Print Screen key and pasting it in an image editing software is over. You can now easily take the complete screen shot of a webpage if you have Mozilla Firefox Browser and the Screengrab Addon.


Screengrab is an excellent Firefox add-on that will help you to take the complete screen shots of a website or webpage with ease.


How to Use Screengrab to take the complete screen shot of a webpage


All you need to do is to open the Website which you want in Mozilla Firefox and right click and hover your mouse pointer  Screengrab option in the right click context menu and select the location in your PC to save the screen shot of the webpage. Its that easy.


Complete Screen Shot of My Website


Take Complete Screen Shots of WebPages Easily

You can customize screengrab to suit your requirements. Screengrab have the options to take only a part of website’s screen shot, Take the Full Screen Shot of  a Webpage, Save the Visible Portion of Webpage to Clipboard, Save only current frame of the website etc. If you don't want to directly save those images you can also direclt copy the screen shot of the complete webpage to the windows cipboard too.


Download Screengrab Addon for Mozilla Firefox

Labels: ,

Monday, May 25, 2009

Easily Find The Font Used On Selected Text in A Webpage

While browsing you might have seen a beautiful font in a website you liked. You don't know which is that font and need to use that particular font on some where else. Comparing that font with others and identifying it can be a tiresome task. I used to find the font used in a website or webpage by looking into the source code of that particular webpage.That too takes some time since we need to trace it out from the css code used in that particular website. Also new users will find it difficult to do this job. Here is an excellent add-on for Firefox to quickly identify the fonts in a certain text used in any webpage you see.


Font Finder is a Firefox add-on that will help you to find the font used in a particular website. You only need to select some portion of the text you need and right click; the font name will be shown to you in a flash - that’s the Font Finder Add-on for Firefox. Font Finder Add-on  can also find out the Color, Decoration/Transformation, Element Details of the font and the Spacing used in that selected portion of text.


Finding out the fonts used in a webpage wont be a problem for you from now on. Webmaster’s will love this add-on for sure!


Easily Find The Font Used On Selected Text On A Webpage


Download Font Finder Add-on for Firefox


Labels: ,

Sunday, May 24, 2009

How to Encrypt/Password Protect USB Flash Drives (Pendrives)

How to Encrypt/Password Protect USB Flash Drives (Pendrives)

Here is a small tutorial on How to Encrypt/ Password protect your Pendrives / USB Flash Drives.


Most of us today have a Pendrive / USB Flash drive. We carry the important data on the USB flash drive. But have you ever thought how secure is that data we stored on our USB Flash drive/ pendrive ? We might have stored important data on the USB  flash drive/ pendrive that we don't want others to see. The Perfect solution to this is to password protect the pendrive or USB flash drive. A small and sleek freeware utility will help you to password protect your USB  flash drive or pendrive and make it secure.


TrueCrypt is an excellent utility that can password protect the USB flash drive / pendrives, your hard disk’s and other devices too. If you only need a small portion in your USB  flash drive / pendrive that needs to be encrypted, you can do that too with ease using TrueCrypt.


Here are the steps to Encrypt/ Password Protect your Flash Drives / Pendrives


  • First Download the TrueCrypt utility from here.


  • Install the TrueCrypt utility to the pendrive / flash drive. Better to install TrueCrypt on its own default folder in the pendrive / USB flash drive.


  • Click the “Create Volume” button from its window. TrueCrypt will now TrueCrypt Volume Creation Wizard Window.


  • Leave the First Option “  Create an encrypted file container  “selected and click on Next.


  • Here also leave the first option “ Standard TrueCrypt Volume “ selected and proceed to Next.


  • In the next window press “ Select File “ and go to your pendrive’s / flash drive’s location. Enter a file name and click save. This file now created by TrueCrypt on your USB Flash Drive / Pendrive will be the store house of the files that we encrypt later. Click on Next.


  • Under Encryption Algorithm leave it as AES on and select  Whirlpool from Hash Algorithm and click Next.


  • Now, Enter the space you need for keeping the encrypted files and click on next and enter a good password ad click on next.


  • Click on “Format”.


  • Now open TrueCrypt to select the are where the encrypted data needs to be mounted. Choose the “ Select Files ” option and now pick the encrypted file area in your USB Flash Drive / Pendrive and click Open .


  • Choose an unused drive letter and press “Mount”. You will be now asked for the Password. Enter the correct Password and windows will mount you encrypted data in your USB Flash Drive / Pendrive  to the selected drive letter.


  • You must click on “ Dismount” before taking / plugging out the USB Flash Drive / Pendrive  from your system.


That's it ! You can now be confident about your data in your USB Flash Drive / Pendrive .

Labels: , , ,

Saturday, May 23, 2009

How to Copy/Paste Commands/Texts in Command Prompt in Windows

Here i will explain how to copy/paste the commands or text inside the command prompt in windows.


You might have used the Windows Command Prompt utility in Windows at least for some reason. It is really annoying to type all such long commands. If any where goes wrong we need to type that command from the beginning. I have been using command prompt for long time and was like this. You might search for some pc solution in the internet and might go to some sites and you find some commands which needs to be typed in the command prompt window and executed to solve that problem. This is really a tiring task especially when you don't have time to type all those commands one by one. How about copying those commands directly from a windows or browser where ever it be and pasting it directly on the command prompt window and vice-versa?


It is very easy to copy and paste the commands inside the command prompt window to/from the windows clipboard.


  • Copy/Paste Single line Commands : Single line commands can be easily copied/pasted using the mouse itself. To do this right click inside the command prompt window and select the “Mark” command. You can select the area you need to copy by dragging the cursor from beginning or from the end , and press [Ctrl]+[C] to copy the command to the windows clipboard. Now you can paste that command any where as you do with normal text.


  • How to copy/Paste Commands in Command Prompt in Windows

  • Copy/ Paste Long Commands (Longer Lists) : It is more wise to use the clip.exe program in order to copy long lists of commands in the command prompt. Clip.exe program is only available in Windows Vista and Windows 7. It is directly integrated and runs from the Command Prompt Windows. You can easily link the clip.exe program with the help of the ‘|’ (pipe symbol) with the required command from the command line window. The pipe symbol can be accessed by pressing ‘[Shift]+[\]’. For example, typing the command ‘dir | clip’ and pressing enter will copy a directory having or the given folder to windows clipboard. 


  • Copy the Entire Contents of a File Using Command Prompt : You can even transfer the contents of a text file ‘project.txt’ directly into the  windows clip board by giving the command ‘type project.txt | clip’. You can also the ‘<’ (Less than) sign for this same task. Typing the command ‘Clip<project.txt’ will copy the entire contents of the ‘project.txt’ file to the windows clipboard. 


  • Pasting Commands to Command Prompt : After you have copied the required command to the windows clipboard you can paste the command directly to the command prompt window. Just right click inside the Command Prompt Window and select “Paste” from the context menu that appears.


    Playing with long commands in Windows Command Prompt Program will not be a problem for you from now on.

Labels: , ,

Wednesday, May 20, 2009

Boost Your Website Alexa Rank and link Popularity Instantly- Rank High in Alexa Rankings Quickly

Most of the webmaster like to grab a high position in Alexa Rankings. Well if you don’t know what Alexa is then i will give a brief explanation on it. Alexa.com offers a search engine, a directory and a toolbar (among other services). It also has a resource called Alexa Traffic Rankings (click the traffic rankings tab at the top when you get to Alexa.com), which is what we are focusing on when we study AlexaRank. You can input any domain name into the traffic rankings form and Alexa will spit out the current ranking data for that site.

You might have searched in Google regarding different ways to increase, boost your Alexa Rank and Link popularity quickly and have seen many articles on that. Even some times you have tried some of those tips. But all those take a very long time to reach the destination.

Will backlinks could Really Increase your link Popularity ?


Backlinks alone cant help you to boost your Alexa Rankings.

The perfect way to get ranked high in Alexa rankings is to get high SERP (Search Engine Ranking Position). So here is a working way to boost your Alexa Rankings and link popularity instantly.

Check My Websites Alexa Rank ?


Click here to check ComputingUnleashed Alexa Rank 


So, are you to interested in boosting, increasing your website’s Alexa Rank and Increasing your link popularity with us?

For Bloggers Users (Click to get Code)


For Wordpress Users (Click to get Code)


Here are the important instructions for joining with me to boost  Your websites Alexa Rank and link popularity


1.) Put Alexa Widget on Your Site From Here.


2.) You are not allowed to change the Order of Links.


3.) Add your Link to the Bottom of List.


4.) After you have posted the New Article with using the Above Codes ( For Bloggers & Wordpress), Do Comment below with the Link to the Post.


Boost Your Alexa Rankings and Link popularity Quickly

Are you getting 50-100 Visitors only on your Website Daily? Want to get 200 - 400 Visitors Daily? If yes follow the simple step and get the double traffic on your Blog. Make A List Of Links As Below and Insert Your Link instead of YOUR LINK HERE from Below:


List Order: 01.) Tweaking Windows 02.) Computing Unleashed 03.)Sony Ericsson Themes  04.) PC Territory 05.)Successful Reign  06.) Success Blog 07.)Expert Adware Spyware


Please Copy the Article Code from here08.) Design of Passion


and make a new post on you blog and then make a reply with the posted link here:


You will see the increase in Alexa Rankings soon.

Labels:

How To Easily Access Blocked Websites,UnBlock,Bypass Blocked Sites Easily

How to Access Blocked Websites,Access,bypass Blocked Sites Easily

I will show you how to Unblock blocked websites, Access, Bypass any blocked websites easily.


You might have come across many news about blocking certain websites in some countries. So the citizens of that countries are not allowed to access those websites. Orkut website blocked in China, Saudi Arabia is a good example for it.


Apart from the government’s tactics, some of the schools, offices etc. too block or restrict the access to certain websites.


Social Networking sites including MySpace, Facebook, Bebo, Hi5, Orkut etc. are the ones which are mostly blocked.


Government blocks some websites for their safety but some of these websites may be useful to the people too.Even if restrictions are put on some websites there are many methods we can use to access blocked websites .


  1. Using IP Address in Place of URL : This method is easy but has a less success rate than others. Type the direct IP address in place of typing the blocked websites domain name. For example instead of typing www.Orkut.com type the IP address of it in your browsers address bar to access Orkut . Host2ip can help you to find the IP address of that blocked websites. If the blocking software can track the IP address send to the web server the website could not be unblocked or accessed by using this method.


  2. Using Anonymous website surfing sites : There are many websites around the net enabling you to surf the internet anonymously. Some of the websites provides options for encrypting the url’s of the websites. These proxy websites will hide our actual ip address and will show another IP address this could prevent the website being blocked, making it easy for us to access them.

    Here is a list of some of the proxy servers that can help you to unblock the blocked websites
     
    http://www.anonymizer.comhttp://www.dailybestlinks.com/
    http://anonymouse.org/http://www.spysurfing.com
    http://proxify.com/http://alienproxy.com
    http://www.bumsk.com/proxyhttp://indianproxy.com


  3. Online Translation Services : Actually here we can do is that, these Translation services can be used as a web proxy. Google Translate, Yahoo Babelfish . Use them to translate the website into the same language it self. If the website is in English you can give the output as English itself. This could help you to access almost any blocked websites.


  4. Using Google Mobile Search : Using Google's mobile search services will make the webpage's to appear in pure HTML. So you wont get the experience which you get while browsing those sites using your normal web browser. However it could help you to access,bypass blocked websites.


  5. Receiving Websites as Email : Websites such as web2mail will deliver the websites as email. However you wont be able to access very large blocked websites. At least it could unblock some of the websites and you could read its content.


  6. Using Google’s Cache : Google’s Cache will keep the stored versions of websites. Just search the desired website (blocked) to be accessed in Google and you will see a link to the cache page very near to the right of the result displayed. Since the blocked website is not being actually accessed from its server using this method can be a success some times.


  7. Short URL Redirection Method : The website you are about access might be banned or blocked by the government or office, by using this url shortening services  there is a chance to get access to those websites which are being blocked or banned. tinyurl, , MooURL, snipurl are good URL shortening redirection services.


  8. Wayback Machine Service : Wayback machine is an internet service that periodically saves the copy of a website from the time it has started. So it caches the most nearest version of the webpage's. This service can be put to use to access the blocked, banned websites.


  9. Torpark : Torpark is combination of TOR and Mozilla Firefox. It works like a browser with Mozilla Firefox engine as its base. ITs advantage is that all the data sent from our PC is encrypted. As a result i becomes very hard to block the websites we visit. The website filtering software used by our ISP wont be able to find it out some times (But don’t use it for online banking etc.) It is worth trying it as it could help you some times to unblock or access the blocked websites. It is also available in Portable from and is free.


  10.  Creating Private SSL Proxy : Psiphon is a service that help you to create private SSL proxies. It can prevent the ISP’s from sleuthing on the content as well. So chances are more for you to get access to the blocked websites easily. Check it out at psiphon.civisec.org to know  more about the program. 


  11. Tunnel Your Connection - More chances of success to access blocked sites : Tunneling your Internet connection will help you to get access to blocked sites more easily. Tunneling your internet connection is a tiresome task. A sleek utility called Toonel will help you to do this tedious job with ease.
    I will show you how to tunnel your internet connection using toonel and access blocked sites easily.

    Access, Bypass Blocked site with Toonel

    • First Download Toonel. You also need to have the java run time installed on your system. Only then Toonelworks properly.

    • After downloading Toonel you will seee a file with .jar extention. All you have to do is to just run that file.

    • Open your browser (If you use Internet Explorer, Go to Tools > Internet Options >Connections > Lan Settings) and from connections set the Proxy address to 127.0.0.1 and the port to 8080. The procedure is some what similar for other browsers too.
      Thats it you have successfully tunneled your internet connection. It will be more easier for you to access blocked sites easily.

  12. Yauba :Yauba is a web service. Yauba claims to be the first Privacy Safe search engine in the world. While using Yauba the website traffic is directed through their webservers instead of ours. So the website blocking softwares used in our company find it hard to trace out us accessing blocked websites.


  13. Screen-Resolution.com :Screen Resolution Checker is a website that will allow us to see how a website looks under different resolutions. Since the website is accessed through their servers it is certainly one of the Best ways to Access blocked Sites Easily. When the website is displayed in the windows we can also navigate through the website by clicking the links in the website as we browse normally.

Also Check Out : How to Browse as Google Bot / Switch User Agent to Google Bot to Access Blocked Forums, Websites etc

Labels: , , , ,

Sunday, May 17, 2009

Install Windows 7 with Windows XP / Vista(100% working & Error free) - The Easiest Way

Install Windows 7 with Windows XP / Vista
It would be great if you can install windows 7 and windows XP/Windows Vista on your computer and use both of them. Windows XP is more liked by gamers and windows 7 by designers. Earlier you might have seen my previous tutorials on Install Windows 7/ Vista on your Hard disc Without using any DVD/CD or Pendrive (USB drive) and Install Windows 7 from a Pendrive (Working 100 %)/ How to create a bootable Pendrive to install Windows 7 and When you try to install windows 7 on a system which is already having windows XP installed by default, after installing Windows 7 you won't get the previous operating system (Windows XP)back. So you could only use the newly installed Windows 7 Operating System. Recently I bought an 80GB hard drive and suddenly an idea struck my mind that day. What about installing Windows 7 on that hard disk and keep the Windows XP on the other Hard Disk? I had downloaded Windows 7 RC on that morning and was thinking of installing it. I had some doubts and I proceeded with it by taking the risk of losing the data on Windows XP. But I succeeded in doing it. I had installed Windows 7 and Windows XP in my PC with no problem. I will say how I did this. This was the easiest method ever I found!

Before proceeding with here are the

Requirements for installing Windows 7 and Windows XP together


  • You must have two hard disks with you. Only then this method can be done. I am sorry to say this.

  • You also need to have the Windows 7 installation DVD.

I will explain in brief how I installed windows 7 and windows XP together. This will not waste your time if you are a computer expert and can skip reading the remaining part and beginners can skip this part.

Install Windows 7 with Windows XP / Vista (For Advanced Users)


I connected the newly bought Hard Disk as the Secondary (represented as HDD 1 in boot options). I had set the first boot priority to the primary hard disk (HDD 0) and booted into windows XP as it was there before. Then I partitioned the newly bought hard drive from windows XP and I inserted my Windows 7 installation DVD into the drive. Then I rebooted the system and entered bios and set the secondary drive (HDD 1) as the first boot device, saved the settings and rebooted. And Windows 7 installation started normally from the DVD. During the Windows 7 installation it asked the drive to which I needed to install Windows 7. Since, I had Windows XP before in the other Hard Disk in C: / I didn’t select it. If I did I should have lost that windows XP installation. So I selected a partition on the new hard disk. And Windows 7 was successfully installed without any errors. After that when ever I need XP I will enter the bios and set the first boot priority as the primary hard disk (HDD 0) and windows booted into Windows XP without any problems. When I needed Windows 7 I would just simply set the secondary hard disk (HDD 1) as the first boot device. That’s how I was able to install Windows 7 with Windows XP. No body could ever find that Windows 7 is also installed in my windows XP PC!

Now I will explain

Step by step on Installing Windows 7 and Windows XP together


I assume that you already have windows XP installed and have a second hard disk which is partitioned.

In my case I had the drive C, D, E, F in the first Hard Disk (The primary Hard disk) and I, J, K, L drive in the Second Hard disk.

  1. First you need to enter the BIOS setting by pressing [Delete] key as soon as you switch your pc on. The key varies but no problem. What ever it is you will be showed on the screen which key you need to press.

  2. After entering the BIOS settings, head over to the boot options and set the first boot device as your Secondary Hard disk (shown as HDD 1).

  3. Insert your Windows 7 installation DVD into the drive and then save the settings by pressing [F10] key. And your system will restart and Windows 7 installation will load.

  4. At the beginning of the Windows 7 installation you will be asked to assign the drive on which Windows 7 is to be installed.

  5. Remember we have to install Windows 7 on the Second Hard Disk (in my case the disk with I, J, K and L partitions) are there. So select a partition which is on the Second Hard disk. You can select it as I.

  6. After that proceed normally with the Windows 7 installation till it completes.
    You will notice that after restarting the system boots into Windows 7 and Windows XP is not seen any where. Don't Panic! It is there in front of you but hiding there!

  7. Now when ever you need to boot into XP enter the bios as said earlier and set the first boot device as your First (Primary) Hard Disk (HDD 0) and save the settings and restart the system.

  8. The system will now boot into windows XP automatically instead of booting into Windows 7.

  9. If you want Window 7 just do the reverse of the above i.e. set the first boot device to your Secondary hard drive (HDD 1). That’s it.

  10. You can do the similar steps if you want to install windows 7 with Vista.


I am now using both Windows XP and Windows 7 together like this. It is very simple and easy as I said earlier. Doesn’t it?

Labels:

Saturday, May 16, 2009

How to Backup Sony Ericsson Mobile Phones Easily

Sony Ericsson Mobie Phone BackupThese days most of us store our valuable data such as phone number, sms, videos, pictures etc. Some times there might be some of the most sensitive data in the mobile e.g. a very important phone number of our intimate friend or else and you have that data or phone number saved in the phone and needed it. Think of the situation your mobile phone has been damaged or stolen or it had a virus attack! You may have no problem losing that mobile phone; you may be able to buy another one easily, but the phone number? It’s gone! So it is important to backup the sony ericsson mobile phones. Almost many of the Mobile Phone owners do not backup the data on their phones and they will be really annoyed when they lose that data on their phone. Here I will explain how easily you can easily backup Sony Ericsson Mobile Phones. The process is very simple and easy you only need to copy the contents or data in your sony ericsson mobile phone to your computer. So even if you lose your sony ericsson mobile phone or whether it is damaged you needed not to worry any more about the data contained in the mobile phone. You can easily retrieve that data on the sony ericsson mobile phone very easily. Make sure that you backup the data in your sony ericsson mobile phone at least once in a week for your safety.

Requirements before starting the Backup of your Sony Ericsson Mobile Phone


You only need to have the free software MyPhoneExplorer and a data cable or a Bluetooth dongle (for transferring the data).
Some basic knowledge on how to connect your PC and your Sony Ericsson Mobile Phone. I will try to make it as simple as possible.

How to Backup the contents of your Sony Ericsson Mobile Phone


Sony Ericsson Mobie Phone Backup using MyPhoneExplorer

  1. Download MyPhoneExplorer from here and install it. The software is only a small 3 MB in size. So it is very easy to download it even if you have s very slow internet connection.

  2. Install the necessary drivers for the Bluetooth dongle after connecting the Bluetooth dongle to your computer.

  3. After starting the Bluetooth service in your PC and your Sony Ericsson Mobile Phone, search for the sony ericsson mobile phone from your computer.

  4. Just after this you will be prompted to enter pass code to pair the two devices together (Your Computer and your sony ericsson mobile phone).

  5. After this process has been completed your sony ericsson mobile phone could be seen on your computer.

  6. Now for the sony ericsson mobile phone’s service, a COM port is required. For that Double click on the Bluetooth icon on your Windows Task bar and select “COM Ports > Add > Outgoing connection “. This step is done because the MyPhoneExplorer requires a COM Port to access your sony ericsson mobile phone through your computer.Open MyPhoneExplorer and choose File > Options and select “Search For Device” seen under “Connections”.

  7. After your sony ericsson mobile phone has been found choose “File > Connect “and give a name for the mobiles profile. At this instant MyPhoneExplorer will synchronize the data with your sony ericsson mobile phone and your computer.
    Check the Option called Files and select the folders and other needed contents that needs to backed up.

  8. After you have selected the necessary files are needed to be backed up.
    Press Create Backup and the contents In your sony ericsson mobile phone will be backed up to your PC.

Labels: , ,

Friday, May 15, 2009

Get Free Genuine license of Techsmith Camtasia 3 for Free

Get Free Genuine license of Techsmith Camtasia 3 for Free

Many of the internet users know about Techsmith Camtasia software. TechSmith Camtasia Studio is a great software that can record screen activity as videos, edit and narrate the
clips, and publish the finished presentation in standard video formats. Techsmith Camtasia can be used to Develop videos that introduce new software, train new users of existing software, or create any kind of active documentation.Distribute the videos as standard AVI files or as streaming presentations from a website..You can edit those videos and share them. The Full version price of Techsmith Camtasia 3 is about 200$. You can get this pricey full version of Techsmith Camtasia 3 absolutely free.

Techsmith Camtasia features :


  1. Record any screen or desktop activity and save them as videos.

  2. You have the option to set Shortcut keys to start and stop recording, thus making your job easier.

  3. Add beautiful Video effects to the captured videos like special effects for cursor movement , mouse clicks,add water marks and more!

  4. You can add cursor sounds, keyboard sounds etc in Techsmith Camtasia 3.

  5. The recorded videos could be saved as flash,wmv and many other popular video formats.

  6. With Techsmith Camtasia's Live Video Output feature, you can even use Techsmith Camtasia 3 as a live source with streaming media encoders, video conferencing, and web cam applications.

Get Free Genuine license of Techsmith Camtasia 3 for Free
Techsmith Camtasia 3 contains all the needed tools that you need to record and produce videos.

To Get the Free full version serial of Techsmith Camtasia 3


Download Techsmith Camtasia 3. You can skip this step if you already have the Techsmith Camtasia 3 setup in your computer.

Now Visit the promotional page of Techsmith Camtasia 3

Sign up there by giving the necessary details and give the email id. 

The Free full version serial key of Techsmith Camtasia 3 will be send to your mail box.

You can get a fully licensed version of Techsmith Camtasia 3 for Free.

You can also avail the updates Techsmith Camtasia 3 software in the future because this serial key for Techsmith Camtasia 3 is absolutely genuine.

Labels: ,

Thursday, May 14, 2009

A Best Free Alternative to Nero Software

A Best Free Alternative to Nero Software
Nero is very popular software which was released for the purpose of burning DVD’s, CD’s and other medias. The whole Nero Application is a whooping 370.5 MB in size (latest). The latest version included many scarcely used application software’s such as Media Player, Video Editor, Audio Editor, Photo Manager. Etc. but we mostly use Nero to burn the DVD’s, CDs and many of the users rarely use the other unwanted applications that come with the software and most times we wont use them at all. This is mainly due to the reason that there are much better alternatives for such applications too. For e.g. Audacity is a full featured and a nice alternative to the audio editor program that comes with Nero. The version 3 of Nero Software included only the DVD and CD burning feature only. But the latter versions arouse with many bloated stuffs that are mostly not needed by the users. Why a Burning Program should include such bloated applications. This was only the trick used by the manufacturers to sell their newer versions. After installation of Nero software it will eat up to 1.5 GB of our hard disk space simply without any use for us. Of course there are few users that play with those unused stuff that comes with Nero. Nero is not a freeware too. So we need to give our money if we need it to use it as long as we like. But if our purpose in only DVD, CD, Bluray disk… burning why we should unnecessarily install those bloated stuffs on our PC when there are many Free and Sleek alternative Software’s that will do these jobs perfectly?

CDBurnerXP is a sleek and freeware utility that is a best alternative to Nero. While the nero installer is 370.5 MB in size, CDBurnerXP is a tiny 3MB stuff yet powerful. CDBurnerXP will support the burning of DVD, CD, HD DVD’s, Blu-ray etc. It also includes the feature to create and burn ISO’s and support’s a multi language interface.

A Best Free Alternative to Nero Software

Main Features of CDBurnerXP   

  1. It can burn all kinds of discs.  
  2. It supports audio-CDs without or with gaps between the tracks.  
  3. Support’s the burning and creation ISO files.  
  4. Includes the feature to verify the data after burning process has completed.  
  5. It can create bootable discs.  
  6. Supports multi-language interface.
  7. Simple cover printing, nrg / bin, ISO converter and more!
  8. Operating Systems Supported: Windows 2000/XP/2003 Server/Vista/Windows 7

In fact these are the most needed features that need to be included in a sleek burning program and CDBurnerXP has all. And the best of all, with all these professional features included CDBurnerXP is free for every one including companies. So why don’t we say CDBurnerXP is an excellent Free Alternative for Nero?

Download CDBurnerXP

Labels: ,

Friday, May 8, 2009

How to Install Windows 7 on Mac OS X Operating System

How to Install Windows 7 on Mac OS X Operating System
You might have seen the tutorials on web on how to install windows vista on a Mac OS X Leopard operating system. This was made possible by using the boot camp software on Apple's Mac OS X Leopard. Just like the extinction of previous operating system’s now Windows XP have been laid to rest and now its turn for Windows Vista to go because of the upcoming Microsoft’s most talked Window 7 Operating system. Windows 7 is really an advanced operating system which has been made after rectifying many errors found in the Windows Vista Operating System. This makes more users to use Windows 7 than using Windows Vista. Apart from the Microsoft’s Windows Operating Systems there are many Operating Systems which are used widely like Mac OS X, Ubuntu etc. The Second widely used operating system in the world is the Mac OS X. Both Windows 7 and Mac OS X have unique features which are very useful to us. So how about installing Windows 7 on Mac OS X and enjoy both Windows 7 and Mac OS X Leopard together! On account of Apple using the Intel Processors on its PC’s it has become possible to run Windows 7 on Mac OS X Operating System. So Mac users can now enjoy the software’s and features which were available only to windows users. So, here is how to install Windows 7 with Mac OS X using the boot camp Boot camp software.

Before Starting with here are the Requirements for Installing Windows 7 on Mac OS X.

  1.  Windows 7 DVD. Get the Direct Download links for Windows 7 RC.
  2.  Mac OS X Leopard DVD.
  3. Mac OS X with at least 15 GB free space. (15 GB is for the Windows 7 Installation).
  4. Download the latest version of Boot camp to install Windows 7 with Mac OS X leopard. Download latest version of Boot Camp from here.
  5. It is recommended that you back up your important files first before proceeding with the installation of Windows 7 on Mac OS X Leopard.
    So let's start the steps to 

Install Windows 7 with Mac OS X Leopard Operating System


  1. In Mac OS X Leopard take the boot camp manager from applications.
  2. Now we need to allocate the space for the Windows 7 Installation on Mac OS X Leopard.
  3. The below Window appear in Mac after you press continue.
  4. Make a point that you need to give enough space available for Mac OS X Leopard. Windows 7 installation normally takes 4.5 GB of space. So you only need to allocate 15 GB or 25 GB space for Windows 7. You can allocate more space if you wish to install more software’s on Windows 7 after its installation.
    How to Install Windows 7 on Mac OS X Operating System
  5. Now press on Partition (see above) in the Window. 
  6. If every thing has been done correct you will now be able to see the boot camp software’s icon on the Mac OS X desktop.
  7. Insert the Windows 7 installation DVD into your drive and press Start Installation.How to Install Windows 7 on Mac OS X Operating System
  8. You won't be able to able to see Windows 7 installation in the list because in the latest version of boot camp software only up to windows vista in updated.
  9. Your Mac OS X will now reboot and you will see the partitions that are available. 
  10. Click on the boot camp partition and press Format and the Windows 7 installation will start eventually.
  11. Soon after its installation it will reboot now take out the Windows 7 installation DVD right now itself.
  12. The system will boot into the Windows 7 installation. You can now customize the various options such as the display, time zone, language etc.
  13. For the installation of device drivers insert your Mac OS X DVD into the drive. 
  14. Now you will see the Boot camp installer popping up and select “install Apple software update for Windows “.You can connect to the internet for your driver’s updates, Windows 7 Updates etc. After the installation is complete your system will restart now.
  15. During the restart process push the options key and you will be able to see the multiple boot options for Mac OS X Leopard and Windows 7 as shown.
  1. How to Install Windows 7 on Mac OS X Operating System
    Enjoy the newly installed Windows 7 Operating system with Mac Os X Leopard.

Labels: , ,

Tuesday, May 5, 2009

How to RUN/Play Latest Games without a Graphics Card

Most of the latest games released to day needs a powerful graphics card in order to run properly. As PC components have become very cheaper most of the computer users today will buy a graphics card together with their new pc. But many people who have bought their PC's some years back will not be able to invest in for a new graphics card; most probably their mother boards wont support it. So if they need to play the latest games the only choice is to invest in a new mother board and graphics card. The same is my case too. But there is some outstanding news for you guys. Yes you can now play these graphics intensive games without a graphics card! Read it again to get the full impact......
When you try to run graphics demanding games like Farcry etc. you will be met with errors like Pixel Shader 2.0 not supported, graphics card not supported like that. So here comes a software that can use the power of the Central Processing Unit; the CPU for these purposes. It will emulate the CPU to do the work of the graphics card, there by enabling old pc users to play latest games on their pc.

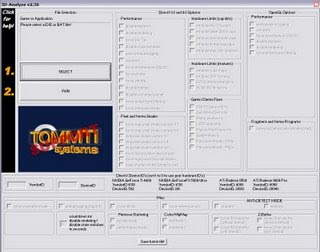
3d analyze is a Graphics Card Emulator that can emulate all the feature of a 3d graphics card like pixel shader 1.1, 1.4, 2.0, bump maps and many other features.
You need not worry when a game stops working on your system, 3D Analyze will come to your rescue. This software is very useful to people whose graphics requirements are higher than the configuration that they have now.

3D analyzer can simulate options like TnL caps,Enable Pixel shader 1.4,etc.
It additionally allows you to simulate your graphics card.

How you can use 3D analyzer to Run/ Play the new Games on your PC


  1. Download the latest version of 3D Analyzer from here.

  2. Now you need to extract the files to a folder by running the file you have just downloaded. Now Run 3DAnalyze.exe file.

  3. Play Games without a Graphics Card
  4. Press "SELECT" button, locate and open the main executable program of the game. You need the select the main executable file itself not the shortcut i.e the select the executable file of the game from the directory where it is installed on.

  5. Emulating missing hardware features with 3D-Analyze:If your graphics card features won't support DirectX based favourite game's minimal system requirements - then look for the corresponding reference on game box or in the game readme.txt file and simulate those settings by "moving" your graphics card into minimal category if necessary. Here are some of the main 3D-Analyze settings to check if you want emulate a DirectX version starting from previous one.

  6. Play Games without a Graphics Card
  7. The VendorID and DeviceID boxe's could be useful if the game doesn't work again and it showa error message saying unsupported Video Card / Graphcs Card.It could emulate both the video cards of that NVidia or AMD Radeon.

  8. Play Games without a video Card
  9. Filling up these blank fields with values written in group box saying DirectX Device ID's, it will compel your game to use your video card like a different one.So if you want to your graphic's card to be of that of Nvidia just change the DeviceID from 0 to 1 thats all.

  10. Play Games without Video Card
  11. Finally Press the "RUN" button, to start the game; it is not guaranteed that you will get the exact performance that you could get on using a real graphics card!. But, higher success chances are of that from DirectX. Atleast you could play the games which wished to play before on your PC


Yes thats it go ahead and play the games that you was not able to play before. Start Gaming!

Labels: , ,

Download Windows 7 RC Directly From Microsoft (Direct Download Links)

Download Windows 7 RC Directly From Microsoft (Direct Download Links)You might have heard that windows 7 will be released on May 5. Microsot Released the Windows 7 RC public download under the Windows 7 RC Customer Preview Program. Windows 7 RC is available for download in both the 32-bit as well as 64-bit flavors from today till July 2009. When you go the the Windows 7 RC Download page in microsoft website you need to login with your Windows Live ID in order to get the Windows 7 RC Activation Keys for both Windows 7 32-bit and 64-bit.........

You can get a Windows Live ID from here if you want.

If you don't want to create a Windows Live ID from Microsoft's website you can Download Windows 7 Directly without the need of login in with Windows Live ID.

Download Windows 7 RC Directly (Windows 7 Direct Download Links)


Windows 7 RC 32-bit Direct Download Link

Windows 7 RC 64-bit Direct Download Link

Enjoy Downloading Windows 7 RC from the above links.

>>>In case if you want to use Microsoft Download Manager then you must access above links through Microsoft Internet Explorer with Java Run Time installed on your PC.

Labels:

Sunday, May 3, 2009

How to Copy the Files Blocked by a Program

How Copy Files Blocked by a ProgramWhile working with windows you tried to copy a file but unfortunately windows won't allow you to copy that file and also display a message that the file is being blocked by a program. Moreover you might be in very need of that file. There is a way to copy the blocked files. You can copy any file that is blocked by a program. By default Windows will never allow you to copy a program/file that is currently being used by windows. Most probably you will face this situation when you try to copy video files that has just been played in your browser it may be Internet Explorer in most cases. I used to do this before and " i can't copy a file that is being used" . There are certain sites that block files this way. So i tried to find a solution (to copy any files that are blocked by a program) for this..........

HoboCopy is a small utility that can do the job of copying a file that is being used by a program. It is actually works like a backup utility that needs to be run from the command line i.e. the command prompt utility in Windows. It can t be run by double clicking the program's exe file. Thats why it needs to be run in command line.

How HoboCopy could copy the files used by a program?


HoboCopy uses the VSS (Volume Shadow Service) to "snapshot" the disk before copying. The File is then copied from the snapshot instead of copying from the "live" disk directly. If you need to know more about how to use the utility then, visit this link.

Download Hobocopy

Labels: ,

Friday, May 1, 2009

Top 5 Excellent Tools To Speed Up Your PC to the Maximum

Top 5 Excellent Tools To Speed Up your PC to Maximum
You might have come across many junk utilities that claim that they will Speed up your PC. Except a few all others affirmation are not true. You need to look for some tool that really helps to tune your PC as per your needs and Speed Up your PC to the maximum. A good tuning tool is the one which repairs windows problems, frees some hard disk space for you and provides you some extra utilities that makes working with windows a lot more easier. Here are some of the best tools that can really speed up your windows pc to the maximum........

1) The Best Registry Cleaner (Clean Up the Registry for a Faster and Error Free Windows)


These days we install a lot of software’s on our pc. We uninstall the unnecessary ones often. But remember uninstalling software won’t remove it completely. It leaves a lot of registry entries in the Windows Registry. These unwanted or unused registry entries get piled up in the Windows Registry and it is a major causes for registry errors. What’s more these unused registry entries will really slow the performance of Windows too! So it is very necessary that you need to remove these unused entries to speed up windows and also make it error free.
Wise Registry Cleaner is an excellent freeware utility that will do the job of cleaning up your Windows Registry. It scans the Windows Registry for orphaned or bad Registry keys, and shows you the name and values for each. It additionally lets you adjudge which entries to delete, and which to keep. For additional Safety it can up your Registry before a scan, so that you can restore it, if any problem occurs.

After doing a scan just press the ‘Repair’ button to clean up the unwanted registry entries. You can now forget about the registry errors and windows will not lose its speed because of them. Remember run this utility at least once in a week. There is a professional version of Wise Registry Cleaner which is not free. But the free version has all the features that we need to suit our needs.

Speed Up your PC to Maximum with wise registry cleaner

Download Wise Registry Cleaner

2)Best Tool to Clean Up the Hard Disk (Clean the Hard Disk the Safest way)


As in the above case installing programs will leave some unwanted files too along with those registry entries. As time passes, these additional junk will eat up you Hard Drive’s space. So you need to do a disk cleanup.
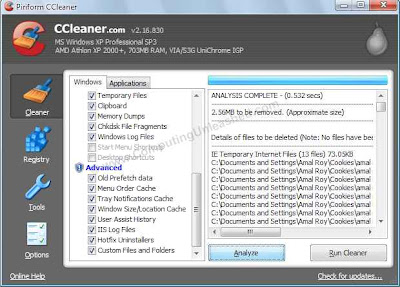
CCleaner is the best tool that will restore your Hard Disk Space to the Maximum. The Striking Feature of this utility is that it is Free, Fast and Robust. CCleaner will clean the temporary internet Files, clipboard, browser history files (Internet Explorer, safari, Firefox, Opera, Google Chrome) and other junk files left in your hard disk.

Speed Up your PC to Maximum using CCleaner

You can select what you need to be cleaned. If you need some files e.g. Browser cookies, you just only need UN tick the cookies option that’s all. You can also Include or Exclude custom folders along with the default ones to be cleaned. In general CCleaner is a must have free ware utility for windows users.

Download CCleaner

3)The Best Tool to Speed Up Internet Connection


Speeding up your PC includes Speeding Up the internet connection too. There is no use in paying for the ISP (Internet Service Provider) if you don’t get the speed for which the type of connection you pay for. For e.g. what’s the use in paying for a 2 Mbps broadband connection and getting only 200Kbps speed when you test internet speed? Windows will not optimize the settings for your internet connection by default: what ever be the type of connection used. If you can adjust the settings to suit your type of connection you will get the maximum possible speed from your internet connection. So here is a great tool that can optimize and Speed up the Internet to the Maximum.
TCP Optimizer is one such great free tool that will do this tiresome job very easily. The interface of the program Is easy to understand for a standard computer user.
Before going with just run a speed test at www.speedguide.net/speedtest to test internet speed available.

How to optimize/accelerate the internet using TCP optimizer

  • You only need to move the pointer towards the speed of your connection (it may be 2000 or above for broadband users and 56 for dial up) give it as per your connection.
  • Now if you are not an expert user just select the optimal settings seen at bottom. If you are an expert user you can take the custom option and adjust the TCP/IP values, MTU, Qos, RWIN etc.
  • After this just tick the “Modify all Network Adapters” option.
  •  Now click “Apply Changes” and restart your PC for the changes to take effect.
  •  There are many other options in TCP Optimizer for Advanced users. The Latency tab will help you to determine how much data packets are lost. After completing these steps you can run a speed test at www.speedguide.net/speedtest.
You might not get the maximum speed at the very first time you configure the program. I am using this program and I have tested it. I am using a BSNL broadband 2 Mbps connection and I have been getting around 250 kbps speed before using TCP optimizer. After I have configured my settings correctly using TCP optimizer I am now getting around 1.7 Mbps+ speed.
I have got this speed after playing with the program for many times. You need to try by adjusting the settings many times to get the maximum speed.
You also need to understand that speed of your internet connection depends on how far away you are from the internet connection office, and the quality of the cable used etc.
Speed Up your Internet Connection to Maximum using TCP Optimizer

You can also visit www.home-network-help.com/tcp-optimizer-to-improve-internet-speed.html for step by step instructions for tuning up your internet connection.

Download TCP Optimizer

4) Using the Flash Drive as Ram for an extra Speed Boost


Accessing data from the RAM is blazingly faster than accessing data from your Hard Disk. These days most of us have a USB flash Drive or Pendrive and the amount of RAM installed on most recent computers are 1 GB or more than that since the prices of RAM is very cheap now a days. So we get more value for money, since we get more performance for less money. eBoostr is a great utility that takes advantage of this. It caches the commonly used system files and application files and makes it possible to launch your commonly used programs in the blink of an eye. You may ask doesn’t this is similar to the Ready Boost feature in Windows Vista? The answer is NO. In Vista you can use only the USB flash Drives or pendrives for accelerating the Windows and Applications. But what makes eBoostr far more superior than vista is that, you can use your System RAM too apart from the Pendrives or USB Flash drives. This makes things real fast.
Before starting with, you need to set the RAM or external storage devices (pendrives / flash drives) as the cache memory and set the size as per your need. Since the amount of cache depends on the amount of ram installed on your system, you will be really benefited if have 2 GB or more ram on your PC. eBoostr keeps a note on the frequently accessed programs and keep their files in the cache, so when you launch the programs again it is accessed in a split second!
Unfortunately this program is not a freeware. But you can enjoy it. The free program works only for 4 hours after each system boot.

Speed Up your PC to Maximum using eBoostr

In spite of this small limitation this is a great utility that can speed up windows to a great extend especially for windows users who have a large amount of ram installed on their computers. Most of the daily computer users will be more benefited from this program.

Download eBoostr

5)Best Tool to increase the File Copying Speed in Windows


We know the default file copying utility in Windows Explorer lacks many features. Some times the file copy process get terminated by half the way due to some errors etc. this will be really frustrating. Forget those days of painful file copying process in windows and here is a great utility.
TeraCopy is a great freeware utility that can copy files in windows with ease. What makes TeraCopy different from Windows default file copying utility is that, TeraCopy supports Stopping and Resuming file copying process. It is blazingly fast and also adds copying options (Copy to and Move to) in the right click context menu of windows. If the software encounters some error during the copying process it will skip that corrupted portion and continues its work.
You can also set TeraCopy as the default file copying utility and replace the default windows file copying utility (Under Options in TeraCopy’s main window, just select the option “Use TeraCopy as the default copy handler”) if needed.

Speed Up your PC to Maximum using teracopy

Download TeraCopy

All the above mentioned utilities offer great value and will surely help to Speed up our PC.

Labels: , ,