Saturday, April 25, 2009

Download Windows 7 RC Build 7100 Now!!! (7100.0.winmain_win7rc.090421-1700) Original both 64 and 32 bit Versions

Download Windows 7 RC Build 7100 Now!!! (6.1.7105.0.winmain.090404-1235)The Winodws 7 team has touched a new build,the latest Windows 7 RC Build 7100 (7100.0.winmain_win7rc.090421-1700) Ultimate details are out on the net now. Recently there were fake releases of it on popular torrent sites.The new RC Build 7100 was compiled with the build string 7100.0.winmain_win7rc.090421-1700.Windows 7 RC Build 7100 comes with improvement's in networking, new drivers, changes in Kernel etc. Here are more details of it...........
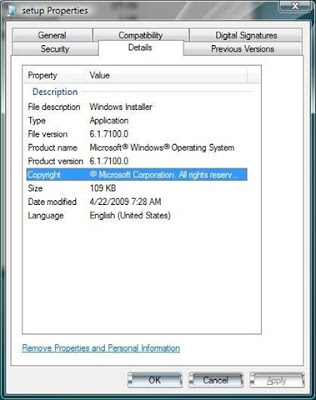
It had been confirmed that Windows 7 Build RC 7100 is the Windows 7 Release Cadidate.

Details of Windows 7 RC Build 7100 x64


Build String: 7100.0.winmain_win7rc.090421-1700
File Name: 7100.0.090421-1700_x64fre_client_en-us_Retail_Ultimate-GRC1CULFRER_EN_DVD.iso
Size: 3.04GB
MD5 Hash: 8867C13330F56A93944BCD46DCD73590
Torrent Hash: CA767EC8 D2D07ED9 ADDBAE37 89C45CC3 5761E4C5

Details of Windows 7 RC Build 7100 x86


Build String: 7100.0.winmain_win7rc.090421-1700
File Name: 7100.0.090421-1700_x86fre_client_en-us_Retail_Ultimate-GRC1CULFRER_EN_DVD.iso
Size: 2.35GB

Screen Shots of Download Windows 7 RC Build 7100


Windows 7 RC Build 7100(7100.0.winmain_win7rc.090421-1700)

Windows 7 RC Build 7100(7100.0.winmain_win7rc.090421-1700)

Here is a brief detail of the major improvements in Windows 7 Build RC.

1. Enhanced networking support, the work will be within the local network.

2. Support for programs that were previously incompatible has been added.

3. Small interface improvements and extras in the LP.

4. Supports new drivers for various latest devices.

5. Extended support for sensory based displays.

6. A small improvements and optimizations in the Kernel.


The Recent Windows 7 Schedule is as Follows

1. Windows 7 RC public release on May 5th 2009.

2. September 2009 for release of Windows 7 RTM build.

3. Windows 7 to be released before January 2010.

You can Activate Windows 7 Beta using the previous Windows 7 Beta keys.

Download Windows 7 RC Build 7100 x86 and x64 (7100.0.090421-1700_x86fre_client_en-us_Retail_Ultimate-GRC1CULFRER_EN_DVD.iso)


Download this Windows 7 RC Build 7100 x86 and x64 Zip file with both 32 and 64 bit versions torrent files inside.

Labels:

Friday, April 24, 2009

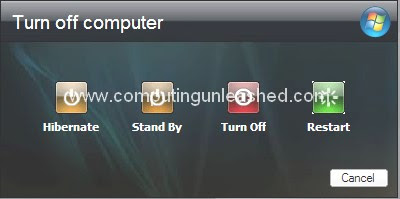
Show Hibernate button in Windows Shutdown Menu along with other buttons

The Hibernate function in Windows will enable to save the current desktop as it is when we shutdown the system. When you Turn On windows again windows will restore the previous desktop you were working with earlier. So this way if you open a lot of programs in Windows you need not start or open the programs again when windows starts up. The hibernate option is a very useful and time saver function for Daily Windows Users. You can access the ‘Standby’ or ‘Hibernate’ function by pressing [Shift] key in the Windows shutdown menu. You will be really embarrassed since you need to press the Shift key each and every time you need to hibernate windows. Microsoft gives this function enhancement only through a telephone call and that too for valid support customers. So how about showing a separate button for the hibernate function in the shutdown menu of Windows by using a simple method? Try this trick to enable the Hibernate option directly instead of pressing the Shift key each and every time…...


  1. A small registry change will embed the ‘Hibernate’ button in the windows shutdown menu easily. Follow the steps below.


  2. Close all the open programs on your system (to avoid errors while installing the registry key), before installing the hotfix.


  3. Open the ‘HKEY_LOCAL_MACHINE\SOFTWARE\Policies\Microsoft\Windows\System’ key in the registry editor using ‘Regedit’.

  4. Create a sub-key with the name ‘Shutdown’ (without the quotes) using 'Edit > New > Key’.


  5. Now create an entry called ‘ShowHibernateButton’ here using ‘Edit > New > DWORD value’ and open it.

  6. Lastly, change the value from the default ‘0’ to ‘1’ and confirm it by pressing ‘OK’.

  7. Close the registry editor after this and restart your system.


Show Hibernate Option in Shutdown Menu

If you have any difficulty in doing the steps above you can download the registry file for these steps from here and merge the registry file in your computer.


Download the registry file to show the ‘Hibernate’ button (option) in Windows Shutdown Menu.


Download Enable/ Show Hibernate (button) option in Shutdown Menu of Windows.


Windows will now display the button for ‘Hibernate’ by default in the shutdown dialog along with the existing buttons and you can resume from your job more faster.

Labels: , ,

Tuesday, April 21, 2009

Use your Apple iPhone as a Wireless Laptop Modem / Get the iPhone's 3G feature in your Laptop

Use your iPhone as a Wireless Laptop Modem / Get the iPhones' 3G feature in your LaptopThe 3G feature in iPhone is a great blessing for internet users. You can browse the web, download files while traveling without a Modem!.Like the Modem's do the full potential of high speed internet is utilized by the 3G feature in iPhone. With some very nice features in iPhone, it would be nice if you can integrate some of these great features with your PC especially the 3G feature. Even with great features such as touch screen, web browsing etc.these cant match the experience you get while using a laptop. So if you can embed this 3G feature in your Laptop, you will be able to use the high speed internet with the help of 3G(using the iPhone as Wireless Modem). So here is how you can get the 3G feature of iPhone in your laptop by using the iPhone as Wireless Modem and experience the high speed internet on your laptop while traveling.........


So while traveling if you don't have access to your WiFi network and you have access to 3G feature, you will be beaming if you have installed the iPhone Modem Application 2. iPhone Modem will help you to get the high speed internet on your laptop by making your iphone to work as a modem for it. Iphone Modem is free to try and is available for a small 10$ price. There is no wrong in buying this software for those users (who own an iPhone 3G) that really needs some high speed internet connectivity while traveling. Atlest that 10$ is cheap compared with an external wireless modem.

Since iPhone Modem software's terms and conditions not fully complies with that of Apple's, you need to jail break the iphone in order to use this utility (iPhone Modem) . Most of the iphones people use today are jailbroken ones. Jail breaking iPhones opens up a wide range of possibilities in front of you. But you need to understand the fact that jailbreaking the iphones will make them lose its warranty and support.So do it at your own risk!

How to Jail Break the iPhone


A software called QuickPwn will do this tedious job very easily. Only thing you need to do is that follow the instructions given by QuickPwn very carefully. QuickPwn is available for both Windows and Mac Operating Systems.

Download QuickPwn

Install iPhoneModem


The Apple IPhone Jailbreaking tool, QuickPwn will be installed as an application namely Cydia. Cydia is really an online store (not the official Apple iPhone Store) from where you can get all the Applications that are not available through official Apple iPhone Store.

Search for " iPhoneModem by Addition " in there and install it. Now download the iPhone Modem helper application on your laptop.

Now you need to setup the network


Run the iPhone Modem helper application (iPhone Modem) you have just installed on your laptop and press " connect ". Now this helper application (iPhone Modem) will setup an hoc network which can be accessed through the iPhone. The default network created by the program (iPhone Modem) will not have a password. So you need to change it via the " Preferences " in the iPhone Modem helper application for setting a password. You need to turn on the Wi-Fi network in your iPhone. Now open the iPhone settings and take Wi-Fi. Select the network you have created before (using iPhone Modem) (here the default one is " iPhoneModem " if you have named it some thing else select it accordingly). Enter the password (if you have created it). Finally, open the iPhone application in your iPhone. All the settings will be configured automatically by itself. After a few seconds both the application's (iPhoneModem in iPhone and the iPhone helper application in your laptop) will confirm that the connection has been established properly. Done! You can now get the high speed internet facility with the help of iPhone 3G in your laptop by using iPhone as Wireless Modem and enjoy the comfortable browsing experience.

Labels: ,

Saturday, April 18, 2009

Fastest And Best Related Posts Widget For Blogger

There have beens posts on many popular blogs related with the Related Posts Widget for Blogger. I have seen many users were upset after installing the Related Posts Widget in Blogger. Most of the Related Posts Widget makes the load time of the blogs lengthier, So despite of increasing the page views the reader gets frustrated and goes away there by losing a reader and the mentioned page views. Even if you are using a cheap high speed internet also you wont get any benefit because the script for loading the Related Posts is the culprit, it takes time to load especially if you are having a lot of related articles. So here is a Related Posts Widget for Blogger which loads pretty Faster (won't slow down your blog loading) which i also uses in my own blog .........

Special Thanks to Debajyoti Das From RealTrix for informing me about this wonderful widget.

Simply adding a Related Posts Widget in blogger wont create a good impression. So you need to add a nice css code to suit your blog only then a reader will be impressed by the widget and he/she will consider reading the related posts. Before going to explain how to add the Fastest and Perfect Related Posts Widget for Blogger, let me explain the Advantages of using the Related Posts Widget in Blogger. Readers who just need the code for it can skip this section.
But you should definitely read this if you don't know what the related posts for blogger can really do.

Advantages of using a Fast Loading Related Post Widget for Blogger


1) The Related Posts Widget Really Helps you to get more Page views on You Blog.

2) Your blogs visitors won't leave quickly and they will stay for more time on your
blog.

3) The more the page views you get the more is the Ad impression in your website and you
will get more CTR (Click Through Ratio) So you will make More Money with Adsense and similar Advertising Programs. So making money online will become more easier for you. You need to work less to get more money online.

4) The

Related Posts Widget

in you website will help the readers to navigate through your website, so they wont get confined to a single post.

5) The

Related Posts Widget

really help when people reach specific posts in your website especially through search engines. They will then be able to discover more contents in your website and they will get impressed, and whats more if you other posts are also too good then the reader will get impressed soon and there are chances for you to get a valuable subscriber for your blog.

I hope now you have got a idea what the Really Related Posts Widget in your Website or Blog can Really Do. Now lets see

how you can add related posts widget in blogger.

There are two sections one for Beginners and one for Advanced Users.
I hope that you got what i meant.

Adding the Related Posts Widget in Your Blog (For Beginners)


Adding the Related Posts widget in blogger is an easy task.

1)

Backing up your Blogger Template


At first go to the " Layout " Tab in blogger and then click the " Edit Html " option. and Click on Download Full Template and your Current Template Will be downloaded. So we have created a back up of your blog now. In case if any thing goes wrong you can upload this file and restore your blog to previous state.

2) Now the real process starts. Click the button below to

Add the Related Posts Widget to your sidebar of your blog


3) No need to enter the title for it because it will be shown automatically as " Related Posts ".

4) Now the Related Posts Widget will be added to your blog's sidebar. If you want it to be shown below the Post then drag it to below " Blog Posts " and click on " Save " (important!).

5) Now just open any of your posts in your browser (not the front page of your blog. You can see the Related Posts showing up there.

Here is My Related Posts Widget in Action


The Fastest and Perfect Related Posts Widget for Blogger
If you are satisfied then this is it. If you need to squeeze some more from it then read on.....

Adding or Showing the Related Posts Widget below the Blog Posts / Any Where in the blog (For Advanced Users)


If you are an Advanced Blogger, then you may want to show the Related Posts widget any where in the blog

Before Reading the following steps add this following piece of codes in your template first.

Go to end of your template or search for the following in your template.

</body>
</html>


Now add this codes just above them so that it looks like this after you have added it.

<script src='http://www.google.com/jsapi'/><script src='http://amalroyamal.googlepages.com/CUrelated.js' type='text/javascript'/>

</body>
</html>


1) If you want to show the related posts just below the blog posts.

Search for
<data:post.body/>
in your blog template and add this code just below it.

It will look like this after you have added.


<data:post.body/>


<div id='related_posts'/>


2) You need to add only this simple piece of code to show Show the Related Posts widget Any where in Your Blog.


<b:if cond='data:blog.pageType == &quot;item&quot;'>
<div id='related-posts'>
<div id='related_posts'/>
</div>
</b:if>


Thats it you can now successfully show the related posts widget in your blog.

If you want to add style to it then here is a nice css code for you.

#related-posts {float : left;width : 580px;margin-top:20px;margin-left : 5px;margin-bottom:20px;font : 11px Verdana;margin-bottom:10px;}#related-posts .widget {list-style-type : none;margin : 5px 0 5px 0;padding : 0;}#related-posts .widget {list-style-type : none;margin : 5px 0 5px 0;padding : 0;}#related-posts .widget h2, #related-posts h2 {color : #940f04;font-size : 20px;font-weight : normal;margin : 5px 7px 0;padding : 0 0 5px;border-bottom:1px dotted #666;}#related-posts a {color : #054474;font-size : 11px;text-decoration : none;}#related-posts a:hover {color : #A91B33;text-decoration : none;}


Now if you have a doubt's and suggestion's related with

Adding the Related Posts Widget for Blogger,

then

Comment On...


Labels:

Thursday, April 16, 2009

Create a Windows Restore Point with Just One Click

The Windows Restore Utility is really a magical utility that we need. It comes to our rescue in needy situations like system wont boot, system is corrupted by virus etc. So most Windows users need to create a System Restore Point most often. As i said in the earlier post Windows usually creates System Restore Points automatically, but we cannot depend on that to be happened. It may or may not happen some times. And that too is a reason to Create A System Restore Point Manually. You need to go through many steps and wizard to do this. So here is a nice and fast way to Create Restore Point with Just One and Only One Click.........

Create Restore Point with Just One Click

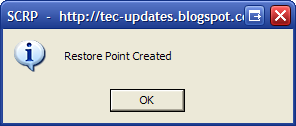
Single Click Restore Point is a small executable file that do this job in a flash. You only need to be logged into Windows with administrative Rights and just run this utility. This utility does't have an interface only it shows a Message saying that a Windows Restore Point is Created. Just that and the Restore Point is created in just One Click. The only problem is that you can't name the Restore Point Created. It will be named by the date along with the name " Created With SCRP Tool " (See the Screen Shot).

Create Restore Point with Just One Click

This tool will help users who struggle to Create System Restore Points in Windowsby navigating through the control Panel. Those users will surely happy with this utility.

Download Single Click Restore Point

Labels: ,

Monday, April 13, 2009

How to backup the Entire Windows Registry Safely and Quickly

99% of the Windows users won't give much importance for backing up the Windows Registry. It's no that important as backing up the data on Hard Disk, but taking a backup of the Windows Registry will be a life Saver in a needy situation. When windows starts acting strangely restoring the Windows Registry with a previously taken backup when it was healthy will solve the problem. Thus you can also avoid a re-installation of Windows. Windows provides mainly two methods for backing up the Windows Registry..........

Windows has an inbuilt semiautomatic backup tool which will also protect some of the important files in Windows besides the Windows Registry. Windows usually creates System Restore Points automatically, but we cannot depend on that to be happened. So we need to create a Restore Point Manually.

Method 1


To create a System Restore Point Manually

Go to Start > All Programs > Accessories > System Tools > System Restore.

Vista users may go to Start > right click on My Computer and click the System Protection Link and then select the "Create" Button .

Now follow the Details as per shown on the Wizard Screen and you can sucessfully create the Backup of Windows Registry.

Method 2 > Taking the Back up of Windows Registry Using Windows Registry Editor


Creating a System Restore Point in Windows is the best and safe method but it takes some time to complete. So if you don't want that method, then there is also a fast method. This is done by using the Registry Editor in Windows.

To start with type " Regedit " in the " RUN " from Start Menu and press Enter.

Now the Registry Editor Windows Opens up. Select File > Export.

Now under the " Export Range " give the option " All ".

Enter a File Name for eg. Windows Registry Backup and save the file. Now when ever you need to restore the Windows Registry to a Previous State , just run this registry file and confirm it by pressing OK.

Method 3 > The best Method to Backup the Windows Registry


Even though the two methods mentioned above are good and safer, they won't sometimes restore any new keys that were created after the Backup.

So here is the Best Method the Backup Windows Registry.

Let me introduce a Free and Nice utility called ERUNT.

Launch the ERUNT program by right clicking it and selecting " RUN as Administrator ".

How to backup the Windows Registry

ERUNT's backup consists of various folders with many files in them out of which there is one called ERUNT.exe which is the restore program.
In case if a restore fails, try booting into Windows Safe made and try again, it could work.

With ERUNT's restore folders, you can restore the Windows Registry to its full glory.

Here are some of ERUNT's Features

· Backup the Windows NT/2000/XP registry to a folder of your choice.
· System and current user registries selectable.
· Command-line switches for automated use of ERUNT
· Restore the registry in Windows 9x/Me/NT/2000/XP and MS-DOS (all-in-one restore program)
· All programs in this package are completely localizable.


A program called NTREGOPT is also included in it for Optimizing the Windows Registry.

Download ERUNT Now


Labels: ,

Friday, April 10, 2009

Download Windows 7 Build 7077 x64 NOW!!! (7077.0.090404-1255_x64fre_client_en-us_Retail_Ultimate-GRC1CULXFRER_EN_DVD.iso)

Soon after the leak of Windows 7 build 7077 x32 bit the 64 bit version of Windows 7 build 7077 x64 is flooding in the torrents from today morning. The newest releases of Windows 7 build are leaked very fast as soon as they are complied. They are out to the public with in hours. This leak of 64 bit Windows 7 build 7077 has took two days to come out after the release of Windows 7 build 7077 32 bit. The size of Windows 7 build 7077 64 bit is a bit bigger in size it is 3.04 GB. Windows 7 Build 7077 x64 is leaked as ISO DVD.

Here is a Screenshot of Windows 7 Build 7077 x64 (64-bit)


Download Windows 7 Build 7077 x64 (7077.0.090404-1255_x64fre_client_en-us_Retail_Ultimate-GRC1CULXFRER_EN_DVD.iso)

Windows 7 Build 7077 x64 Details


Flie Name: 7077.0.090404-1255_x64fre_client_en-us_Retail_Ultimate-GRC1CULXFRER_EN_DVD.iso
Size: 3.04GB
MD5: 9a5e6cdb8d4d42f528a7053f810a4765
SFV: E5A79DFA
SHA1: 508afefec802613e6a3346f8d766793a562147ff


Download Details for Windows 7 Build 7077 x64 (64-bit)


Go to jcxp forums for the Download of Windows 7 Build 7077 x64 (64-bit). Windows 7 Build 7077 x64 (64-bit) download is made available as a torrent file. So the download may be a little slow. It will get speed as more users seed it.

Labels:

Thursday, April 9, 2009

Add Text to Images Online within 10 Seconds!!!!

We often add text, add comments etc to our favorite pictures. Usually we go for the help of an image editing software such as Adobe Photoshop or similar ones for doing this simple job. This certainly takes some of your valuable time. When you have, say 10 images or so to add some text or comments. It really matters. But forget about such image editing softwares when this can be done under 10 seconds and that too without an image editing software......

Add Text to Images Online within 10 Seconds!!!!

PicFont is a great online service that will help you to add a text to an image very easily.

It has many good features too. You will see the options to add text, select the font, size, color and also to rotate the text by an angle. And whats more if you made some mistake in adding the text you can also undo the action. After you add a text, you can adjust the image to the position you want before it is fixed.

There are other two more features apart from this. There is a Canvas option (space with your favorite background color) . You can decide the height and width of the canvas to suit your needs.

Next a shapes option is also available where you can add text to certain shapes.
You can pick a wide variety of fonts and preview it.

On the whole PicFont is a really good service that will help you to add any text or comments to any images with ease.

Visit PicFont Now

Labels:

Wednesday, April 8, 2009

How to Open Favorite Websites using Keyboard Shortcuts in Mozilla Firefox

How to Open Favorite Websites using Keyboard Shortcuts in Mozilla FirefoxMost often you open up your favorite website using the bookmarks toolbar, menu or by typing it on the address bar in Mozilla Firefox. The first two are some what quick. But how about opening your favorite websites Extremely Faster than any other methods you have seen. Yes this is possible if you use Keyboard shortcuts. Don't you use keyboard short cuts in Windows for Cut, copy operations etc, which really speed things up ?. Now let me show you how to open you favorite websites as fast as possible i.e. by using keyboard shortcuts........
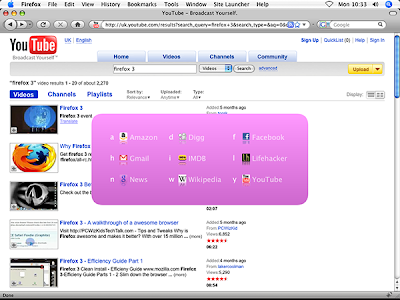
You may have never seen a browser with the functionality to open your favorite websites using keyboard shortcuts. A Free Addon called Site Launcher will add these function in Mozilla Firefox easily. Site Launcher addon is a super-quick way to open your favorite websites in a jiffy.

open your favorite websites using keyboard shortcuts in Firefox

The Default Shortcut to call up Site Launcher in Firefox is Ctrl+Space ( Ctrl+Alt for Mac users).

Here is What Site Launcher Offers

  1. Since every site key is shown in the Launcher, there won't arise a problem to remember all the shortcuts for your favorite websites. All you need to remember is just one and only one shortcut key.

  2. The Default can be changed as per your needs.
    You can add as many sites as you wish to Site Launcher.

  3. You are not confined to keys from a-z or 0-9, a wide variety of shortcuts can be used.

  4. The interface is completely customizable. You can make the program suit your needs.

  5. There are many elective visual effects - rounded corners, transparency and gradients.

  6. You can make the site shortcuts to be arranged automatically or to be manually arranged in the way you want them to be shown in the Launcher.

  7. You can make Set Launcher to open the sites in a newtab or in the current tab.

  8. What's more you can also make Site Launcher to be shown on startup in lieu of your homepage.


Site Launcher works with Firefox 2.0 to 3.6 a1pre.

Download Site Launcher

Labels: ,

Sunday, April 5, 2009

5 Best Tools To Recover Data From Damaged DVD/CD and other Medias

Recover Data from a Scratched DVD / CD EasilyAlmost all of the computer users will have a plenty of collection of DVD's or CD's. Other than any other medium to back up important data we prefer CD's or DVD's due to their easy availability and cheap prices. After prolonged use or keeping them for years, they become unreadable due to the scratches on them. You may have many valuable data in it. Most of the users end up in throwing away their unreadable or corrupt DVD's or CD's. Most probably windows fails or refuses to read and retrieve data from such scratched DVD's or CD's. This is because they consolidate the data into very small area and a scratch will make it unreadable. Dont lose your hope; you can still recover the data from those damaged/Scratched/Unreadable DVD/CD easily and that too without spending any money. Here are some Great Free Utilities to Recover Data from unreadable or scratched DVD's or CD's
  1.  IsoPuzzle
  2. 5 Best Tools To Recover Data From Damged DVD/CD and other Medias
    This is one great utility that tries to recover as much as data from unreadable or scratched DVD's and CD's.

    All readable data is taken form the scratched DVD or CD and it is stored as an image file in ISO format. ISO files can be read by various softwares like as WinRar, Nero Burning Rom, Daemon Tools etc.

    You just need to specify the " Source " and " Destination " and press the " Start " button and the copy process will automatically start.

    If the DVD or CD is severely damaged that even IsoPuzzle can't recover the data, there is also an option to give the time limit for the purpose, so after that the software will automatically stop by its own.

    The whole recovery process could take an hour or more. The DVD or CD will be ejected after the recovery process if you have activated the " On completion| Eject " option.


    Download IsoPuzzle


  3. Unstoppable Copier

  4. 5 Best Tools To Recover Data From Damged DVD/CD and other Medias
    Unstoppable Copier is faster than IsoPuzzle, but do not perform as much as IsoPuzzle does.

    When windows is unable to copy a file or folder from a unreadable or damaged DVD or CD it will abort the process and deletes the portion of the files copied till now.

    Unstoppable Copier continue copying the file from first to the end. Any data which is unrecoverable even after many retries are replaced with blanks. This will help you to really recover every byte of information that can be recovered.


    Download Unstoppable Copier

  5. CD Recovery Toolbox

  6. 5 Best Tools To Recover Data From Damged DVD/CD and other Medias  Apart From any other CD/ DVD data Recovery utilities CD Recovery Toolbox is the best out there. This is just because  it is free and due to its high data recovery rates. It is just an awesome CD/ DVD data Recovery  tool.
    After installing CD Recovery Toolbox. Start the program and insert your DVD/CD from which the data is to be recovered. If the DVD/CD has been inserted CD Recovery Toolbox will display the contents of the DVD/CD on it's window. Next you need to select a folder location to save the recovered data from the DVD/CD. On the next step select the Folders and Files you want to be recovered. You can select the entire DVD/CD to recover if you want. But doing this will take a lot of time for the data to be recovered. So it would be wise to select only the important folders and files that you need the most. Now press the Save button Finally. 

    CD Recovery Toolbox can recover data from different media such as CD, DVD, HD DVD, Blu-Ray, etc.

    Download CD Recovery Toolbox


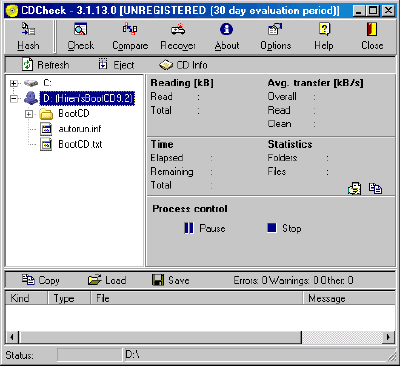
  7. CDCheck

  8. 5 Best Tools To Recover Data From Damged DVD/CD and other MediasCD Check is another great utility that will recover the data from Damaged/ Unreadable/Scratched DVD/CD easily. Cd check is made to detect the errors on damaged DVD/CD's and recover them. It checks for the corrupted data on the DVD/CD's and will show the corrupted ones to you. CDCheck is a Shareware Utility but it is free for Personal Use. Get a free license for CDCheck from here.


    Download CDCheck


  9. Dead Disk Doctor

5 Best Tools To Recover Data From Damged DVD/CD and other MediasDead Disk Doctor is from Russia. This tool will try to read the damaged part of DVD/CD and will try to recover it if it can't read the data the software will automatically replace those portions with random data. Since replacing data DVD/CD with random data could corrupt it, this tool is more useful if you have some DVD/CD or other medias with audio or Video content in it to be Recovered. So you will still be able to recover most parts in the DVD/CD even though small portions may get skipped. 

Download Dead Disk Doctor


All the 5 Utilities are Free and offers great value for recovering important data from damaged DVD's/CD's.

Labels: ,

Thursday, April 2, 2009

Addon to Skip the UnWanted Windows in Popular File Download Sites

Addon to Skip the UnWanted windows in Popular File Download SitesAlmost every active internet user should have faced difficulties while downloading files in popular file sharing sites such as RapidShare, MegaUpload, MediaFire etc. You need to get through many unwanted screens or wait for countdowns to get to the download destination. Most probably these will asking to upgrade the plan to get better download speed, more download limit etc. So, if you download files frequently or let it be occasionally from these file sharing sites, these will be a sure nuisance to you. So here is a nice addon for Mozilla Firefox to get rid of all such unwanted windows or countdowns and quickly proceed to the download page........

SkipScreen is one nice addon for Mozilla Firefox users that will quickly take you to the download page by passing through the unwanted windows or countdowns in major files sharing sites.

Here are the list of the site supported by SkipScreen.

  • Rapidshare.com
  • zShare.net
  • Megaupload.com (no captcha action... yet)
  • MediaFire.com
  • Sharebee.com
  • Depositfiles.com
  • Sendspace.com
  • Divshare.com
  • inkbucks.com


Skip unnecessary pages on sites like Rapidshare, Megaupload, zShare, Mediafire, and more.Skip unnecessary pages on sites like Rapidshare, Megaupload, zShare, Mediafire, and more.

The developers of this nice addon says that they will be improving the functionality of this addon. So more site will e added to the addon.

SkipScreen works with Mozilla Firefox 2.0 - 3.16a1pre.

Download SkipScreen Now


Labels: ,