Sunday, August 9, 2009

20 Keyboard Shortcuts to Enhance Your Web Browsing Speed

Shortcuts are one of the key ways to go if you are thinking of how can i work more faster with my web browser? No matter what all tweaks you apply to speed up your browsers still you will find some thing missing. Yes! they are Keyboard Shortcuts. Using Keyboard Shortcuts will greatly help you to work faster with your browser. A lot of your time and energy can be saved by using simple Keyboard Shortcuts?Keyboard Shortcut's to Speed Up Web Browsing So, it is essential to know some basic Keyboard Shortcuts that will help you to work faster with your Web Browser and saves you a lot of time. Here are some of them.

Keyboard Shortcuts for Internet Explorer, Firefox, Google Chrome, Opera and Safari


Ctrl + T (Open A New Tab) - Instead of right clicking and selecting or clicking the New Tab option, using the Ctrl + T keyboard shortcut will help you open a new tab in the current window.


Ctrl + W (Close the Current Tab) - Like Opening a New Tab in your browser, this will help you to Close the Current Tab you are working with.


Ctrl + N (Open A New Window) - This will help you to open up a new window in your browser.


Ctrl + D (Bookmark Current Website) - Bookmark your useful websites using this easy shortcut.


F5 ((Refresh)) - Refresh the Current Open Tab.


Ctrl + F5 (Hard Refresh) - Clear the cache of the current stored webpage and stores a fresh new copy. Thats what a Hard Refresh is for. Helpful when just posted comments don't appear etc.


Ctrl + H (Show History) - You know it! Show the history of previously visited webpages.


Ctrl + L or Alt + D or F6(Not For Opera) (Highlight Search Bar) - No need to move your mouse and click on the address bar to type a websites address in your browser again. Just use this quick shortcut.


Ctrl + E (Highlight Search Bar) - This will move the cursor to the search bar. Save the time you move your mouse over to the search bar!


Ctrl + (+/-) (Zoom In/Out) - Zoom in or Zoom out the current pages.


Ctrl + F (Find) - Instantly find a particular text on the current page.


Ctrl + C and Ctrl + V (Copy/Paste) - I bet you already know this!


Home / End (Top / Bottom) - These will help you to go to the Top or Bottom of a Page in a Jiffy.


CTRL + Click (Not for Opera) (Open Link in Background) - Open a link in a Background Tab without interfering your work.


CTRL + U (Source) - View the source code of the current website.


CTRL + left Click (Save Images (Opera Only)) - In fact this is a really a very handy shortcut that will save time. Why need to right click on an image and select the Save Image... option? Just Hold down the Ctrl key and click the left mouse button.


CTRL + Shift + T or (CTRL + Z also works in Opera) (Restore Tab) - This will help you to quickly reopen or recover previously closed Tab easily.


Some Additional Time Saver Keyboard Shortcuts


In fact these are some really useful shortcuts to save your time and energy.

You can save a lot of time by excluding the www., .com , .org, .net etc. There are simple keyboard shortcuts that can do these jobs very easily. We actually need to enter the name of the website only in the address bar of the browser.

Enter name of the website in the address bar and press CTRL + ENTER to auto-complete http://www. and the .com/ parts automatically. For example, type computingunleashed in the address bar and press CTRL+ENTER, the browser will automatically make it http://www.computingunleashed.com/.


Like wise SHIFT+ENTER will auto-complete the .net domains and CTRL+SHIFT+ENTER auto-completes the .org


If you feel that the mouse more comfortable and than the keyboard shotcuts, then i recommend you to, first try these shortcuts for a day or two to familiarize them. Once you do it you wont go back. And if you know any more shortcuts to be included please comment it down. I will surely include them in the post.

Labels: , ,

Saturday, June 27, 2009

Speed Up Firefox 3 - Make Firefox 3 Super Fast

Speed Up Firefox  - Make Firefox Super FastWhen it comes to Speed Firefox tops. The World's Most Popular browser Mozilla Firefox is certainly speedy. Browsing with it is a great experience what's more the addons power up it really well. These days most of the users use a high speed broad band connection. So they wont get the full utility from firefox 3 because Firefox is configured to work on slow (dial-up) connections by default. Applying certain tweaks optimize Firefox 3 for Fast for broadband connections. Dial Up users wont get much benefit from this but certainly broad band users will.
Here are some tweaks that could speed up Firefox 3 by optimizing it for fast broad band connections.
Pipelining is a technology used to speed up firefox 3 really well. This technology will allow FireFox to load all the page elements simultaneously instead of loading them one by one. This will make Firefox really fast. Here's how to speed up Firefox 3 to the maximum.


  1. Enter about:config in the address bar of Firefox 3. You can see lot of options displayed.
  2. Type network.http in the Filter box.
  3. You will see an option called network.http.pipelining double click the entry to make it true and do the same for network.http.proxy.pipelining. This is done to Enable Firefox to do multiple requests to a server at a time. So if you have a high speed connection you will be benefited.
  4. Now for the entry network.http.pipelining.maxrequests set its value to 30.

This number 30 means that Firefox will make 30 requests to a server at a time.
For an Extra Speed boost right click in a blank space in the above window and select NEW> Integer from the right click menu.Give its name as nglayout.initialpaint.delay and give it's value as 0. This is the amount of time Firefox waits before processing any information it received.

If you want to Speed Up Firefox 3 Even More then create these values

  • network.dns.disableIPv6 set its value to False

  • content.notify.backoffcount value as 5

  • plugin.expose_full_path value as true”.

  • ui.submenuDelay and value as 0


Make Firefox 3 Use Less Ram For Its Cache


This isn't really a speed boost but will be helpful for people with less ram.For this firefox tweak type about:config in the address bar. And search for browser.sessionhistory.max_total_viewer and double click it and set its value to 0. (If you dont see it create one as a boolean value by right clicking and New -> Boolean)Thats it Firefox wont now eat up more memory for its cache.

Now just restart you browser and see the speed increase in Firefox 3. If you have any suggestions and tweaks comment it. I will include them in the post.

Labels: , ,

Friday, April 24, 2009

Show Hibernate button in Windows Shutdown Menu along with other buttons

The Hibernate function in Windows will enable to save the current desktop as it is when we shutdown the system. When you Turn On windows again windows will restore the previous desktop you were working with earlier. So this way if you open a lot of programs in Windows you need not start or open the programs again when windows starts up. The hibernate option is a very useful and time saver function for Daily Windows Users. You can access the ‘Standby’ or ‘Hibernate’ function by pressing [Shift] key in the Windows shutdown menu. You will be really embarrassed since you need to press the Shift key each and every time you need to hibernate windows. Microsoft gives this function enhancement only through a telephone call and that too for valid support customers. So how about showing a separate button for the hibernate function in the shutdown menu of Windows by using a simple method? Try this trick to enable the Hibernate option directly instead of pressing the Shift key each and every time…...


  1. A small registry change will embed the ‘Hibernate’ button in the windows shutdown menu easily. Follow the steps below.


  2. Close all the open programs on your system (to avoid errors while installing the registry key), before installing the hotfix.


  3. Open the ‘HKEY_LOCAL_MACHINE\SOFTWARE\Policies\Microsoft\Windows\System’ key in the registry editor using ‘Regedit’.

  4. Create a sub-key with the name ‘Shutdown’ (without the quotes) using 'Edit > New > Key’.


  5. Now create an entry called ‘ShowHibernateButton’ here using ‘Edit > New > DWORD value’ and open it.

  6. Lastly, change the value from the default ‘0’ to ‘1’ and confirm it by pressing ‘OK’.

  7. Close the registry editor after this and restart your system.


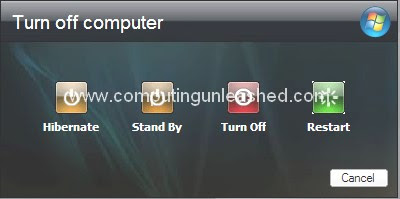
Show Hibernate Option in Shutdown Menu

If you have any difficulty in doing the steps above you can download the registry file for these steps from here and merge the registry file in your computer.


Download the registry file to show the ‘Hibernate’ button (option) in Windows Shutdown Menu.


Download Enable/ Show Hibernate (button) option in Shutdown Menu of Windows.


Windows will now display the button for ‘Hibernate’ by default in the shutdown dialog along with the existing buttons and you can resume from your job more faster.

Labels: , ,

Wednesday, March 18, 2009

Remove Entries from CONTEXT MENU in Windows

You might have noticed the Windows context menu studded with certain options which you have never used or will never use. These unused options are attached to the context menu when you install an application so that it can be accessed quickly.You can remove some unwanted menu options by a simple registry tweak if it is not required........

You can remove a context menu option with the help of the following methods:

Click "Start" and type "regedit" in the "search" box.

As the context menu options are not stored under one category in the registry,you would have to browse to the locations mentioned below and delete the required keys.

HKEY_CLASSES_ROOT\*\shell
HKEY_CLASSES_ROOT\*\shellex\ContextMenuHandlers
HKEY_CLASSES_ROOT\AllFileSystemObjects\ShellEx
HKEY_CLASSES_ROOT\Directory\shell
HKEY_CLASSES_ROOT\Diretory\shellex\ContextMenuHandlers

You will be able to recognize the context menu option by viewing the description that appears below the"Data"field.

Labels: , ,

Saturday, February 21, 2009

Add / Remove any item (link) from the Send To options in right click menu / Speed up the Send to menu in Windows

The Send To options in the right click menu in Windows enables to work in windows Faster. After a long time the send to menu gets cluttered and it will take more time than usual for the items under send to options to appear. So here is a way to speed up or create a send to options which is clutter free.....

The steps are simple.
Just go to RUN from start button or press [WIN] + [R].
Now type sendto and press [Enter].
A window showing the list of items which under the send to menu in Windows will open up.
You can add any new link or delete the unwanted items from the send to menu.

Labels: , ,

Monday, February 2, 2009

Ultimate Windows Tweaker v1.1 Released Download now / Make Windows Super Fast!!! | Get the Best Free Tweaker for Windows

WinVistaClub has finally released one of the best and powerful tweaking utility for Windows (created by Microsoft MVP Ramesh). It can tweak and optimize almost every thing in Windows Vista (32-bit and 64-bit) and certain (most) tweaks work for Windows XP too!. This small and free utility will make your Windows more faster, secure and stable in a few mouse clicks.It will tweak Windows Vista to its Best. This program is made user friendly and is portable. Lets see what all it does.

ULTIMATE Windows Tweaker for Windows

It has a lot of features.This program has an ability to detect whether you have installed IE7 or IE8 and give the relevant tweaks according to the version installed on you system. Different tweaks have been organized into various sections, they are :
1) Personalization,
2) User Accounts & UAC,
3) System & Performance,
4) Security,
5) Internet Explorer (IE7 / IE8)
6) Network Optimization
7) Additional Options

This program features over 130 tweaks and is portable (380kb) ie. it can be run without installing. Whats more you can safely tweak windows because it has the option to create a System Restore Point too!. The program is currently in the beta stage and the Final version will be out soon. So subscribe and keep updated.

Download ULTIMATE Windows Tweaker

It is mainly made for Windows Vista versions.

Labels: , , ,

Sunday, January 25, 2009

Windows 7 Registry Tweaks>> Registry Tweaks for Speeding Up Windows 7 / A nice collection of most Useful Tweaks for Windows 7

Winodws 7 Registry Tweaks
Every windows user will be using a lot of tweaks these days for speeding up their system. I am sure all will be waiting for the Registry tweaks for the newly born Windows 7 operating system. Here are some registry tweaks that can be safely applied after its installation or later. I am sure these tweaks can speed up Windows 7.
First of all i will tell what all changes will be made after applying the tweaks.

  • Hanged programs will be terminated quickly.ie. Automatically it will end tasks of programs that are taking longer to respond.
  • Menus will be shown very faster. When you pause on the main menus the sub menus will be shown up very fast than normal.
  • You will get an option " Take Ownership" when you right click on files or folders. This will become handy when you want to replace system files while doing customization.
  • Make windows not to search for a program that no longer exist when you click on the shortcut there by saving your valuable time.
  • Adds "Copy To" and "Move To" options in the right click context menu of Windows 7. So from now on copying and moving files from one place to another will be more easier than before.
  • Directly opens up the Files list when you choose "Open With" option there by deactivating the " search on Internet " option.
  • Speeds up the navigation in Windows Explorer by disabling searching for network printers and scheduled tasks on network.
  • Disables the annoying "low disk space" message notification in your system tray.


Download Registry Tweaks For Windows 7


Restart your system after applying these registry tweaks to take effect. You will also get a small speed increase in Windows 7

Labels: , ,

Monday, January 12, 2009

How to Apply One Folder's View To all the Folders

In Windows Xp we get six different Folder views Thumbnails, Tiles, Icons, List, Details, Filmstrip. Each time when we open different type of Folder for example we opened a folder containing pictures we see the view set to Filmstrip or so. If you want to set it in tile view you have to select form the view option. Doing this for each and every folder is really time consuming.

Setting a particular Folders view setting to all the Folders will be the easy way.To do this just go to My Documents Folder and select the type of view you want too have in all the Folders from the view options after doing that. From the menubar select tools> Folder Options and select the 'View' tab from it. Now click on " Apply to All Folders " Options and select apply and then OK.

Thats it from now on you can get a common view setting in all the Folders.

Labels: , , , ,

Tuesday, December 23, 2008

Optimize Adblock Plus in Firefox and Filter junk ads Faster than ever

There may be hardly few Firefox users who don't know about the Adblock plus extension. Adblock Plus is used as the online ad filter by many users. But using a large number of self defined filters in Firefox can make it really sluggish. Long self defined filter lists makes Firefox sluggish because every page that is loaded is checked against the filters each and every time. However we can solve this problem to a great extend by optimizing the filter lists.
  1. To start with first you have to save your filter list.
  2. Then go to 'Tools'>'Adblock Plus'.
  3. From settings dialogue box open 'Filters'> 'Export Filters'.
  4. Open Windows Explorer and open the text file with an editor like Notepad.
  5. Now select the entire content of the file by pressing [Ctrl] + [A] and copy tit to clipboard by pressing [Ctrl] + [A].
  6. Now go to the website http://adblock.free.fr/optimize/index.php?lang=en and paste the list there by pressing [Ctrl] + [V].
  7. Now check the options that are set. Please check that the 'Optimize URLs' and 'Remove Filters matched by others' options are active.
  8. If you are already using an optimized list the 'Optimize including pre-existing RegExes' option must be activated. This will insert new filter list to the already optimized ones.
  9. Now click 'Optimize'.
  10. A dialog box showing the compressed list will show up.
  11. Select the optimized list and copy it to a new blank text file and save it.
  12. Now in Adblock settings dialog box, Open 'Filters'> 'Import Filters' and now navigate to the new text file and click on 'Open'.
  13. It will ask whether to replace it. Now click on 'Overwrite' if not Firefox will add the new one together with the existing one .
  14. Confirm it by clicking 'OK'. Done !
Now Firefox will filter ads faster than before. Make sure you do this at least once in a month.

Labels: ,

Monday, December 15, 2008

Increase the Performance\Speed of SATA Hard Disk's in Windows Vista

By default Vista does not make use of the full potential of the new SATA hard disk's. We do not get the actual power of the Hard disk that we use. In order to get it we just need to make a small change.
  1. Call up the Start menu and type Device Manager in the search box.
  2. Expand the Disk Drives section by clicking on the plus sign near it.
  3. Now Look for the internal SerialATA (SATA) drives under it.
  4. Right Click the disk and select properties.
  5. Go to the "Strategies" TAB.
  6. Now check the option "Enable Advanced Performance ".
  7. Select OK and Close the Device manager.
  8. Restart your system.
  9. Done!
You will now be able to get the full power of your SATA Hard Drives from now on!!!.

Labels: , , ,

Monday, December 8, 2008

Unlock the Locked Features in Windows 7 [updated] bluebadge patch 3

Friends there is way to unlock the locked features in Windows 7 build 6801.This operating system of windows comes with the major features locked. There is patch called "Blue Badge" which will allow users to unlock these features meant to full time microsoft's employees.


Once this patch is applied new features such as panning, new taskbar, gestures, wallpaper changer etc. will get unlocked.
Now the tool have been modified by rafael and this new version can now unlock Aero Peek feature too. Apply the patch and enjoy the new features.

Download the Blue Badge Patch 3 for Windows 7 build 6801 (32-bit)


Download the Blue Badge Patch 3 for Windows 7 build 6801 (64-bit)

Labels: , , ,

Thursday, November 6, 2008

Insert /Add "Open in New Window " Option in Windows Explorer context menu

Here is a trick to add " Open in New Window " option to explorer right click menu or context menu.
This trick is applicable for Windows XP, Windows Vista and Windows 7 users.
  1. Copy the following registry entry in notepad and save as CU.reg then just run the file and add the registry entry in windows.
  2. Windows Registry Editor Version 5.00

    [HKEY_CLASSES_ROOT\Directory\shell\opennewwindow]
    @="Open inside New Window"

    [HKEY_CLASSES_ROOT\Directory\shell\opennewwindow\command]
    @="explorer %1"

    [HKEY_CLASSES_ROOT\Drive\shell\opennewwindow]
    @="Open inside New Window"

    [HKEY_CLASSES_ROOT\Drive\shell\opennewwindow\command]
    @="explorer %1"

Now you will get the option to open a folder or drive inside a new window in explorer context menu.

Labels: , , , ,

Hide or remove the disk drives(C:,D:,E: etc) in My Computer

This trick can be used to hide the disk drives in your Computer.

  1. Go to start menu>select run the type regedit.

  2. Now Got to HKEY_CURRENT_USER\Software\Microsoft\Windows\CurrentVersion\Policies\Explorer.

  3. Right click on the right pane and create a new Dword value.

  4. Give the name as NoDrives Give the name as it is given here.

  5. Modify it's value and make it to 3FFFFFF(Hexadecimal).

  6. Now restart your PC.

  7. Open my computer you will not see any disk drives now!!!.

  8. To get them back just delete this dword value and restart your PC.You will get back the drives now!!!.

Labels: , , , ,

Wednesday, November 5, 2008

Add an Entry / Application or your Name to Right Click Menu of MY Computer

Hi friends here is a trick to add any application shortcut or even your name to Right Click Menu of My Computer.This tricks can also help in doing your job faster.If you want to add you name to the right click menu follow the steps.

  1. Copy the following code from below and paste it on notepad and save the file as computingunleashed.reg and run the file.
  2. Windows Registry Editor Version 5.00 
    [HKEY_CLASSES_ROOT\CLSID\{20D04FE0-3AEA-1069-A2D8-08002B30309D}\shell\Registry Editor]
    @="ComputingUnleashed"
  3. Here you can replace Computing Unleashed with your name or any name you like.

Add an Application Shortcut to My Computer Right Click menu.

  1. Repeat step 1 mentioned above.
  2. Windows Registry Editor Version 5.00 
    [HKEY_CLASSES_ROOT\CLSID\{20D04FE0-3AEA-1069-A2D8-08002B30309D}\shell\Registry Editor]
    @="Name of your Application"
    [HKEY_CLASSES_ROOT\CLSID\{20D04FE0-3AEA-1069-A2D8-08002B30309D}\shell\Registry Editor\command]
    @="Location Of The Application"
  3. Give the Location as c:\program files\movie maker\moviemk.exe if you want to add movie maker.
Here are some more codes.

  • Add Control Panel to My Computer Right click menu.

[HKEY_LOCAL_MACHINE\SOFTWARE\Classes\CLSID\{20D04FE0-3AEA-1069-A2D8-08002B30309D}\shell\Control Panel\command]
@="rundll32.exe shell32.dll,Control_RunDLL"


  • Add Add/Remove programs option.

[HKEY_CLASSES_ROOT\CLSID\{20D04FE0-3AEA-1069-A2D8-08002B30309D}\shell\Add/Remove\command]
@="control appwiz.cpl"


  • Add Shutdown option.
[HKEY_CLASSES_ROOT\CLSID\{20D04FE0-3AEA-1069-A2D8-08002B30309D}\shell\[Shutdown]\command]
@="shutdown -s -f -t 5"


  • Add reboot option.
[HKEY_CLASSES_ROOT\CLSID\{20D04FE0-3AEA-1069-A2D8-08002B30309D}\shell\[Reboot]\command]
@="shutdown -r -f -t 5"


If you have any doubts in doing it feel free to comment it down.

Labels: , , , ,

Sunday, November 2, 2008

Shut down windows under 2 seconds!!!/Make Windows Shutdown Extremely Faster

Hi friends here is trick to shutdown windows like never you have done before.This trick can be used to do an emergency shut down.You will be surprised to see windows will shutting down under 2 seconds!!!. At first make sure that you don't have any unsaved works.So here is how you do it.
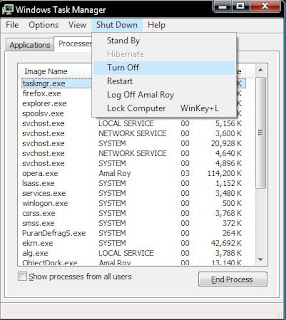
  1. Call up the task manager by pressing Ctrl + Alt + Delete or by pressing Ctrl + Shift + Esc(for vista users.Xp users too can do this.)
  2. Pressing Ctrl + Shift + Esc will directly call the task manager in vista.
  3. Now from the menu bar select the shutdown option.
  4. Hold Ctrl and press Turn off.


You will see windows shutting down under the blink of an eye.

I don't recommend using this trick cause it may sometimes cause problems.

Use it only in case of an emergency.

Labels: , , ,

Saturday, November 1, 2008

Get/Add the RUN command in Windows Vista Start Menu

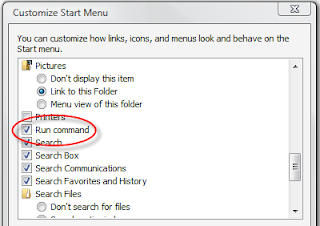
Don't see the run command in Vista's start menu like in Xp? Don't worry.You can add the run command to vista's start menu very easily.Here is what you have to do.

  1. Choose properties by right clicking on the start menu.
  2. Select the customize button under start tab.
  3. Scroll down and tick the run command option.
  4. Select apply and then press OK.
  5. If you have any doubt check the screen shot below.


Select the start button now and you will see the run command.

Labels: , ,

Thursday, October 23, 2008

How to Get Back the Thumnail view in vista\Enable Thumbnail view in Vista

You are used to the thumbnail view for previewing image and video file types on Windows Explorer in Windows Xp.In vista this option is not seen and instead large icon types are provided by default.
Vista can display the thumbnails too.But the option to enable them is hidden by default.This is how you can get them back.
  1. Open Windows Explorer and go to tools>Folder options.
  2. Select the "Advanced settings" in the view tab.
  3. Search for the option "Always show icons, never thumbnails".
  4. Deactivate the option and Confirm the setting by clicking "Apply" and then "OK".
  5. Now you have to only select an icon variant for display under "View" so that the icons get turned into thumbnails.
  6. You can even get the preview of the marked item in the lower part of the list view.
Note: Enabling the Thumbnail option in old Pc's will take time to display, especially in the case of video files.

Labels: , ,