Tuesday, December 1, 2009

How To PRINT SELECTED PARTS OF A WEBPAGE ?
You might have thought of saving your printer ink while printing. This becomes more prominent while printing webpages, because there are many unwanted things that comes along with the print like advertisements, images etc that simply wastes the printer's ink.How To PRINT SELECTED PARTS OF A WEBPAGE ? So, how about saving the printer ink by printing only necessary areas in a webpage ? The problem of ink wastage while printing webpages can easily be controlled to a great extend with the help of Printliminator.

In brief Printliminator is a browser bookmarklet that will help you in printing only the needed portions in a webpage.

How to Install Printliminator ?


Regarding the usage, Printliminator is very easy to use. The only thing you need to do to install Printliminator is to first go to the Printliminator Home page and drag the Printliminator bookmarklet to your browsers bookmark toolbar.
And the installation of Printliminator is complete! Thats so simple as 123.

How to Use Printliminator to Print Only Certain Part of a WebPage ?


After you have installed the Printliminator bookmarklet, you are ready to use Printliminator.

  • First, load the website on your browser that needs to be printed.


  • From the Bookmark's Toolbar in your browser click on the Printliminator bookmark.


  • You will be presented with three option's namely Remove Graphics, Print Stylize, & Send To Printer. Along with two other options.

    How To PRINT SELECTED PARTS OF A WEBPAGE ?


  • Clicking on the "Remove Graphics" option will remove all of the images in the webpage.

    Clicking the "Print Stylize" option will highlight the various elements in the webpage with in a red border. Left Clicking within the red border removes a particular section/area. You can Continue to select and remove any unwanted sections/areas until you are ready to print. If you have removed certain portion by mistake you can choose the undo option or refresh the page and start over.


Prinliminator is a great tool for saving both the printer ink and the paper.

Get the Prinliminator Bookmarklet


Labels: , ,

Saturday, November 7, 2009

3 Ways To Remove / Uninstall Nod32 Completely From Your PC

These days many people face the problem of removing the antivirus or internet security software's from their system completely.  May new security suites and antivirus software's emerge and people slip on to them for many reasons.  Recently i installed the Eset Nod32 Smart Security in my windows 7  system and later i thought of uninstalling it but even after trying many times the uninstall of nod32 was not complete. The software went irremovable from the system.  After trying a lot i was able to remove nod32 from the system. Are you too facing a similar situation like Eset Nod32 Uninstaller not working, Nod32 cant be removed etc? Here are 3 ways to Uninstall/ Remove Nod32 from the System completely


3 Ways To Remove or Uninstall Nod32 Completely From Your PC

Method 1 : Doing the Usual Uninstall of Nod32


First of all try running the uninstall tool of nod32 with administrative privileges. For this right click Ese Uninstall tool from start menu and select Run as Administrator in Vista/ Windows 7. Else follow the below step.


  • Go to the Control Panel and select Add or Remove Programs and run the Nod32 uninstaller from there. For Windows 7 Users  type this in the Address Bar of Windows Explorer. Control Panel\All Control Panel Items\Programs and Features it will directly take you to the Add or Remove Programs area.


  • Right Click Eset Smart Security / Eset Antivirus and choose Change and choose Remove and continue with the uninstallation Process.


If This normal uninstall or removal of eset nod32 didnt work then try Method No. 2


Method 2 : Uninstalling Nod32 with the Nod32 Removal Tool


The removal tool for nod32 is made for situations where you cant uninstall the software by normal methods.


  • Download Eset Nod32 Removal Tool .


  • Right Click the Nod32 Removal Tool icon and choose Run as Administrator in Vista/ Windows 7. XP Users just need to run the tool.


  • Now Restart Your Computer for the changes to take effect. In most cases this method will uninstall nod32 from your system completely.


If Method 2 also fails for you then try the Last,  Method No. 3


Method 3: Manually Removing Nod32


You should try this method iff the above two method fails. (Here i assume you have installed your operating system in the C drive if not change the drive letter accordingly).


  1. Start Your Computer in Safe Mode.


  2. Type Regedit in the start Menu (Xp users press [win] + [R] and type regedit).


  3. Delete the Following keys one by one.

    • HKEY_CURRENT_USER\Software\ESET


    • HKEY_LOCAL_MACHINE\Software\ESET


    • HKEY_LOCAL_MACHINE\Software\Microsoft\Windows\CurrentVersion\Run\egui


  4. (For XP Users) browse to C:\Windows\inf and delete the file INFCACHE.1 (Make sure Show Hidden Files andFolders option is enabled from the Folder Options)


  5. (For Vista and 7 Users) Browse to C:\Windows\System32\DriverStore and delete INFCACHE.1


  6. Now restart your computer.

  7. Next Remove the Following folders from your system.
      (For XP Users)

    • C:\Program Files\ESET


    • C:\Documents and Settings\All Users\Application Data\ESET


    • C:\Documents and Settings\%USER%\Application Data\ESET


      (For Vista and 7 Users)

    • C:\Program Files\ESET


    • C:\Users\All Users\ESET


    • C:\Users\All Users\Application Data\ESET


    • C:\ProgramData\ESET


  8. Also delete any other eset folders if found. Just do a search for Eset in windows search and you can find any other folder if it is there.


Now, Eset Nod32 will be removed / uninstalled completely from your system.


Labels: , ,

Tuesday, October 27, 2009

How To RUN / Get XP in Windows 7 - Best Alternative to XP Mode in 7

Windows 7 has been released, fixing a lot of compatibility issues regarding both software and hardwares. So the users need not fear any compatibility issues with the softwares they install in windows 7. Many are still sticking with Windows XP thinking that their daily used programs might not work in windows 7. If you have a program that works only with XP, then dont worry when upgrading to windows 7, because windows 7 has Windows XP and Windows Vista compatibility modes for coping up with such cases. For more microsoft has released a XP mode which can make programs that failed in windows vista to work in windows 7. So there are obvious reasons for people to upgrade to windows 7. A good number of people who come to know about this upgrade to windows 7 thinking that with these new XP mode and other support they can use their windows xp programs in windows 7. But there are some downsides for this and there is a simple solution too.

Things to Know Before Going with the Windows Xp Mode Feature


  • Do you think microsoft is giving away the windows xp for free with windows 7? Absolutely No, because microsoft provides this additional feature for a price. The Windows Xp Mode is only available in Windows 7 Professional, Enterprise and Ultimate editions of windows XP.


  • The Windows Xp Mode in windows 7 only works with colors limited to 65,536. This was done just avoid programs from using too many system resources.


  • In order to use the windows Xp mode you need to have Microsoft Virtual PC installed in your system. This tool gives you an impression that you are running windows Xp inside windows 7, and for this purpose it uses a hardware-based visualization via the CPU. And further this option is only with the new processors (Intel Vitalization Technology or AMD V) and the corresponding option needs to br enables from the BIOS.


  • These are enough reasons for many, which will prevent then from upgrading to windows 7. So,

    How can we upgrade to windows 7 and use windows XP in it?


    There is a simple solution for this.

    You can Get windows XP inside Windows 7 in its full glory with the help of VirtualBox.

    How To Get or Run XP in Windows 7 or Best Alternative to XP Mode in 7
  • VirtualBox runs on other windows 7 versions too.

  • With VirtualBox you will get support for more than 65,536 colors. You can use the complete 1.6 million colors or the maximum you have.

  • VirtualBox doesn't need any Hardware Visualization Technology to Run Windows Xp in Windows 7 and you don't notice any loss of performance without having that.


  • Things to have before installing windows Xp inside Windows 7


    The only essential thing you need to have is the Windows XP installation Disc.

    so lets start,

    How To Get Windows XP inside Windows 7


    1. First you need to get VirtualBox to start with, so Download VirualBox and install it.

    2. Open VirtualBox and Click the "New" button and create a virtual PC

    3. How To Get or Run XP in Windows 7 or Best Alternative to XP Mode in 7
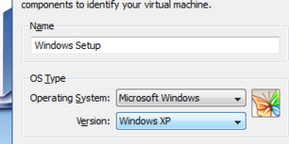
    4. In the Wizard select operating system as "Microsoft Windows" under version "Windows Xp".

    5. How To Get or Run XP in Windows 7 or Best Alternative to XP Mode in 7
    6. Give a name to the Virtual Machine you have created.

    7. Next you need to assign the amount of memory and hard disk space to be used for the virtual machine you have created. Set atleast 512 MB for the memory and some 10-30Gb for the hd space.

    8. How To Get or Run XP in Windows 7 or Best Alternative to XP Mode in 7
    9. Insert your Windows Xp setup CD in your DVD/Cd drive and type the corresponding drive letter of your drive in VirtualBox under "CD/DVD-Rom"
    10. (There is provision for specifying the Windows Xp iso file too).
    11. Now select "Devices > Install guest addons " and follow the instructions in virtual box.

    12. Now select "Machine > Wireless Mode".

    13. Now this will simulate the Windows Xp mode in Windows 7.

    Looking Forward to hear from you Friends.

    Labels: ,

    Wednesday, October 14, 2009

    How To Copy/Backup Changed or Modified Files automatically

    Daily computer users make a lot of changes to their system. There can be mistakes that can happen such as accidentally overwriting an important file or accidentally deleting it. What ever be it we dont (most of us) usually are reluctant to make backups. This is seriously frustrating when we have a lot of files that need to be backed up, which are changed most often. So it is really a time consuming task backing up or copying the modified files, when they are in bulk. So here is a nice software than can help you out of this tedious job of backing up/copying only the changed or modified files automatically.

    How To Copy or Backup Changed or Modified Files automatically

    The copy changed files utility is a small tool that lets you to copy changed files from one directory to another.

    The program copies only the changed files, the non changed files will be left intact.

    Features of Copy Changed Files


    * Copy changed files only
    * Multi threaded
    * Append current date to destination directory for easy version maintenance
    * Set from directory
    * Set to directory
    * Set the from date, to scan for files changed after that date
    * Compare date AND time
    * Maintain directory structure in destination directory
    * Exclude files from copying, eg. thumbs.db
    * Automatically check for new version


    Screen Shot Of Copy Changed Files


    How To Copy or Backup Changed or Modified Files automatically

    The program doesn't needs to be installed, it just needs to be extracted and can be run directly.

    Download Copy Changed Files

    Labels: , ,

    How to Jailbreak iPhone 3G/3GS 3.12 Firmware in Windows

    The iPhone Dev Team has released the PwnageTool 3.1.4 to Unlock / Jailbreak the new iPhone 3.12 firmware for Mac users only. Well, that has been a disappointment for the windows users. So here is a small guide on How to Jailbreak the iPhone 2G, 3G or 3GS with 3.12 Firmware for windows users. You don't need to wait for the windows version of the PwnageTool or RedSn0w tool to be released.


    How to Jailbreak iPhone 3G or 3GS 3.12 Firmware in Windows

    How to Jailbreak iPhone 3G/3GS 3.12 Firmware in Windows


    1. You should have the Latest version of iTunes to be installed before starting. So Download Latest iTunes version if you dont have it.

    2. Now connect the iPhone to your PC using the USB port in the back of the CPU (Avoid USB hubs).

    3. Open up iTunes and sync all data with your pc. This is done to make iTunes take a backup of your important data.

    4. For Mac users a custom IPSW File is created by the Pwnage tool automatically. So as a windows users you need to download the suiting firmware first.
      Following are the files

      For iPhone 2G Users: “iPhone1,1_3.1.2_7D11_Custom_Restore”
      For iPhone 3G Users: “iPhone1,2_3.1.2_7D11_Custom_Restore”
      For iPhone 3GS Users: “iPhone2,1_3.1.2_7D11_Custom_Restore”


      Just Google for it. You will easily get it.

    5. After you have downloaded the required .ipsw file . Copy the file to the following location.

      For Windows Xp Users: “C:\Documents and Settings\[username]\Application Data\Apple Computer\iTunes\iPhone Software Update\”

      For Windows Vista Users:“C:\Users\[username]\AppData\Roaming\Apple Computer\iTunes\iPhone Software Updates\”

      For Windows 7 Users:“C:\Users\[username]\AppData\Roaming\Apple Computer\iTunes\iPhone Software Updates\”


    6. If you manually browse to the location then make sure you have "Show Hidden Files and Folders" option enabled to see those folders, as they are made hidden by windows automatically.


    7. Restart iTunes and make sure that you dont update your iPhone to 3.1.2 firmware using iTunes.


    8. Choose iPhone from the devices list in left sidebar of iTunes window.


    9. While Holding the left Shift button click on ” Restore “ option.


    10. iTunes will ask you to locate the custom downloaded firmware 3.1.2,Locate it and open the custom IPSW file you downloaded.


    11. That's it you have successfully Jailbreaked your iPhone 3.12 Firmware in Windows

    Labels: ,

    Thursday, September 24, 2009

    How To Use/Install GreaseMonkey Scripts in Opera - Make them Work

    Greasemonkey addon for firefox has become the users favorites. It helps to install scripts that can enhance webpages by adding extra functionality to it. It may be any thing from adding more functionalities and options such as re-tweet in twitter, comparing prices in amazon with in the page etc. The only demerit for Greasemonkey addon is that it is just for firefox users. So why should they leave other browsers ? Opera browser too has a good amount of users. So ,here is how to use/make greasemonkey scripts work in opera.

    Emulate GM Functions user script can make some of the of the Greasemonkey scripts work in opera.
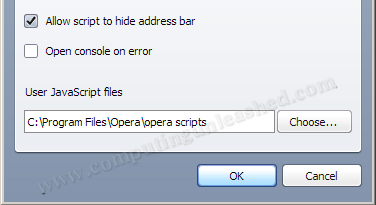
    The process is very easy. Just create a folder named "opera-scripts" in your Home Folder. Now Open opera and from the Tools menu, navigate to Preferences -> Advanced -> Content -> JavaScript options.
    Now the “User JavaScript files” field point to the path where your “opera-scripts” folder is located and press “OK” .

    Install or Use GreaseMonkey Scripts in Opera

    Now download (Right click and select "Save target as) the Emulate GM functions user scripts from here and move the downloaded aagmfunctions.js file to the Opera-scripts folder.

    So, when ever you need to use a particular grease monkey script in opera just save the script in the opera-scripts folder. Use any other browser that is not Firefox, like Opera, move to the userscript page, click “Install” and save the page without modifying the script extension for example abc.user.js.[via Kabatology]

    So, you can now install/ use your greasemonkey scripts in opera browser.

    Labels: ,

    Wednesday, September 2, 2009

    Prevent Websites From Appearing In The Firefox Address Bar/Awesome Bar

    Prevent Websites From Appearing In The Firefox Address BarThe Firefox Address bar or the awesome bar is the most used and one of the most useful features that the Firefox has. It will popup the related websites as soon as we type in there. Firefox goes through the tags, web history and book marks to show the related websites. Of course the Awesome bar (address bar)in Firefox is very useful for us but some times there may be occasions where we need to adjust the awesome bar or the address bar of firefox so that only the required websites are displayed. Unfortunately Mozilla Firefox doesn't have an option to exclude or prevent specific websites from the search in the Address Bar of FireFox.

    There may be many reasons to prevent specific urls or websites from appearing in the address bar (awesome bar) of firefox. Let the reason be any thing here comes Not Awesome addon for Firefox that will help you prevent certain website or url from appearing in the address bar (awesome bar) of firefox as you type. NotAwesome will prevent those websites from appearing in the address bar which have been bookmarked and tagged with notawesome. Any website having the notawesome tag will be excluded from the search in address bar.

    Prevent Websites From Appearing In The Firefox Address Bar/Awesome Bar
    If you have websites bookmarked earlier which you want to prevent from being displayed in the address bar of firefox just edit those bookmarks and add the notawesome tag. It will be prevented from being displayed again. via [ghacks]

    After you install the notawesome addon in firefox, then each time when you bookmark a website in Firefox, an option will be displayed to prevent or exclude the website from being displayed in the address bar.

    Download NotAwesome Bar Addon For Firefox

    Labels: ,

    Tuesday, September 1, 2009

    How To Wake And Shutdown Your PC At Specified Time Intervals (Automatically)

    There are many software's available for the purpose of shutting down your PC at a specified time. Today i was looking for a tool that could wake your pc at a specific time and shutdown. I usually start the downloads at 2:00 am in the morning and ends it at 8:00 am since at these time i downloads are free for my internet connection. So waking up at 2:00 am just for this purpose is a tough thing as it disturbs my sleep. So i was looking for a way to make wake my pc at 2:00am and shutdown it at 8:00am i found DShutdown.

    DShutdown is an excellent tool that will help you to shutdown your pc at a specified time as well as wake it. DShutdown can also be used for waking and shutting down remote PCs at specified time, with a variety of options.
    DShutdown is not just an ordinary wake up and shutdown tool it has a plethora of features.
    DShutdown supports more than just standard shutdown options, there are options relating to "pure" shutdown (such as the "force after wait" option which causes a forced, but 'clear' shutdown).

    How To Wake And Shutdown Your PC At Specified Time Intervals (Automatically)
    DShutdown includes options to shutdown your PC when a particular application gets closed, intercept a shutdown request, initiated by the user or an application, and to then execute the shutdown request with selected options from DShutdown (This is very helpful to shutdown all the connected PC's in LAN when the server shutsdown).

    There are also options to shutdown a PC when the Internet traffic reduces below a particular data-rate (useful to shutdown a PC when it has finished a large download).

    How To Wake And Shutdown Your PC At Specified Time Intervals (Automatically)
    There is a RDShutdown tool included with the package which will help you to shutdown remote PC's very easily. The RDShutdown tool should be installed in the Remote System.

    DShutdown doesn’t force a power-off without logging off and saving settings.
    DShutdown doesn't needs to be installed in your computer, it is portable and you can carry on a flash drive and run it directly on any PC and its Free. DShutdown works with Windows 9x/NT/2000/XP/2003 and Windows Vista systems.

    Download DShutdown

    Labels: , ,

    Sunday, August 30, 2009

    How To Lock Windows Using USB Flash Drives

    Locking our computer definitely comes into play when you are not the only user of it. There are many ways to lock our windows operating system. Usually in most of the ways, for locking windows you need to have a password entered for it. And again you need to type in a password in order to unlock windows. These days USB Flash drives are so common and almost all the computer users have one with them. So, how about making use of these USB flash drives to lock your windows computer?

    Lock Windows Using USB Flash DrivesPredator is a small windows utility that will help you to lock the current windows session easily just by unplugging your USB flash drive. Using Predator some what like using a key to open a door! Doesn't that very simple.
    Predator is a tool meant for windows not for your USB Flash drives. As soon as Predator is run it will ask you for a password to enter. This is done to ensure that you can gain access to windows in case if you lost your USB Flash Drive.

    Lock Windows Using USB Flash Drives
    Type the password in the preferences window. From now on, to lock the current windows session just unplug the USB Flash drive from your computer. And to unlock windows just plug the USB Flash Drive again. Its that simple. You dont need to take the pain of entering the windows password each and every time you lock your current windows session.
    There are many other features predator has it can keep a log file which can be used to find out whether somebody has tried to access you pc in your absence. For an added security Predator will change the keys on the USB drives frequently to prevent any one from accessing your system using a copied keyfile.
    When you remove the Flash Drive from your computer the screen will go blank, there by locking the current windows session. You need not worry about your Flash drive as predator wont do any thing with it.

    Download Predator

    Labels: , , ,

    Wednesday, August 19, 2009

    How To Delete NTFS Partition Safely & Easily

    For some or other reason you might have come across a situation where you need to Delete NTFS Partition in your system and NTFS partition is the most widely used Hard Disk Partition today. You will definitely think of deleting your NTFS partition from your Hard Drive when your computer becomes old and you are going to lend it to some body else. Deleting the NTFS partition really matters to you especially if you have sensitive data on your Old Hard Disk in this case. Delete NTFS Partition Safely Deleting the data in the Hard Disks using FDISK, FORMAT utilities, or DELETE standard operating system commands are not sufficient enough to wipe off the data since there is a chance to recover deleted files using data recovery softwares. So here i will explain how you can safely and easily delete NTFS Partition from your computer.

    Most of us believe that simply Deleting or Formatting a Hard Disk will completely remove the data contained in it. But it wont. The data deleted or formatted from a Hard Disk can be safely recovered with todays Data Recovery Programs.

    You need not worry if you delete the data the safe way. A handy Free utility called Kill Disk will safely delete the NTFS partition from your system without requiring too much effort.
    The KillDisk utility efficiently deletes the NTFS partition or the complete data in your Hard Disk with DoD 5220.22-M US government standards. So chances of recovering those deleted data from the NTFS partition is almost negligible!
    KillDisk can be easily operated from a bootable CD/DVD, USB and it Scans NTFS and FAT volumes and displays existing and deleted files and folders.
    Download KillDisk to Delete NTFS Partition

    Labels: , ,

    Sunday, August 16, 2009

    How To Create Videos From Images/Photos For Free

    Wont it be nice to convert our favorite photos into videos? Images / Photos taken using digital Cameras can be well presented by converting them into beautiful videos. Instead of sporadically saving photos in your PC, it adds more value if you could make those photos into wonderful slideshows for free. It would be better if you can combine all the images taken at some important occasion into beautiful looking slideshows.How To Create Videos From Images For Free
    Here comes PhotoFilmStrip that will answer your question on how to create videos from images. The task of creating slideshows from images is not a tedious job at all if you have the right tools with you. The task will be completed in a matter of minutes! with PhotoFilmStrip.
    PhotoFilmStrip will create beutiful slideshows from images in just three steps.

    How To Create Videos (Slideshows)from images with PhotoFilmStrip


  • First Select the photos/ images from which the video or slideshow is to be created.

  • Customize the motion path

  • Render the video

  • PhotoFilmStrip supports Popular Video output formats such as VCD, SVCD, DVD up to FULL-HD.

    PhotoFilmStrip Screen Shot- Create Videos from Images


    Create Videos From Images Free

    Download PhotoFilmStrip

    Labels: , ,

    Thursday, August 6, 2009

    Read Popular Paid Magazines For Free Online - How To

    Why should you spend money for subscribing to Popular Paid Magazines when you can read them completely Free of Cost? If you are interested in reading popular Paid Magazines like PC MAGAZINE, MAXIMUM PC, Forbes Asia, National Geographic, EcoMag, Popular Science, Business Week and a lot of others. Today i came across Magme a website which provides popular paid magazines free of cost for online reading. MagMe is an online service platform that provides a free distribution channel for digital publications.

    Read Popular Paid Magazines Free OnlineWhen you visit magme as a guest i.e. without registering you can flip through the pages of the magazines like you are reading the pages of a book. You can also comment on them. By reading as a guest you also can browse through the Index Pages of the Magazines. By registering you get even more features and it is Free too.

    Read Popular Paid Magazines Free Online
    MagMe is a 100% FREE online publish services provider.
    The Magazines are displayed with excellent quality and is very easy to read them. The reading experience into a dynamic and interactive one.The pages are loaded one by one. You can navigate by the Next and Previous buttons.
    Dont miss this site friend you can bookmark it for later use too.

    Visit Magme

    Friends, Don't forget to comment your Opinions about the same

    Labels: , , ,

    Friday, July 31, 2009

    Enlarge Images Without Losing Quality/Pixelated – 4 Must See Tools

    When we Enlarge images chances are very less that we might get a perfectly enlarged image without any loss of quality. Either the image will be blurred, pixelated or noisy. This is a common problem faced by most of the people while enlarging images. Recently,  I came  across a few softwares and online services that will help to Enlarge pictures without losing any quality/getting pixelated/blurred.


    Enlarge Images without losing quality or getting pixelated and blurred

    1) SmillaEnlarger


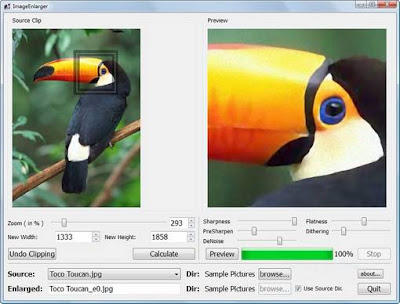
    This small Image Enlarger will help you to enlarge images photos without losing quality or getting pixelated. SmillaEnlarger can also convert a low resolution images to a high resolution images by minimizing the images distortion and by maintaining as much as details as possible. SmillaEnlarger comes with many image adjustment options and a instant preview window to see the real-time preview of the enlarged images. This utility certainly gives dramatically good results.
    SmillaEnlarger - Enlarge Images Without Loosing Quality
    But there is some  thing that i found annoying with this tool. The Lack of a Save Option!. We need to first select the directory containing the images. The program will save the images automatically with a new name. In short this Image Enlarger is a nice application that will help us to easily enlarge the images without making it lose its quality or getting blurred / pixelated.

    Download SmillaEnlarger


    2) VectorMagic


    You may know that vector images are made of lines and curves which also have their respective position and colors used, stored in the images. So what make vector images special is that they can be resized into any size. You can decrease the image size or enlarge it to any size without losing any of its qualities. So, if we can convert the BMP and JPEG (bitmap) images into vector images. Enlarging images without losing quality will not be a problem at all. Thanks to Ray from Raymond since i came to know about vector magic from there.

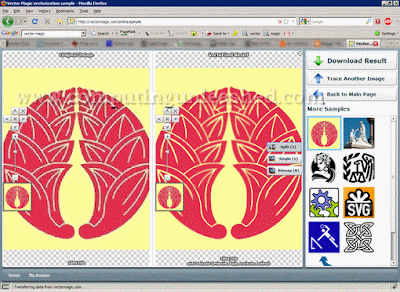
    Vector Magic is actually a website that will help you to enlarge images online. Vector Magic website provides a free online service to convert bitmap images to vector images easily. It makes this possible using its auto-tracer service.
    VectorMagic - Enlarge Images Without Loosing Quality

    How to Use Vector Magic to Enlarge images


    (You need to have adobe flash player installed in your system for this to work)


    1. Browse the Bitmap image to be converted into vector format and click on Upload.

    2. Now Select the quality level of the image and select if the image less than 12 colors or more than that.

    3. Choose the palette needed to convert your image into vector format.

    4. This is it. The final vector image can be downloaded in PNG, SVG or EPS formats.

    You can now enlarge the image to any amount of size as needed without losing any quality or getting pixelated/blurred. Vector Magic produces excellent results and moreover it is free and its the best way to enlarge images free.

    Visit Vector Magic to Enlarge Images


    3) SizeFixer - Enlarge images up to 400%


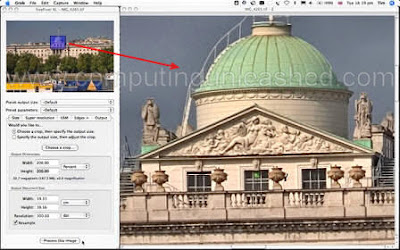
    SizeFixer is a wonderful tool from FixerLabs. Before starting with let me say SizeFixer is not a Free Tool so i didn’t wanted to include this in here, but later i thought of its usefulness to professionals so i included SizeFixer. What makes this tool special is its capability to enlarge images upto 400% of its original size. Thats way ahead of other softwares can do. SizeFixer makes this possible by automatically erasing the dark and faded parts in the image thus giving rise to a high clarity image without losing quality. SizeFixer was first released in 2005 for MAC. Later the windows version came up promising to enlarge images by 33×46 inches without losing any of its quality.
    SizeFixer - Enlarge Images Without Loosing Quality
    The "super-resolution technology" of SizeFixer contributes to the making of such gigantic images. SizeFixer comes in 3 different versions - XL, SLR & Home. SizeFixer Home version can Enlarge images upto a size of 16 Mega Pixels. SizeFixer is a pricier tool but it is worth for professionals. SizeFixer XL, SLR & Home costs $199.95, $269.90 & $59.95 respectively. SizeFixer is not just an ordinary tool because it is used by the government authorities, military and also in NASA. If you want to experience what SizeFixer is actually capable of then i suggest you to go for a free trial first.

    Download Size Fixer


    4) Reshade - Photo Enlargement Without Quality Loss


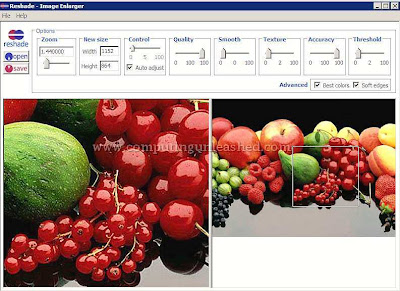
    Reshade eliminates most of the problems faced during photo enlargement process such as pixelation, loss of focus, loss of sharpness, exagerated noise . Reshade also comes with an online service to resize the images. You can make the image smaller or enlarge it. The Desktop Version of Reshade is not free and it costs 149$ to buy and there is a premium online service too which offers similar features of the desktop application.


    I am dealing with the free online service of reshade since it is free and does a decent job. It is adequate for home use. Professionals may require the paid version. You can use the Reshade service with or without an account but the features will vary. It is free to create  free account with reshade and it provides some more features. Signing up for a free Reshade account offers you the ability to enlarge images to a maximum resolution of 1920x1200px with a zoom of 2X.

    Reshade - Enlarge Images Without Loosing Quality
    You will be able to enlarge images to standard monitor resolutions, enhance poor quality images, crop. It supports JPG, BMP, GIF, PNG image formats,  single frames and non-transparent, maximum file size is 10MB, maximum size is 4000x4000 pixels, minimum size is 50x50 pixels. You can either upload the image from your system or from direct link and then you can select the specifications and the enlarged image without much loss of quality will be ready for download with in a few seconds!

    Visit Reshade Free Image Enlarger


    if there are other image enlarging software's, comment it down Friends.

    Labels: , ,

    Saturday, July 25, 2009

    How to Clean dirty, smudged or Scratched CD/DVD Properly

    The DVD or CD put outside the pouch/cover are likely to get dirty, smudged or scratched. Since the disk surface is very sensitive it is also prone to fingerprints. Data Recovery Rate will be very less from a dirty, smudged or Scratched CD/DVD. Even with the help of the best data recovery software's we might not get the required results. But if we clean the CD/DVD properly we may be able to recover the data in the disk to a good extent. So before we use some data Recovery Software’s we must clean the DVD/CD properly first. So here is how to clean a dirty, smudged or scratched DVD/CD. How to Clean dirty, smudged or Scratched CD or DVD ProperlyMost of us clean the Old DVDs or CD just by rubbing it with a soft cloth. This may work some time when the dust can be easily wiped off. But things go bad if the dirt or dust is stubborn. When we wipe the DVD/CD with stubborn dust using a soft cloth it actually damages the DVD or CD more and more. So don’t do it with aged DVDs or CDs.


    How to clean a clean a dirty, smudged or scratched DVD/CD Properly


    The CD/DVD cleaning process must be carried out carefully.


    • First you need to find a container good enough to submerge a DVD/CD completely in it.


    • Now take some liquid soap or glass cleaning solution in the container. Make sure that the soap solution you use is not a very strong one i.e. You must not use solutions that are used to clean metal surfaces etc. Hand washing liquids will do.


    • Take a little of the liquid soap or cleaning solution in the container (15 – 20 ml) .


    • Now pour clean hot water to get a little concentrated soapy solution. The water must be hot in a way that you can drink it. (I said like this because drinking water is the best for this purpose as it will be very clean).


    • Dip the DVD/CD into the solution and leave it aside for 5 minutes. Take out the DVD/CD and rinse it with clean water 3-4 times then after.


    • After rinsing the DVD/CD with clean water properly, Shake Off the excess water and Let the DVD or CD to dry naturally. You may put it under a fan but don’t try to dry it using any other ways.


    You can use the DVD/CD on your system. Now you will have a very good chance of Data Recovery Rate from the disk.


    Note:- If you have very important data in the DVD or CD you may seek professional help. I have no responsibility for any data loss caused.


    Also Check :

    5 Best Tools To Recover Data From Damaged DVD/CD and other Medias


    Labels: ,

    Thursday, July 23, 2009

    Add a Floating Follow Me/US on Twitter Button To Your Website Easily

    Most of the twitter users show their power by the number of followers they have. So its essential to get a good number of twitter followers if you want to become a power twitter user. Many websites out there put a small twitter icon, or a follow me on twitter statement near to their subscription button in their website to get followers. But actually these things go unnoticed for most of the visitors. So creating a floating Follow me/us on Twitter button in your website will surely grab viewers attention. (Each and Every visitor to your site will notice it for sure).

    Add Twitter Follow ME button in WebsiteWhen i was looking for this i came across a website called Go2Web20  which gives the same. But it had many negatives. The most weird thing i found that it is based on JavaScript, so if a visitor with JavaScript disabled on his/her browser  visits the site then its of no use. Secondly it does not work on Internet Explorer (Still most of the people use IE). So i needed an alternative for this.


    I found it easier to implement the same Twitter Follow floating button with the help of CSS. So, Here is a Simple way to


    Add a Floating Twitter Follow Me/US Button to your website


    The advantages of this method are :


    It is compatible with all browsers.


    It doesn’t use JavaScript at all. 


    Add this CSS code to your Website First.


    #twitter-follow { border: 0;position: fixed;  top: 200px; right:0;}

    (Blogger users should add this before ]]></b:skin> in your template)

    In the above code top: 200px; the distance from the top you can adjust it to suit your website.

    Now add the following code to your Website. (For blogger users add the code in your template just after the <body> tag)


    <div id="twitter-follow"> <a href="http://twitter.com/amalroy"><img src="http://img2.pict.com/91/e8/71/1279044/0/twitterfollowme.png" alt="Follow Me on Twitter" /></a> </div>

    Replace my name with yours. Also if you need the image to be shown on left side just replace right:0; in the css code with  left:0;


    Add a Floating Twitter Follow Me or US Button to your website

    You can replace “http://img2.pict.com/91/e8/71/1279044/0/twitterfollowme.png” with your own twitter Follow Me/US image if you want.


    And here is the link for Twitter Follow US button.Add a Floating Twitter Follow Me or US Button to your website
    http://img2.pict.com/ad/29/8b/1279120/0/twitterfollowme.png

    You will now have a Twitter Follow Me button in your website similar to mine.

    If you have any doubts regarding this comment it down.

    Labels: , ,

    Monday, July 13, 2009

    How to Extract Text From Images for Free (OCR) - 2 Easy Ways

    Have you thought about extracting text seen on images?. This idea was lurking in my mind for a long time. Today i searched and found a software for extracting text from images. But the software was not free. It was very costly too. Then after i came across two ways to extract text from images easily for free. Optical Character Recognition is a method of extracting the text see on images and then making it available as a text document for editing.

    Here is How to Extract Text From Images For Free


    1. JOCR is a Freeware developed by EverRex Software that will help you to do this job easily. JOCR will capture the images on your screen and then convert the captured image to editable text document. The use of JOCR really becomes important when we need resurrect the protected files whose text can not be copied. JOCR can extract the text from Web pages, PDF files, error messages too. So JOCR could be used to copy the text on a blocked website easily. It offers many capture modes.

       Extract Text From Images Free With JOCR
      You need to have Microsoft Office 2003 or higher version for JOCR to work. JOCR supports a wide variety of languages.


    2. Download JOCR


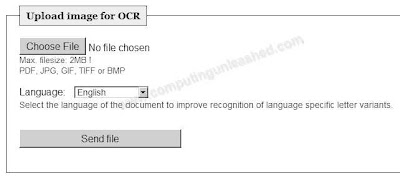
    3. Free-OCR.com is a Free Online Service to Extract Text From Images for Free. This free online OCR service is very simple to use. All you need to do is, just to Upload the image from which the text is to be extracted. Free-OCR.com supports PDF, GIF, JPG, BMP or TIFF file formats.
      Extract Text From Images for Free with Free-OCR.com
      The only restriction is that the images must not be larger than 2MB, no wider or higher than 5000 pixels and there is a limit of 10 image uploads per hour


    Visit Free-OCR.com

    Labels: , ,

    Friday, July 10, 2009

    How to Find Out The Read & Write Speed of USB Flash Drives/Hard Drives Correctly

    Test the Speed of Your USB Flash DrivePortability, accessibility, affordability and portability have contributed to the wide use of USB Flash Drives as a storage medium now. Most of us today own a USB Flash Drives. The storage capacity is not the prime factor for a USB Flash Drives to consider it to be good. There are many other factors such as durability, price and Performance that comes into account. Among this three the Performance comes first because performance is related with time eg. if we choose two USB Flash Drives a 4 GB and 16 GB. The 16 GB Flash Drive will be always behind the 4 GB Flash Drive when it comes to performance in most cases. So our job gets done quickly with the 4 GB Flash Drive. Here i will tell how to Test/Find out the Read and Write Speed of any USB Flash Drive easily and accurately.

    Most of the people analyze the potential of a USB Flash Drive just by seeing its design and price. But this is wrong as some Flash Drives will be really slow. So we must be able to choose the correct USB Flash Drive which performs really well and give good bang for the buck.

    How to Test/Find out the Read and Write Speed of any USB Flash Drive/Hard Drives


    USBDeview is a nice software that will help to Test/find out the Speed of your USB Flash Drives. USBDeview was meant for finding out which all USB drives are used on a computer. The speed testing feature comes with it.

    The software comes with a very simple interface and is easy to use for beginners too. When you run the software it will list all the USB devices connected to your computer.
    To Test/Find out the Read and Write Speed of any USB Flash Drive just right click on the required flash drive from the shown list and select Speed Test.

    How USBDeview to Test/Check the Read and Write Speed of USB Flash Drive/Hard Drives
    Find Out The Read & Write Speed of USB Flash Drives,Hard Drives Correctly
    USBDeview checks the read/ write speed of the USB drives by sequential read and write operations because the drive shows the maximum speed when copying a single file than copying multiple files of same size. For eg. Copying a 2 GB single file is much faster than copying a lot of files with all together make 2 GB and generlly this is the case with almost all storage devices.

    After the speed of your USB device is recorded by USBDeview an option will be displayed called "Publish Test Result ". Clicking this will submit your Read/Write Speed of your USB device with their records which have information submitted by various users of USBDeview. So you can easily compare your device with other USB devices too. USBDeview is free, portable and small in size about (59.13 kb).

    Download USBDeview

    Labels: , , ,

    Wednesday, July 8, 2009

    How To Convert DVDs to iPhone/ iPod Touch Format Easily

    Hot to Convert or RIP DVDs to iPhone or iPod Touch Format

    Before the arrival of smart Phones we used to keep our favorite movies in DVD’s and in our computer. With the arrival of Smart Phones and gigantic storage spaces we started carrying movies and videos gradually. The arrival of iPhone in the mobile phone world was a great buzz and the iPhone was sold at a record breaking rate. iPhone/ iPod Touch has a decent storage space for carrying a few of our favorite movies. But the problem is that how to make the big movie we see in our computer suitable for the iPhone/ iPod Touch to play? We can easily purchase our favorite movies from the Apple iTunes Store suitable to play on iPhone/ iPod Touch. If we already own the movie’s DVD why there is a need to waste money purchasing it again?


    We can easily convert the movie to a video file and save in our PC and then transfer it to our iPhone/ iPod Touch.


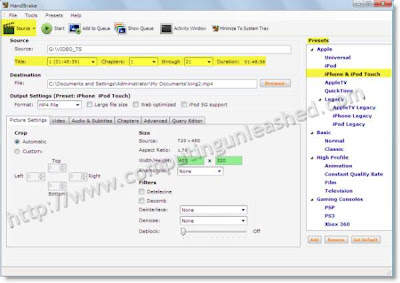
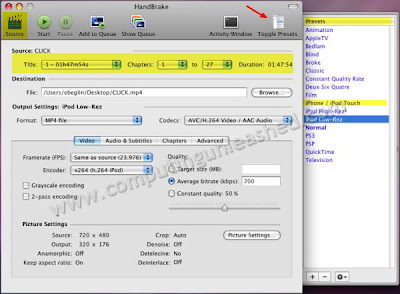
    There is a free ware software called HandBrake that will help you to convert DVD to iPhone/iPod Touch format easily. What makes HandBrake  special is that it is available for both Windows and Mac.


    So,


    Here is How To Convert DVD’s to iPhone/iPod Touch format using HandBrake


    1. Download the HandBrake software from http://handbrake.fr/?article=download and install HandBrake on your computer.


    2. After installing HandBrake insert the DVD with the movie to your DVD drive. Then in the main windows of HandBrake, under destination click browse and locate your DVD drive.


    3. Now HandBrake and allows you to pick the title and chapters you want to rip for your iPhone/iPod Touch.
    4.  Convert DVDs to iPhone or iPod Touch Format Easily using handbrake

    5. Click on the “Presets” and from the given list of presets displayed, select iPhone and iPod Touch preset.


    6. Click on Start in the HandBrake main window. Now HandBrake will start converting your DVD to a playable format in your iPhone/iPod Touch. (This may take some time).
    7.  Convert DVDs to iPhone or iPod Touch Format Easily with  handbrake in MAC
    8. Now after converting the movie DVD you will see a video file given by HandBrake. Now just copy it to your iPhone/iPod touch and enjoy your favorite movie on your iPhone/iPod touch. Alternatively you can move the file to iTunes and then synchronize it with your iPhone/iPod touch.


    Labels: , , ,

    Friday, July 3, 2009

    How to Search in Google and Bing at Same Time (together)

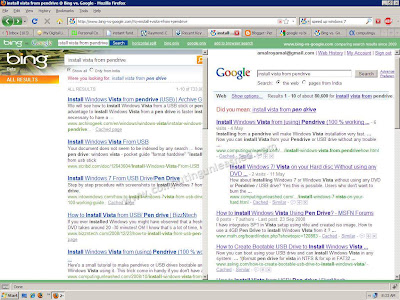
    Search in Google and Bing Together (at same time)The Growth of Microsoft's Bing Search Engine was blazing fast. Bing was able to impress the first time users very much with its loads of features. Bing too now holds a very good ranking as a search engine provider. The results given by bing and google search are different. So we might be satisfied by the results given by bing and some times those given by google for searching different topics. When we need to search for a particular keyword in both the search engines, its time consuming we need to open google in one tab and bing in another and enter the search terms individually. Not any more. Here is some thing for the Google and Bing lovers. You can Simultaneously search in Google Search and Bing at the same time.

    There are three ways to Search in Google and Bing at the same time.
    How to Search in Google and Bing at Same Time (together)
    First Method

    This is the very simple method.
    Go to http://www.bing-vs-google.com/ and enter your search keyword thats all. Very simple.
    You will get the Google's and Bing's search results side by side.
    If you use this service frequently then its better to bookmark the site http://www.bing-vs-google.com/. So it will be easier to take the webpage.

    Second Method

    In order to try this method you need to have Mozilla Firefox browser installed first.
    Download Firefox from here if you don't have it.
    Now download the Bing & Google Addon for Firefox.
    Install the Bing & Google Addon on Firefox and restart.
    The Addon can be seen Top Right Corner of Firefox Window.

    Third Method
    If you dont like to download the Addon for Firefox. Just visit http://www.bing-vs-google.com/ and right next to the search box in the site you will see the option " add to browser search " just click it the Bing & Google search will be added to the Firefox Search box automatically.


    Waiting to see your suggestions about it.

    Labels: ,

    Wednesday, July 1, 2009

    How to Browse as Google Bot / Switch User Agent to Google Bot to Access Blocked Forums, Websites etc

    Switch User Agent to Google bot or Browse as Google Bot to Access Blocked Forums Websites etcMost of the websites allows the google bot to access their forums, content etc. Some websites prompt us to register in their forum in order to view a certain post or content. This becomes trouble some. These websites or forums will allow google bot to access their content (to get them indexed in google). So if we can browse as Google bot and visit those forums we could easily access the blocked content or bypass the register screens easily.
    According to Wikipedia
    Googlebot is the search bot software used by Google, which collects documents from the web to build a searchable index for the Google search engine.

    We can easily browse as Google bot by changing the user agent to Google bot. Here are two Firefox Addons that can help us to easily switch the user agent to Google bot or other.

    1) Configuration Mania


    Configuaration Mania is a great addon for Firefox that will help you to change the user agent to IE, Opera, Safari, iPhone etc on the fly.

    Configuration Mania Firefox Addon will help you to browse as Google bot or Switch User Agent to Google Bot to Access Blocked Forums Websites etc
    After installing Configuration Mania Addon for firefox just go to the Tools > Configuration Mania and on the browser tab select the user agent you want.

    Download Configuration Mania


    2) User Agent Switcher


    User Agent Switcher is another similar extention for firefox that will help to change the user agent quickly. User Agent Switcher extention will automatically add a menubar and a toolbar to Firefox for changing the user agent.

    User Agent Switcher Firefox Addon will help you to browse as Google bot or Switch User Agent to Google Bot to Access Blocked Forums Websites etc

    Download User Agent Switcher

    Labels: ,