Wednesday, October 21, 2009

Transform Ubuntu To Windows 7 - Download Transformation Pack

It's nice to see some thing vivid. Transformation packs are one such things that do this. A lot of Transformation packs are floating in the web which gives you the flavor of the operating system you want. But most of them are just for windows users. So what if the other users too want to try them. Here is a nice windows 7 transformation pack for linux that will transform ubuntu to windows 7 easily. Many users prefer linux for obvious reasons, but when it comes to beauty they cant neglect the aero glass and other effects that windows 7 has. So this windows 7 transformation pack for linux will help you to get some of the windows 7 looks to your ubuntu operating system.

Windows 7 Transformation Pack for Linux comes with the Following.
1) Windows 7 GDM theme
2) Windows 7 Icons Theme
3) Windows 7 GTK Theme
4) Windows 7 Wallpapers
5) Windows 7 Sounds
6) Gnomenu Theme
7) Windows 7 Panel Backgrounds
8) Windows 7 Cursor theme
9) DockBar

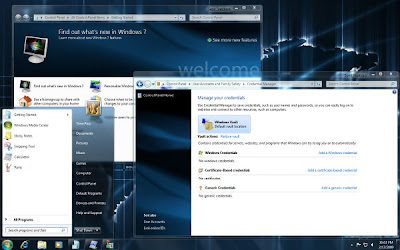
Windows 7 Transformation Pack in Ubuntu Screen Shots


Transform ubuntu (Linux) to windows 7 with Windows 7 Transformation Pack For Ubuntu

Transform Ubuntu To Windows 7 - Download Windows 7 Transformation Pack For Ubuntu

If you want complete step by step guide on transforming ubuntu to windows 7 then see the author's website here.

Download Windows 7 Transformation Pack For Ubuntu


[via Redmondpie]

Labels: , ,

Wednesday, October 7, 2009

Get/Pin Show Desktop Option in Windows 7 Taskbar

The Windows 7 Taskbar is certainly one of the most striking feature to be seen on Windows 7. It has got a lot more features than any other taskbar we have seen. Live Thumbnail Preview, Aero Peek, Jumplists etc are some of the feature that the Windows 7 Taskbar or the Superbar has. There is no need of explanation what the "Show Desktop" Option does in windows. It has got that magical ability to minimize all the opened windows and take us directly to the desktop. But with windows 7 the show desktop option disappeared from the taskbar and it was moved to the extreme right of the desktop which was called the Aero Peek Feature (of course it was Show Desktop for non aero). Since windows users have got used to the show desktop icon in the taskbar, here is a way to get/pin the Show Desktop Icon in the Windows 7 Taskbar Easily.

Show Desktop is a Free Tool that will help you to get the Show Desktop icon on the Windows 7 Taskbar.

Pin Show Desktop Option in Windows 7 Taskbar

You can use this tool on other windows versions too although it was made for windows 7. After installing the utility just drag the Show Desktop Option to the Windows 7 Taskbar.[via jkwebtalks ]

Download Show Desktop


Also Read : Get the AERO Peek Effect of Windows 7 in Vista and Xp

Get the AERO Snap Feature of Windows 7 in Vista and Xp

Labels: ,

Saturday, September 5, 2009

Post to Twitter through Desktop Application / Update Twitter Status From Desktop

There are many twitter desktop applications available on the net that will help to post to twitter directly from your desktop. Usually we post to twitter / Update twitter status from the Twitter website. It is very easy to post to twitter when we are browsing. But when no browsers are opened up and we need to update our twitter status quickly, then it becomes a pain. So here is a desktop application for twitter that will help you to post to twitter/ update your twitter status right from your desktop.

Almost all the twitter clients for desktop have similar features. Twhirl is one of the best twitter client around.
Twhirl stands out from most of the twitter clients for desktop, because it supports both Windows and Mac OS X operating systems. So almost all internet users can use Twhirl. This is because Twhirl uses the Adobe AIR platform.
With this wonderful twitter client, desktop tweeting will be very easy and you need not open any web browser to update your twitter status or for posting your updates to twitter.

Some of the Features of Twhirl - Twitter Desktop Application


  • Twhirl can connect you with multiple Twitter accounts and also supports laconi.ca, Friendfeed and Seesmic accounts.

  • You dont need to bother any more shortening big urls for twitter. Twhirl can Shorten long URLs (using digg.com, bit.ly, snurl, twurl or is.gd)

  • You will be notified when new messages arrive.

  • You can also post to various other socail networking sites aprt from twitter, like Jaiku, Facebook, MySpace, LinkedIn and more via Ping.fm

  • Post images to TwitPic

  • Search tweets using Twitter Search and TweetScan, and follow topics in near-real time with saved searches

  • automatically find tweets mentioning your @username


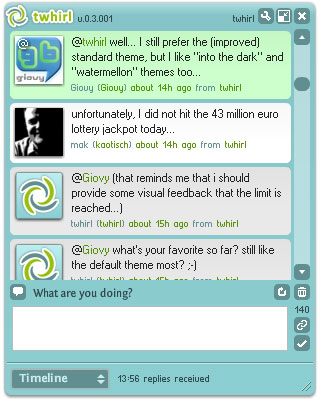
Screen Shot of Twhirl - Twitter Desktop Application
Post to Twitter through Desktop Application / Update Twitter Status From Desktop
There are many other features too.
When you hover the mouse cursor over your twitter friends avatar, options will be displayed like Retweet, direct messages, favorite , replies.

Download Twhirl

Labels: , , , ,

Tuesday, September 1, 2009

How To Wake And Shutdown Your PC At Specified Time Intervals (Automatically)

There are many software's available for the purpose of shutting down your PC at a specified time. Today i was looking for a tool that could wake your pc at a specific time and shutdown. I usually start the downloads at 2:00 am in the morning and ends it at 8:00 am since at these time i downloads are free for my internet connection. So waking up at 2:00 am just for this purpose is a tough thing as it disturbs my sleep. So i was looking for a way to make wake my pc at 2:00am and shutdown it at 8:00am i found DShutdown.

DShutdown is an excellent tool that will help you to shutdown your pc at a specified time as well as wake it. DShutdown can also be used for waking and shutting down remote PCs at specified time, with a variety of options.
DShutdown is not just an ordinary wake up and shutdown tool it has a plethora of features.
DShutdown supports more than just standard shutdown options, there are options relating to "pure" shutdown (such as the "force after wait" option which causes a forced, but 'clear' shutdown).

How To Wake And Shutdown Your PC At Specified Time Intervals (Automatically)
DShutdown includes options to shutdown your PC when a particular application gets closed, intercept a shutdown request, initiated by the user or an application, and to then execute the shutdown request with selected options from DShutdown (This is very helpful to shutdown all the connected PC's in LAN when the server shutsdown).

There are also options to shutdown a PC when the Internet traffic reduces below a particular data-rate (useful to shutdown a PC when it has finished a large download).

How To Wake And Shutdown Your PC At Specified Time Intervals (Automatically)
There is a RDShutdown tool included with the package which will help you to shutdown remote PC's very easily. The RDShutdown tool should be installed in the Remote System.

DShutdown doesn’t force a power-off without logging off and saving settings.
DShutdown doesn't needs to be installed in your computer, it is portable and you can carry on a flash drive and run it directly on any PC and its Free. DShutdown works with Windows 9x/NT/2000/XP/2003 and Windows Vista systems.

Download DShutdown

Labels: , ,

Sunday, August 16, 2009

How To Create Videos From Images/Photos For Free

Wont it be nice to convert our favorite photos into videos? Images / Photos taken using digital Cameras can be well presented by converting them into beautiful videos. Instead of sporadically saving photos in your PC, it adds more value if you could make those photos into wonderful slideshows for free. It would be better if you can combine all the images taken at some important occasion into beautiful looking slideshows.How To Create Videos From Images For Free
Here comes PhotoFilmStrip that will answer your question on how to create videos from images. The task of creating slideshows from images is not a tedious job at all if you have the right tools with you. The task will be completed in a matter of minutes! with PhotoFilmStrip.
PhotoFilmStrip will create beutiful slideshows from images in just three steps.

How To Create Videos (Slideshows)from images with PhotoFilmStrip


  • First Select the photos/ images from which the video or slideshow is to be created.

  • Customize the motion path

  • Render the video

  • PhotoFilmStrip supports Popular Video output formats such as VCD, SVCD, DVD up to FULL-HD.

    PhotoFilmStrip Screen Shot- Create Videos from Images


    Create Videos From Images Free

    Download PhotoFilmStrip

    Labels: , ,

    Friday, July 31, 2009

    Enlarge Images Without Losing Quality/Pixelated – 4 Must See Tools

    When we Enlarge images chances are very less that we might get a perfectly enlarged image without any loss of quality. Either the image will be blurred, pixelated or noisy. This is a common problem faced by most of the people while enlarging images. Recently,  I came  across a few softwares and online services that will help to Enlarge pictures without losing any quality/getting pixelated/blurred.


    Enlarge Images without losing quality or getting pixelated and blurred

    1) SmillaEnlarger


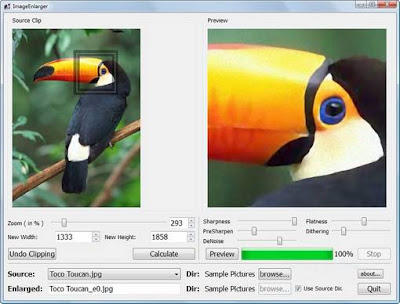
    This small Image Enlarger will help you to enlarge images photos without losing quality or getting pixelated. SmillaEnlarger can also convert a low resolution images to a high resolution images by minimizing the images distortion and by maintaining as much as details as possible. SmillaEnlarger comes with many image adjustment options and a instant preview window to see the real-time preview of the enlarged images. This utility certainly gives dramatically good results.
    SmillaEnlarger - Enlarge Images Without Loosing Quality
    But there is some  thing that i found annoying with this tool. The Lack of a Save Option!. We need to first select the directory containing the images. The program will save the images automatically with a new name. In short this Image Enlarger is a nice application that will help us to easily enlarge the images without making it lose its quality or getting blurred / pixelated.

    Download SmillaEnlarger


    2) VectorMagic


    You may know that vector images are made of lines and curves which also have their respective position and colors used, stored in the images. So what make vector images special is that they can be resized into any size. You can decrease the image size or enlarge it to any size without losing any of its qualities. So, if we can convert the BMP and JPEG (bitmap) images into vector images. Enlarging images without losing quality will not be a problem at all. Thanks to Ray from Raymond since i came to know about vector magic from there.

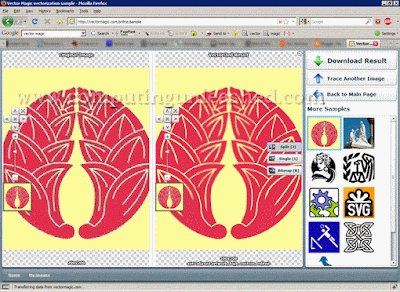
    Vector Magic is actually a website that will help you to enlarge images online. Vector Magic website provides a free online service to convert bitmap images to vector images easily. It makes this possible using its auto-tracer service.
    VectorMagic - Enlarge Images Without Loosing Quality

    How to Use Vector Magic to Enlarge images


    (You need to have adobe flash player installed in your system for this to work)


    1. Browse the Bitmap image to be converted into vector format and click on Upload.

    2. Now Select the quality level of the image and select if the image less than 12 colors or more than that.

    3. Choose the palette needed to convert your image into vector format.

    4. This is it. The final vector image can be downloaded in PNG, SVG or EPS formats.

    You can now enlarge the image to any amount of size as needed without losing any quality or getting pixelated/blurred. Vector Magic produces excellent results and moreover it is free and its the best way to enlarge images free.

    Visit Vector Magic to Enlarge Images


    3) SizeFixer - Enlarge images up to 400%


    SizeFixer is a wonderful tool from FixerLabs. Before starting with let me say SizeFixer is not a Free Tool so i didn’t wanted to include this in here, but later i thought of its usefulness to professionals so i included SizeFixer. What makes this tool special is its capability to enlarge images upto 400% of its original size. Thats way ahead of other softwares can do. SizeFixer makes this possible by automatically erasing the dark and faded parts in the image thus giving rise to a high clarity image without losing quality. SizeFixer was first released in 2005 for MAC. Later the windows version came up promising to enlarge images by 33×46 inches without losing any of its quality.
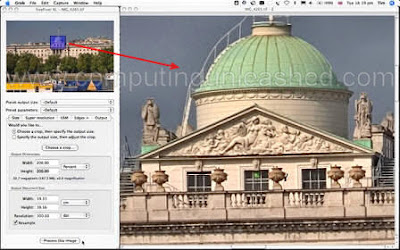
    SizeFixer - Enlarge Images Without Loosing Quality
    The "super-resolution technology" of SizeFixer contributes to the making of such gigantic images. SizeFixer comes in 3 different versions - XL, SLR & Home. SizeFixer Home version can Enlarge images upto a size of 16 Mega Pixels. SizeFixer is a pricier tool but it is worth for professionals. SizeFixer XL, SLR & Home costs $199.95, $269.90 & $59.95 respectively. SizeFixer is not just an ordinary tool because it is used by the government authorities, military and also in NASA. If you want to experience what SizeFixer is actually capable of then i suggest you to go for a free trial first.

    Download Size Fixer


    4) Reshade - Photo Enlargement Without Quality Loss


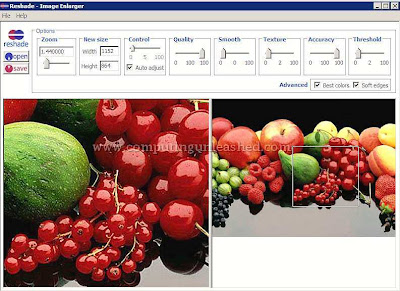
    Reshade eliminates most of the problems faced during photo enlargement process such as pixelation, loss of focus, loss of sharpness, exagerated noise . Reshade also comes with an online service to resize the images. You can make the image smaller or enlarge it. The Desktop Version of Reshade is not free and it costs 149$ to buy and there is a premium online service too which offers similar features of the desktop application.


    I am dealing with the free online service of reshade since it is free and does a decent job. It is adequate for home use. Professionals may require the paid version. You can use the Reshade service with or without an account but the features will vary. It is free to create  free account with reshade and it provides some more features. Signing up for a free Reshade account offers you the ability to enlarge images to a maximum resolution of 1920x1200px with a zoom of 2X.

    Reshade - Enlarge Images Without Loosing Quality
    You will be able to enlarge images to standard monitor resolutions, enhance poor quality images, crop. It supports JPG, BMP, GIF, PNG image formats,  single frames and non-transparent, maximum file size is 10MB, maximum size is 4000x4000 pixels, minimum size is 50x50 pixels. You can either upload the image from your system or from direct link and then you can select the specifications and the enlarged image without much loss of quality will be ready for download with in a few seconds!

    Visit Reshade Free Image Enlarger


    if there are other image enlarging software's, comment it down Friends.

    Labels: , ,

    Thursday, July 16, 2009

    Automatically Identify Correct Program to Open Any File Formats with OpenWith.org

    I am sure that many of us had come across a situation in which we would be in a dilemma to use which program to open an unknown file format (extention). We usually search in the internet for the correct program to open that unknown file format (extension). Forget those painful days when the new OpenWith.org Desktop Tool is available. OpenWith.org Desktop Tool makes it easier to find the correct program to open unknown file formats (extension).


    Once the installation of OpenWith.org Desktop Tool desktop is completed the users can use it directly.  When you right click on an unknown file format (extension) an option will be automatically displayed in the right click menu as “OpenWith.org – How do I Open This?”. When  you click on that option, OpenWith.org Desktop Tool will search on your system for any suitable program to open the file (extension) if the required program is not installed in your system then OpenWith.org Desktop Tool will search the internet automatically and provide you with the download link of the suitable program to open that unknown file (extension).


    Automatically Identify Correct Program to Open Any Type of File Formats with OpenWith.org

    OpenWith.org Desktop Tool works with Windows 98, ME, 2000, XP and Vista.


    Download OpenWith.org Desktop Tool


    Labels: , ,

    Wednesday, June 24, 2009

    Control Your PC Actions with Mouse Gestures - StrokeIt is Back!

    Control Your PC Actions with Mouse Gestures - StrokeIt is Back!There might be many mouse gesture applications around in the web but there is nothing that could pose a strong rival to StrokeIt. This great mouse gesture application popped into the wild almost 8 years ago. But after February 2005 it seemed like the programs development staunched. Now Stroke it is again back in action! the program developer came up with the news that StrokeIt version 0.9.6 will run in all windows versions starting from Windows 95 to the newest Windows 7.

    The developer had added a new portable feature too. So taking the program along with us on the go wont be a problem. This is what the developer says about StrokeIt.
    StrokeIt is an advanced mouse gesture recognition engine and command processor. What is a mouse gesture? Mouse gestures are simple symbols that you "draw" on your screen using your mouse. When you perform a mouse gesture that StrokeIt can recognize, it will perform the "action" associated with that gesture. In short, it's a nifty little program that lets you easily control programs by drawing symbols with your mouse.

    StrokeIt can currently recognize more than 80 unique mouse gestures and can be easily trained to recognize many more. For each gesture recognized, StrokeIt can execute a user-defined set of commands within the active application. StrokeIt commands are defined within plugin libraries that can be easily created by third parties to do nearly anything.

    Control Your PC Actions with Mouse Gestures - StrokeIt is Back!

    The program supports Safari and Google Chrome too. StrokeIt can currently recognize over 80 programs. And with all these superb features available the program is absolutely Free for personal use.

    Download StrokeIt

    Labels: ,

    Monday, June 8, 2009

    Automatically Rotate Windows 7 Logon Screens - Enjoy Different Logon Screens at each Windows 7 Login

    Get Different Logon Screens at Each Windows 7 LoginHere comes a great utility for all windows 7 lovers. Windows 7 has the new support for changing the logon screens without the need of any external softwares. So if you need a change in logon screen you need to manually apply a new image to be displayed at the logon time. Forget about that.!

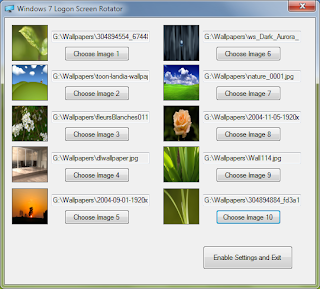
    Windows 7 Logon Screen Rotator is a nice utility that will help you to display upto 10 random logon screen images at logon. luke_smily_face from Neowin.com created this nice utility. You can choose your favorite 10 images and Windows 7 logon rotator displays them randomly during login.
    Enjoy Different Login Screens at each Windwos 7 Login

    After selecting your favorite images at logon jusr click on "Enable Settings and Exit". Then a windows will popup asking you which logon screen to be displayed during the first login. Enter the number corresponding to your favorite image and Press "OK".

    During each time from now on different logon screen's will be displayed with your favorite images.

    If you dont want this feature and need to remove it, then just run "Remove files and settings.exe", which comes along with Windows 7 Logon Screen Rotator pack.
    Your Default logon screen will be restored.

    Download Windows 7 Logon Screen Rotator

    Labels: , ,

    Saturday, May 30, 2009

    Download Leopard Transformation Pack 2 to Transform Vista To Mac OS X

    Download Leopard Transformation Pack 2 to Transform Vista To Mac OS XMac Operation system has very appealing user interface. How about getting Mac OS X interface in Windows Vista? Leopard Transformation Pack 2 will transform Windows Vista To Mac OS X Interface. Leopard Transformation Pack 2 can give the look and feel of Mac OS X interface in Windows Vista.


    Before You install the Leopard Transformation Pack 2 for Windows Vista you need to have the uxtheme.dll file to be patched and for an added safety create a system restore point too (will be handy if any thing goes wrong). Install the Leopard Transformation Pack 2 in the Safe Mode with Administrator rights for a successful installation.


    Screenshot of Leopard Transformation Pack 2 Installed in Widows Vista


    Download Leopard Transformation Pack 2 to Transform Vista To Mac OS X

    Before Transforming Windows Vista to Mac OS X Leopard Read this too


    You must read these important instructions given by the author before installing the Leopard Transformation Pack 2 for Windows Vista.
    Currently the Leopard Transformation Pack 2 is only available for Windows Vista (32 bit) with SP1 installed. If you haven’t installed Windows Vista (32 bit)  SP1 then install the Leopard Transformation Pack 2 only after upgrading to windows vista sp1.


    Download Leopard Transformation Pack 2 for Windows Vista (32-bit)SP1

    Labels: ,

    Saturday, May 23, 2009

    How to Copy/Paste Commands/Texts in Command Prompt in Windows

    Here i will explain how to copy/paste the commands or text inside the command prompt in windows.


    You might have used the Windows Command Prompt utility in Windows at least for some reason. It is really annoying to type all such long commands. If any where goes wrong we need to type that command from the beginning. I have been using command prompt for long time and was like this. You might search for some pc solution in the internet and might go to some sites and you find some commands which needs to be typed in the command prompt window and executed to solve that problem. This is really a tiring task especially when you don't have time to type all those commands one by one. How about copying those commands directly from a windows or browser where ever it be and pasting it directly on the command prompt window and vice-versa?


    It is very easy to copy and paste the commands inside the command prompt window to/from the windows clipboard.


    • Copy/Paste Single line Commands : Single line commands can be easily copied/pasted using the mouse itself. To do this right click inside the command prompt window and select the “Mark” command. You can select the area you need to copy by dragging the cursor from beginning or from the end , and press [Ctrl]+[C] to copy the command to the windows clipboard. Now you can paste that command any where as you do with normal text.


    • How to copy/Paste Commands in Command Prompt in Windows

    • Copy/ Paste Long Commands (Longer Lists) : It is more wise to use the clip.exe program in order to copy long lists of commands in the command prompt. Clip.exe program is only available in Windows Vista and Windows 7. It is directly integrated and runs from the Command Prompt Windows. You can easily link the clip.exe program with the help of the ‘|’ (pipe symbol) with the required command from the command line window. The pipe symbol can be accessed by pressing ‘[Shift]+[\]’. For example, typing the command ‘dir | clip’ and pressing enter will copy a directory having or the given folder to windows clipboard. 


    • Copy the Entire Contents of a File Using Command Prompt : You can even transfer the contents of a text file ‘project.txt’ directly into the  windows clip board by giving the command ‘type project.txt | clip’. You can also the ‘<’ (Less than) sign for this same task. Typing the command ‘Clip<project.txt’ will copy the entire contents of the ‘project.txt’ file to the windows clipboard. 


    • Pasting Commands to Command Prompt : After you have copied the required command to the windows clipboard you can paste the command directly to the command prompt window. Just right click inside the Command Prompt Window and select “Paste” from the context menu that appears.


      Playing with long commands in Windows Command Prompt Program will not be a problem for you from now on.

    Labels: , ,

    Friday, May 15, 2009

    Get Free Genuine license of Techsmith Camtasia 3 for Free

    Get Free Genuine license of Techsmith Camtasia 3 for Free

    Many of the internet users know about Techsmith Camtasia software. TechSmith Camtasia Studio is a great software that can record screen activity as videos, edit and narrate the
    clips, and publish the finished presentation in standard video formats. Techsmith Camtasia can be used to Develop videos that introduce new software, train new users of existing software, or create any kind of active documentation.Distribute the videos as standard AVI files or as streaming presentations from a website..You can edit those videos and share them. The Full version price of Techsmith Camtasia 3 is about 200$. You can get this pricey full version of Techsmith Camtasia 3 absolutely free.

    Techsmith Camtasia features :


    1. Record any screen or desktop activity and save them as videos.

    2. You have the option to set Shortcut keys to start and stop recording, thus making your job easier.

    3. Add beautiful Video effects to the captured videos like special effects for cursor movement , mouse clicks,add water marks and more!

    4. You can add cursor sounds, keyboard sounds etc in Techsmith Camtasia 3.

    5. The recorded videos could be saved as flash,wmv and many other popular video formats.

    6. With Techsmith Camtasia's Live Video Output feature, you can even use Techsmith Camtasia 3 as a live source with streaming media encoders, video conferencing, and web cam applications.

    Get Free Genuine license of Techsmith Camtasia 3 for Free
    Techsmith Camtasia 3 contains all the needed tools that you need to record and produce videos.

    To Get the Free full version serial of Techsmith Camtasia 3


    Download Techsmith Camtasia 3. You can skip this step if you already have the Techsmith Camtasia 3 setup in your computer.

    Now Visit the promotional page of Techsmith Camtasia 3

    Sign up there by giving the necessary details and give the email id. 

    The Free full version serial key of Techsmith Camtasia 3 will be send to your mail box.

    You can get a fully licensed version of Techsmith Camtasia 3 for Free.

    You can also avail the updates Techsmith Camtasia 3 software in the future because this serial key for Techsmith Camtasia 3 is absolutely genuine.

    Labels: ,

    Monday, March 23, 2009

    Get MAC like Focus border in Windows Explorer for XP

    In MAC when we are using any of the edit boxes, buttons etc. and blue border will be shown around the border of the box. This will help us to keep us focused in our work. So, we can concentrate more. This is really a unique feature present only in MAC Operating Systems.At times our attention will go away from what we are working on in Windows XP. This utility wil help us to stay focused. So here is how to get this cool and unique feature in Windows Xp too.

    All you need to have is Focusin . A small freeware utility that will bring this cool feature of MAC in Windows XP Operating Systems.

    Get MAC like Focus border in Windows Explorer for XP

    Just run the utility and it will sit to the Windows taskbar silently and will provide the focus borders in Windows Explorer.

    Right clicking the utility on the Taskbar will show the " Preferences " option. You make Focusinstart with Windows from here.

    The theme of the Utility is designed for Leaprod XP Visual Style. So it will be more blended if you are using the Leapord XP Visual Style in Windows XP. Just google for " Leapord XP visual style " and you will get that too.

    Download Focusin for XP

    Labels: , ,

    Thursday, March 19, 2009

    Change Windows 7 Logon Screen without using any software or hacks

    It has been found by rafael from withinwindows that Windows 7 will now officially support to change the logon screen background without using any software or hacks. So we can use our favorite picture as the background in the logon screen of Windows 7. Before we used many softwares like Tune Up Utilities, Logon Studio etc. to change the logon screen in previous Windows version.
    Here are the steps to change the logon screen in Windows 7..........


    First download this regisrty file (EnableCustomLogonFeature) from here.

    Now extract it and run the file to merge the entry to Windows Registry. This is done to enable the custom logon feature in Windows 7.

    Now navigate to C:\Windows\System32\oobe (Assuming that Windows 7 is installed in C drive).

    Now create a New Folder here and name it as Info. And again create another one inside this info folder and name it as backgrounds.

    Now just Reboot your system to Enjoy new logon screens in Windows 7.

    The following are the files (sorted by width-to-height ratio) supported in C:\Windows\System32\oobe\Info\Backgrounds folder:

    * backgroundDefault.jpg
    * background768×1280.jpg (0.6)
    * background900×1440.jpg (0.625)
    * background960×1280.jpg (0.75)
    * background1024×1280.jpg (0.8)
    * background1280×1024.jpg (1.25)
    * background1024×768.jpg (1.33-)
    * background1280×960.jpg (1.33-)
    * background1600×1200.jpg (1.33-)
    * background1440×900.jpg (1.6)
    * background1920×1200.jpg (1.6)
    * background1280×768.jpg (1.66-)
    * background1360×768.jpg (1.770833-)


    When using custom images make sure that the image is less than 256kb in size.

    Enjoy using your favorite image as the logon background from now.

    Labels: ,

    Tuesday, March 3, 2009

    Disable the Cut, Copy, Paste and Delete Operations in Windows 7, Vista, XP

    Disable the Cut, Copy, Paste and Delete Operations in WindowsYou might have faced a situation where you need to leave your computer in front of some body, your friends or relatives. You have some private data in your pc and you don't want any body to do any thing with that. That is just one case. You might be also in trouble if some body delete important files in your system. You might think if there was any option to disable or remove the cut, copy, paste and delete functions in windows. Then wait here is a way to disable the Cut, Copy, Paste and Delete functions.

    Here is a small standalone (run without install) application that will simply deactivate or disable the cut, copy,paste and delete functions in windows.

    All you have to do is to run this application and you will get the required options disabled.

    When you want the Cut, Copy, Paste and Delete options again in windows you just need to press Ctrl + Shift + Esc and the Task Manager will open up. And just stop the process named stopper.exe in it by right clicking it and selecting End Process.

    But if some experienced users come they will easily get the options you disabled back just by doing the above step.

    So you can rename the file to some thing similar to system process like winlogon.exe or system.exe etc.. so no body can easily find it out.

    you can make this application to start along with windows. To do it just create a shortcut of this program and paste it in the start up folder of windows.

    You might ask " Can't the user copy cut and paste by using the windows shortcuts"?. The answer is no. This program will also disable the windows shortcuts too! and yes one more it will work with all the windows versions.

    You can now leave you pc to your friends or anybody you like without fear.

    Download the utility from here

    Labels: , ,

    Saturday, February 21, 2009

    Add / Remove any item (link) from the Send To options in right click menu / Speed up the Send to menu in Windows

    The Send To options in the right click menu in Windows enables to work in windows Faster. After a long time the send to menu gets cluttered and it will take more time than usual for the items under send to options to appear. So here is a way to speed up or create a send to options which is clutter free.....

    The steps are simple.
    Just go to RUN from start button or press [WIN] + [R].
    Now type sendto and press [Enter].
    A window showing the list of items which under the send to menu in Windows will open up.
    You can add any new link or delete the unwanted items from the send to menu.

    Labels: , ,

    Wednesday, February 18, 2009

    Download All new OneWorld Theme For Windows 7 now!!!

    WinVistaClub has released a new and refreshing cool theme for Windows 7 today called the OneWorld Theme For Windows 7. This theme pack contains awesome nice and cool wall papers for Windows 7. This theme will change the Welcome center and task pane in Windows 7 too. This theme has been tested successfully on Windows 7 Beta 32-bit Build......

    OneWorld Theme For Windows 7


    How to install the OneWorld Theme For Windows 7:

    • Extract the contents of the downloaded zip file.
    • To apply the theme double-click “OneWorld.themepack” file.
    • If you need to customize the welcome center > open %systemroot%\Windows\System32 folder and take ownership of the Oobefldr.dll and take a backup of it and keep it safe. Now copy the Oobefldr.dll file contained with the theme pack to this place and replace the file. That's it now you also have an all new refreshing welcome center in Windows 7.
    • Doing the same accordingly will help to change the taskpane in Windows 7 too.

    This theme give the feeling that we are all in the same universe.

    Download OneWorld Theme For Windows 7


    Comment on your experiences with this new theme friends.

    Labels: , ,

    Work in Safe Mode with Usual or Original Resolution that you use

    Safe Mode with your Usual or Original ResolutionFor some or other reason you need to boot into Windows Safe Mode. But on doing that you will find the resolution had been set too low than the resolution you get when you use windows normally. Windows completely messes up your desktop since it loads only the most basic graphic driver and settings. So here is a way to get your original or usual resolution back.

    Go to Start > RUN > and type regedit.

    Then navigate to HKEY_LOCAL_MACHINE\SYSTEM\CurrentControlSet\Control\SafeBoot and look for a subkey called 'Option'. If not create it by going to 'Edit > New > DWORD-value ' and create a one called 'OptionValue'.

    Now open it by double-clicking and set its value as " 1 "(safe mode without network ) or " 2 "(safe mode with network).

    To start the computer normally again set its value to " 0 ".

    That's how we can work in Safe Mode with our usual or original resolution that we normally get.

    Labels: , ,

    Monday, February 9, 2009

    Make the Taskbar "Thumbnails Preview" Feature FASTER in Windows 7 / Show the Thumbnail Preview (Speed up) INSTANTLY in Windows 7

    Windows 7
    In Windows 7 we can see the Thumbnails of the Windows when we hover our mouse over them in the Windows 7 Taskbar. This is a really cool feature of Windows 7. But it takes a small time interval to get the thumbnail appeared. We can reduce it and make the Thumbnails to show up Instantly when we hover our mouse over it. Here is what you have to do.

    Press [Win] + [R] or select the RUN option in the Windows 7 Start Menu.
    Type regedit and press [ENTER].
    Navigate to HKEY_CURRENT_USER\Control Panel\Mouse.
    Look for the key MouseHoverTime and double click on it.
    And Enter 0 as the Value Data.
    Done!.
    Now close the registry editor and restart your system. You can see the Thumbnails in the Taskbar are showing up instantly.

    Labels: ,

    Sunday, February 1, 2009

    Turn OFF Windows 7 Password Protection / Automatically logon to Windows 7 without Entering any User name or Password

    In Windows 7 you have to enter a password in order to log in to Windows. This is to protect your PC from Unauthorized access by others. If you are only the one using your computer every time when you start Windows 7 need to to enter the password to log in. This becomes very irritating. So here is how to log in to Windows 7 without entering any user name or password .


    In the run menu type control userpasswords2.
    Just press WIN + R to get the RUN menu.
    The user accounts windows will now open up.
    Look for the option saying " Users must enter a user name and password to use this computer " and uncheck this option and press "OK".
    Now a windows opens up asking you to enter the current password you use to log in to Windows 7. Enter the password and confirm. Done!.

    From now on when you boot to Windows you will not be asked or prompted to enter the user name and password. This can also save a couple of seconds while starting Windows.

    Labels: , , ,