Tuesday, March 31, 2009

Disable Automatic Restart in Windows XP / FIX Windows XP Restarting by itself

If there is a vital error in your system, Windows XP will restart itself by default with out asking your permission i.e. without any warning. You might be in the middle of some work and may not have saved it. This causes a lot of loss (data or hardware) to you some times. Windows XP restarts by itself to record the error message for troubleshooting purposes. This is a thing you most often don't make use of or don't require. So here is how to disable XP restarting by its own..........


  1. Press [Win] + [R] or select " RUN " from the start menu and type
    " Control Panel ".


  2. The control panel will now open up. Now double click on the " System " icon. Make sure you have selected " Switch to classic View " option in control panel if not you won't see the " System " option.


  3. Now in " System Properties " windows select the " Advanced Tab ".


  4. Click " Settings " in the " Startup and Recovery " area.


  5. You will see an option saying " Automatically restart " with a check box ticked to left of it. Remove the tick mark in the check box and click " OK " in the " Startup and Recovery " window.


  6. Now click on " OK " in the " System Properties " windows.


This is it. So from now on when the BSOD (Blue Screen of Death) error screen comes Windows XP will not restart by itself, it will ask your permission to restart. so you can restart the system manually if you need.

Labels:

Sunday, March 29, 2009

How to make a Program Start Along [Together] with Windows / Automatically Start a Program along with windows Start up

You may have seen many tutorials in the Internet related with starting certain applications along with windows. But they may not have told you how to start a program together with the windows. After reading their tutorial you might don't know how a to start a program properly along with the windows start up. The process is very simple.Follow these steps to start an Application or Program along with Windows.......


  • First Right click the program you want to start along with windows.

  • Now select the option "Desktop (create shortcut)" seen under the "Send To" option.

  • A shortcut of the required program will be created on the Desktop.

  • I have done like this because the shortcut will require only a very small space instead of the program. So windows can quickly start the program along with it.

  • Next we have to copy this shortcut to the " Start up " folder of Windows. For that,

  • Select "RUN" from the "Start Menu" or press [Win] + [R]. Now type or copy the following into it and press [Enter].


    • start menu\Programs\Startup


  • You will see a windows popping up. This is the "Start up folder" of Windows.

  • Now right click the shortcut you have created earlier i the Windows Desktop and select cut. Now paste the program in the newly opened window. i.e. the Start up folder of windows.


Done that's it. Now that program or Application will automatically start along with windows.

Labels: ,

Monday, March 23, 2009

Get MAC like Focus border in Windows Explorer for XP

In MAC when we are using any of the edit boxes, buttons etc. and blue border will be shown around the border of the box. This will help us to keep us focused in our work. So, we can concentrate more. This is really a unique feature present only in MAC Operating Systems.At times our attention will go away from what we are working on in Windows XP. This utility wil help us to stay focused. So here is how to get this cool and unique feature in Windows Xp too.

All you need to have is Focusin . A small freeware utility that will bring this cool feature of MAC in Windows XP Operating Systems.

Get MAC like Focus border in Windows Explorer for XP

Just run the utility and it will sit to the Windows taskbar silently and will provide the focus borders in Windows Explorer.

Right clicking the utility on the Taskbar will show the " Preferences " option. You make Focusinstart with Windows from here.

The theme of the Utility is designed for Leaprod XP Visual Style. So it will be more blended if you are using the Leapord XP Visual Style in Windows XP. Just google for " Leapord XP visual style " and you will get that too.

Download Focusin for XP

Labels: , ,

Monday, February 16, 2009

[Solution] Restore Missing DVD/CD drive (" Error code 19 " [ Fix ] )/ Get back the Accidentally Deactivated DVD/CD drives

DVD/CD drive missing in My ComputerWhen you have opened the 'My Computer' or Windows Explorer the DVD/CD drive has got disappeared!. when you peeped into the 'Device Manager' it is seen that there is some serious problem and the entries have been marked with the yellow exclamation mark. When selecting the 'Properties from the context menu of the particular drive and error code is reported saying "Error code 19". Here is the solution to get the DVD or CD drive back.

Just editing the Windows registry a little bit will solve this problem.
Press [Win] + [R] (or select Run from start menu)and type 'regedit'.
Go to [HKEY_LOCAL_MACHINE\SYSTEM\CurrentControlSet\Control\Class\{4D36E965-E325-11CE-BFC1-08002BE10318}.

In the right pane delete the "UpperFilters" and "LowerFilters" values. Just select it and press [Delete] key and confirm. Now restart your system you will get your DVD/CD drive back in My Computer.

Labels: , , ,

Sunday, January 25, 2009

Optimize Windows by Removing Junk that the Disk Clean Up Won't / Make a Disk Clean utility and up clean more Files

Everybody don't like junk. There are a lot of junk files created in Windows by default. The Disk Clean up Utility in Windows help us to remove the system Clutter upto certain extend. Disk Cleanup can also remove the outdated or older restore points being created by System Restore which we do not need any more. But there are many temporary files the Disk Clean up utility of Windows wont clean by default. We can configure it to clean up those unnecessary junk there by making more space available.

Here we are not going to do any thing with the Disk Clean up utility but we create a small batch file that does the clean up job as the Disk Clean up utility does.

  1. Open the Notepad and type the following in it.
  2. del /s /q "C:\Documents and Settings\placeyourusernamehere\Local Settings\Temp\*.*"
  3. You need to replace placeyourusernamehere with the User name you have logged into Windows.
  4. Now save the files as a bat file. To do this select "Save As" option from notepad and select "All Files" from "Save as type" tab. and give the file name as TempKill.bat.
  5. When you want to clean the temporary files you can run this file. If you want this to run this automatically with the Windows just place the file in the start up folder of windows for that go to this location.
  6. C:\Documents and Settings\placeyourusernamehere\Start Menu\Programs\Startup
  7. Now do step 3.

That's it! From now on the files in the temp folder will be cleaned automatically on Windows Start Up.

Labels: , , ,

Thursday, January 22, 2009

Install Windows 7 or Windows Vista from a Pendrive / USB drive (Working 100 %) for XP users

I had written the tutorials to make a Pendrive / USB drive bootable for installing Windows Vista and Windows 7 from it. But the steps given in those tutorials worked for users using Windows Vista and Windows 7 only. So some of my visitors asked me for a solution since they were using Windows XP. (Thanks Miguel for bringing this to my notice).So Here is it.


First you have to format your pendrive / USB drive to NTFS format.
For that download this tool and format your pendrive in NTFS format. Don't use quick format option. Now follow the steps from step 14 on this tutorial to Install Windows 7 from Pendrive (Work for Windows Vista Too).

Labels: , , , ,

Saturday, January 17, 2009

How to Get back / Restore Lost or Disabled Right Click Context Menu's

Most Windows users today, experiment with the windows registry most often without creating backups. What will you do while you are playing with the windows registry you have accidentally disabled the right click context menu. You no more get it while you right click on Files.

This is a problem occasionally faced by Windows users. There is a simple solution for that. You can get back the right click context menu by using the Windows registry itself.

  • First go to start and select RUN or press [WIN] + [R].
  • Now type 'regedit'. This will open up the Windows Registry Editor.
  • Go to HKEY_CURRENT_USER\Software\Microsoft\Windows\CurrentVersion\Policies\Explorer and check for the 'NoViewContextMenu' DWORD value is seen on the right pane.
  • If you see it just delete it by right clicking it and selecting Delete.
  • Now you will get the right click context menu back.
  • Also you may check for this option under the main branch of HKEY_LOCAL_MACHINE.

Labels: , , ,

Enabling Thumbnail Preview for more file formats like TIF, PCX, PSD, PSP/ Extend the functionality of Thumbnail Preview Feature of Windows

The thumbnail Preview Feature in Windows XP is very useful for identifying the Image files Quickly especially when you have a lot of image files in a directory. But the Thumbnail Preview is very limited for files like TIF, PCX, PSD etc. it shows only the icons of the files. Here is a software that can increase the functionality of the Windows Thumbnail Feature.

' ThumbView Lite ' a free shell extension for windows can support 19 more graphics formats so you will be able to preview almost all the image file formats. This program will automatically integrate into Windows and there is no need for a separate program to be launched. This tool will also enable windows Explorer to display main properties of the respective file types. Scarily used file types like EPS and CDR will be displayed as icons.

Download ThumbView Lite

Labels: , , ,

Wednesday, January 14, 2009

Power up/Speed up the Foreground process and get more control over Windows

How about Getting more Features when you right click on a window or on when it is on the taskbar. Many features such as Hide Others, Hide All, UnHide All, Unhide, Minimize to system tray, Transparency are there. You can use this wonderful utility and get full control over the windows. I say this is a must have utility for all the Windows Users.


You can make a process run faster by giving it a high priority and there by making your work faster than before. You can hide an opened window so that even by pressing Alt + Tab wont find it. Best of all this program is Free. Instead of wasting your taskbar area you can Minimize the windows to the system tray as small icons and more.This wonderful utility was created by one of my friend and software engineer Arif Ali.

Download Process Manager

Labels: , , , ,

Tuesday, January 13, 2009

Restart Crashed Programs Automatically and make your work Faster

Most frequently used programs such as e-mail clients, file sharing tools etc should run continuously. Some times these programs get crashed or get closed by mistake. So again we need to start them from the beginning. Instead of this if the programs start automatically by itself our work will get done more faster. You can automate this task of continuously checking whether the programs are active or not.

A tool called Monitor will do this task for you. So you don't have to bother again about those programs again. The program will automatically check whether the software's are active or not and will restart them accordingly.

Download the program from the link given below. When the program starts, click the "Add" tab and give a name in the "Name" and click the tab next OT "Path" to select the program file which needs to be monitored from the file dialog. You can even specify the parameters in the "Arguments" Section. Do not change the checking interval and create an entry for monitoring by clicking on "Create". Now all you need is to activate the check box seen in front of the respective task to start the automatic process.

Download Jockersoft Application Monitor

Labels: , , , , ,

Monday, January 12, 2009

How to Apply One Folder's View To all the Folders

In Windows Xp we get six different Folder views Thumbnails, Tiles, Icons, List, Details, Filmstrip. Each time when we open different type of Folder for example we opened a folder containing pictures we see the view set to Filmstrip or so. If you want to set it in tile view you have to select form the view option. Doing this for each and every folder is really time consuming.

Setting a particular Folders view setting to all the Folders will be the easy way.To do this just go to My Documents Folder and select the type of view you want too have in all the Folders from the view options after doing that. From the menubar select tools> Folder Options and select the 'View' tab from it. Now click on " Apply to All Folders " Options and select apply and then OK.

Thats it from now on you can get a common view setting in all the Folders.

Labels: , , , ,

Friday, January 9, 2009

How to DELETE a File that is currently being used/ Deleting files Blocked by a Program

Some times Windows refuses to delete some files when we try to delete a file that is supposedly in use. But you know very well that you have not opened that file or the files is not currently being used by any software. This is really a irritating situation. Here is a solution to delete those blocked files.

A small software called ' Process Explorer ' can relieve you from this situation.It will help you to end the corresponding program that is using a particular file without much worry!.

Using the program is easy. Open the ' Find | Find Handle or DLL' to find the application you want to close. You may enter the file name displayed in the windows error message and do a search. The program which is using that file will appear in the process column. Now things are more easy just right click the corresponding program and select 'Kill process'. This will terminate the program that is currently using the file and now you will be able to delete the file without any problem.

Process Explorer has many more features it can be used as a replacement to the default Windows Task Manager and its free too.!


Download Process Explorer

Labels: , , , , ,

Sunday, January 4, 2009

Get the AERO Peek Effect of Windows 7 in Vista and XP


Aero Peek is a cool and unique feature on Windows 7. Let me tell about it shortly. This is found as a small rectangle present last on the Windows 7 taskbar.

When you hover your mouse cursor over it you can see through all the maximized widows ie. all the maximized windows becomes transparent and only their outline will be showed.


A small application created by GeeQ can bring this effect in Windows XP and Windows Vista too. So from now on all the XP and Vista users also can enjoy this unique Windows 7 feature.

Download Aero Peek Utility now

To use it click on the icon in the system tray and Desktop preview will be activated to disable double click it.

Labels: , , , ,

Monday, December 22, 2008

Access frequently used system files instantaneously / Faster

Experienced windows users will often visit the 'Program Files', 'System32' , 'Windows Folder' etc. But it is very irritating to navigate to these places using Windows Explorer directory structure. How about navigating to these places at an instant?.


You can open the desired folder in Windows Explorer by using some shortcuts. For this just go to the 'Start Menu' and select 'RUN' (For XP users) and 'Start> All Programs> Accessories> RUN ' (For Vista). The same can be done by just pressing [WIN] + [R]. This will directly bring up the run dialog box. Type ' shell:' in the input field and confirm by pressing the 'OK' button. This will be more faster than typing the directory path in the address bar.
For example the command 'shell:system' will open up the windows folder. Here 'system' is the place which is some thing like 'C:\Windows\system32'. Here is a table which will tell you which name specify which folder. The Windows Environment work just like these names.A list of such details can be obtained by giving the command 'set' in the 'command prompt'.


Labels: , ,

Thursday, December 18, 2008

Minimize all windows to your desktop like Thumbnails instead of minimizing to the Taskbar

What about minimizing all windows as thumbnails on your desktop?. It will be very easy to identify the required windows and your work will also speed up. Yes this is possible.A small utility called miniMIZE can do this job for you. Currently this software works both on Windows Xp and Windows Vista.This software has option to start automatically with windows, so you don't have to start it every time on each boot.Option for changing the thumbnail size, adjusting thumbnails position on desktop, changing opacity etc. are also there. More over this wonder utility is Free!.

Download MiniMIZE now

Home page

Labels: , , ,

Wednesday, December 17, 2008

Add Safe Mode to Windows Boot Menu/Show Safe Mode without pressing F8 or F5

Hi friends here is a trick to show Safe Mode in the Windows Boot screen. Usually you get the option to boot into safe mode by pressing F5 or F8. But this option can be shown in Windows Boot menu so you don't have to press those buttons again.
  1. Select Run command from the start menu.
  2. Type in Control Panel and press enter.
  3. Open the "System" icon from there and go to the Advanced Tab.
  4. Click Settings under Startup and Recovery.
  5. Now you will see a window in the windows click the option "Edit".Actually when you press edit you are actually opening the boot.ini file of windows.
  6. Now you will see Notepad opening up with some codes.
  7. Copy the last line and paste it under it and now change the newly pasted code to the one like below.

  8. multi(0)disk(0)rdisk(0)partition(1)\WINDOWS="Safe Mode" /safeboot:minimal /sos /bootlog
  9. The final code looks some thing like this(This is the boot.ini file in my system).
  10. [boot loader]
    timeout=8
    default=multi(0)disk(0)rdisk(0)partition(1)\WINDOWS
    [operating systems]
    multi(0)disk(0)rdisk(0)partition(1)\WINDOWS="Microsoft Windows XP Professional" /noexecute=optin /fastdetect
    multi(0)disk(0)rdisk(0)partition(1)\WINDOWS="Safe Mode" /safeboot:minimal /sos /bootlog
  11. Change the code accordingly.
  12. Now save the file and quit and restart windows.
  13. You will now get the option to boot into safe mode in the windows boot menu.
  14. Make sure you don't make any mistake while editing the boot.ini file(The file which we have changed just now).

Labels: , ,

Monday, December 8, 2008

Boot From USB and CD even if Bios or Motherboard Don't support it

I had written a post on how to make pendrives bootable earlier.But if you are in a situation that you Bios don't support booting from USB or from a CD. There is a boot manager called PLoP which can solve this problem very easily.This program can do the job even without installing it on the hard disk.
This PLoP boot manager can be launched from almost any where fro mfloppy drives, networks or from any other boot manager, even from DOS and windows boot menu.

To use this software Download it from here and visit the distributors website from here and follow the instructions given there.

When the program is launched you can boot from USB or a CD even when your motherboard / BIOS don't support it.

Labels: , , ,

Friday, December 5, 2008

How TO DELETE FOLDER contents by retaining Folder Structure in Windows XP

So here is a tutorial to delete the contents of a folder by retaining the folder structure. This option to " Empty folder contents" can be added to the right click menu is so easy follow the steps below.
  1. Go to Start > Run > type regedit.
  2. Browse to HKEY_CLASSES_ROOT\Directory\shell.
  3. Right click on shell on the left pane and add a new key and name it as "Empty Folder Contents".
  4. Now right click on Empty Folder Contents and create another key(subkey) to it and name it as Command.
  5. Click on Command and on the right pane you will see a key called default.
  6. Then double click on it and enter this value cmd /c “cd /d %1 && del /s /f /q *.*” .
  7. That's it the job is completed.
  8. If you have any difficulty in doing it just download this file and run it.
From now onwards you will get the option Empty Folder Contents in Right click menu. So you can delete the folder contents safely and that too without removing folder tree structure.

Labels: ,

Tuesday, December 2, 2008

Get the Tabbed Browsing in Windows Explorer for Windows XP/Windows Vista

How about browsing the windows explorer as we do in Internet explorer and Mozilla Firefox. Well, QTTabBar is a small utility that helps to get the tabbed browsing feature in both Windows XP and Windows vista. Here is a small tutorial about how to use the tool.


You can get the program from qttabbar.wikidot.com. You need to have Microsoft.NETFramework 2.0 installed to operate this program properly you can get it from microsoft.com .

If you are using windows vista make sure you run the installation by rightclicking the installation file and selecting the 'Run as Administrator' option.

Labels: , , ,

Sunday, November 16, 2008

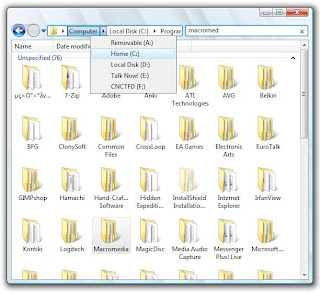
Get the Windows 7/Vista like Explorer in Windows Xp "Visplore" is here

The most awaited vista like windows explorer for windows Xp is here. It gives the same eye candy you see in vista in Xp.The most interesting thing is that it needs only little resources.All the Windows Xp users can now get a vista explorer to their desktop now.


As you see in the image the vista like address bar is also available in this nice piece of software.
The search bar is embedded into it which helps to access your desired files quickly.
And Above all the software is small as 334.34 kb in size.This product was developed by lee soft.
The software is in it beta state so may have some minor bugs until the final and stable version is released so keep updated by subscribing now!!.


Labels: , ,