Thursday, December 3, 2009

How To SETUP & USE Google Public DNS

You might have heard about the open dns service which gave more security and more speed while browsing the web. Now Google too has come up with their new Google Public DNS. This service gives you more speed while browsing and also protects you from DNS spoofing attacks and from various other security threats. This one too look promising like the open dns.


If you don't under stand what's the use of it then just take a look at this.

How To SETUP & USE Google Public DNSAs web pages become more complex and include more resources from multiple origin domains, clients need to perform multiple DNS lookups to render a single page. The average Internet user performs hundreds of DNS lookups each day, slowing down his or her browsing experience. As the web continues to grow, greater load is placed on existing DNS infrastructure.DNS lookups can become a significant bottleneck in the browsing experience. Whenever a client needs to query a DNS resolver over the network, the latency introduced can be significant, depending on the proximity and number of nameservers the resolver has to query (more than 2 is rare, but it can happen).

How to Change DNS Server to Google Public DNS in Windows XP, Vista and 7


  • Go the Control Panel.Click Network and Internet, then Network and Sharing Center, then Manage network connections.

  • Select the connection for which you want to configure Google Public DNS. For example: To change the settings for an Ethernet connection, right-click Local Area Connection, and click Properties.

  • To change the settings for a wireless connection, right-click Wireless Network Connection, and click Properties.

  • If you are prompted for an administrator password or confirmation, type the password or provide confirmation.

  • Select the Networking tab. Under This connection uses the following items, click Internet Protocol Version 4 (TCP/IPv4) (In Windows Vista and 7), and then click Properties.
  • Xp users just need to take the Open Internet Protocol TCP/IP Settings.
  • Click Advanced and select the DNS tab. Select Use the following DNS server addresses.
    Replace those addresses with the IP addresses of the Google DNS servers: 8.8.8.8 and 8.8.4.4.
    Restart the connection you selected in step 3.
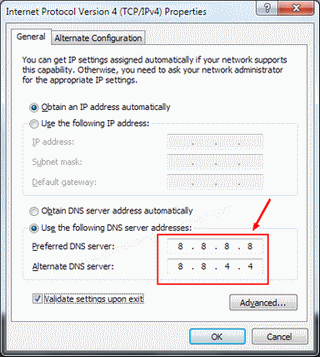
  • How To SETUP & USE Google Public DNS


Setting Google Public DNS in Mac OSX


  • From the Apple menu, click System Preferences, then click Network. If you are prompted for an administrator password or confirmation, type the password or provide confirmation.

  • Select the connection for which you want to configure Google Public DNS. For example:
    To change the settings for an Ethernet connection, select Built-In Ethernet, and click Advanced.

  • To change the settings for a wireless connection, select Airport, and click Advanced. Select the DNS tab.

  • Click + to replace any listed addresses with, or add, the Google IP addresses at the top of the list: 8.8.8.8 and 8.8.4.4.

  • Click Apply and OK.
[via Google Code]

Dont Forget To Comment Down Your experiences after New DNS Servers from google.

Labels:

Tuesday, December 1, 2009

How To PRINT SELECTED PARTS OF A WEBPAGE ?

You might have thought of saving your printer ink while printing. This becomes more prominent while printing webpages, because there are many unwanted things that comes along with the print like advertisements, images etc that simply wastes the printer's ink.How To PRINT SELECTED PARTS OF A WEBPAGE ? So, how about saving the printer ink by printing only necessary areas in a webpage ? The problem of ink wastage while printing webpages can easily be controlled to a great extend with the help of Printliminator.

In brief Printliminator is a browser bookmarklet that will help you in printing only the needed portions in a webpage.

How to Install Printliminator ?


Regarding the usage, Printliminator is very easy to use. The only thing you need to do to install Printliminator is to first go to the Printliminator Home page and drag the Printliminator bookmarklet to your browsers bookmark toolbar.
And the installation of Printliminator is complete! Thats so simple as 123.

How to Use Printliminator to Print Only Certain Part of a WebPage ?


After you have installed the Printliminator bookmarklet, you are ready to use Printliminator.

  • First, load the website on your browser that needs to be printed.


  • From the Bookmark's Toolbar in your browser click on the Printliminator bookmark.


  • You will be presented with three option's namely Remove Graphics, Print Stylize, & Send To Printer. Along with two other options.

    How To PRINT SELECTED PARTS OF A WEBPAGE ?


  • Clicking on the "Remove Graphics" option will remove all of the images in the webpage.

    Clicking the "Print Stylize" option will highlight the various elements in the webpage with in a red border. Left Clicking within the red border removes a particular section/area. You can Continue to select and remove any unwanted sections/areas until you are ready to print. If you have removed certain portion by mistake you can choose the undo option or refresh the page and start over.


Prinliminator is a great tool for saving both the printer ink and the paper.

Get the Prinliminator Bookmarklet


Labels: , ,

Thursday, November 26, 2009

How to Get a Valid IMEI Number For Mobile Phones in India

According to studies there are currently 25 million mobile phones used in India which don't report IMEI (International Mobile Equipment Identity ) numbers. Imported phones like the China Mobiles and like were allowed to operate in India which do not have IMEI numbers. This was exploited by criminal to get away with serious crimes.
It was reported that in recent terrorist attacks at Mumbai, the terrorists were allegedly using China Mobiles. There are many genuine users in India who buy these mobiles because its so cheap. Finally, the Cellular Operators Association of India and Department of telecom have made necessary steps to block all the invalid or fake IMEI handsets from December 1 2009 allover the country.So, from now on its very necessary to get a Valid 16- digit IMEI number for your mobile phone.

If you dont know whats an IMEI number for? then its just a 16 digit number that appears on the service providers network logs each time a call is made from the mobile phone. This number is unique to a particular handset and can be used to find out the location of the handset within one kilometer radius.

Why it is important to Have a Valid IMEI Number for the Mobile?


If you find your Mobile Phone stolen you will be safe if you know the IMEI number of your Mobile. The stolen mobile phones can be used by criminals for committing crimes, and you will b one who's getting caught by the police for that.

The IMEI number is like a finger print for your Mobile. Typing *#06# in your mobile will show you the IMEI number of your Mobile.

If you find your mobile is lost or stolen, you can call the service provider and ask them to block the phone by using the IMEI number.


How To Check whether the IMEI Number of Your Mobile Phone is Valid or Genuine?


How to Get a Valid IMEI Number in India for China Mobiles
Typing *#06# will give you the IMEI number of your Mobile.

Note down the IMEI number and send it to 53232 via SMS.

The format should be IMEI .

If your Moible Phones IMEI number is valid you will get a Success message and if not you will get a invalid IMEI number message.

How To Get a Valid IMEI number for my Mobile ?


There is no problem even if you own a China mobile or similar that dont have a IMEI number till now.

How to Get a Valid IMEI Number For Mobiles in IndiaThe Mobile Standards Alliance of India through the "Genuine IMEI Implant Program ", is working in partnership with Cellular Operators Association of India (COAI) and Department of Telecommunications (DOT) to implant the genuine IMEI numbers on to the mobile handsets which are carrying bad/non genuine IMEI numbers as a one time Amnesty Program.

The GII program is being run to help protect the interest of consumers who unwittingly bought these handsets.

Advantages of this program are:

You can register handsets with Invalid IMEI implanted with genuine IMEI number.
Genuine IMEI recognized by network operators so 'no barring' of services.
Govt. approved genuine IMEI implant process.
Choice of 1600 + GII service partners nationwide as they are rolled out.

To Get/Register a Vaild IMEI Number


Visit http://www.msai.in/listofcentre.php, and the name of your state and check out your nearest GSP(genuine service providers) outlet.

You can visit your nearest authorized GSP center with a valid identity proof, and just Rs. 199 as life time fee and get genuine/valid IMEI for your handset.

Alternatively you can also register online at http://www.msai.in/registration.html
to get a valid IMEI number.

This is a great opportunity if you have unwittingly bought the china mobile handsets or if your handset dont have a genuine / valid IMEI number. So Dont wait, get a valid IMEI number for your Moblie as fast as possible.

Labels: ,

Tuesday, November 24, 2009

Download Youtube Videos in Google Chrome Directly - YouTube Downloader Extension

Wondering how to download youtube videos in Google Chrome without any pain? Actually there are many techniques to download the videos, like there are many website that gives you direct download links to videos by pasting the video's url, many separate softwares etc. Google Chrome has gained the hearts of many people due to its clean looks, speed and many for many other obvious reasons. So there are many users for it now. Since almost all of us visit Youtube frequently or occasionally, its really annoying to depend on third part software's or websites each time when you want to download a youtube video in Chrome. Downloading the videos directly will be some things great and time saving.

There are many google Chrome Extensions released for Chrome Now. I have previously posted about 10 best Google Chrome Extensions/ PluginsHere comes an extension that will help you to download videos from youtube directly to your computer.

YouTube Downloader Extension For Chrome will help you in downloading videos from youtube directly.

This cool extension will add a download option in the right sidebar of you tube website when you are playing a video.

Download Youtube Videos in Chrome Directly - You Tube Downloader Extension

The Videos can be downloaded in HD, MP4, FLV and 3GP file formats.

The Extension currently supports developer build of Google Chrome 4.0 or later.

You need not worry about going for download managers and other websites when you need to download a video in you tune while using Google Chrome.

Download YouTube Downloader Extension For Google Chrome

Labels:

Sunday, November 22, 2009

Google Chrome OS Review : 7 Different things that make the New OS Unique

Finally Search Giant has released the much hyped Google Chrome OS Source Code. Developers all over the world can dive into them to come up with more programs and ideas on improving it. According to Google their new operating system is far different from any other operating system available till now. The Chrome OS team has released a short 3 minute video which briefly explains how exactly it is different from the other operating systems. Here is a brief review of the google's New Operating system.


Here are

7 different things that make the Google OS Unique


The Browser Itself is the Interface :If you have used the Google Chrome browser before, you wont feel anything new when you first take a glimpse on the new operating system this is because the browser is the primary interface of the operating system. Unlike Windows, Mac and Linux you don't have a separate desktop, file explorer etc for Chrome OS. However you can open up multiple windows some thing like multiple desktops and switch between them is some what similar to the windows 7's Alt+Tab feature with the live preview.

chrome os windows switch live preview

Designed For Security: One of the main problem's faced by the computer users today, are the viruses, spywares etc. You need an antivirus software in operating systems like windows but in chrome os you dont need such a thing because the OS is designed for security. Each and Evey application you run are put in "security sandboxes" which is designed to resist viruses and malwares. Moreover the Chrome OS is intelligent enough to verify its own code and reboots the system and fix by itself, if it finds any issues with it.
The Operating system will be always upto date. It wont give you a choice to turn on/off automatic updates. The OS automatically updates itself when required.

Google Chrome OS Demo Video


Data Storage is in the Cloud: What ever you save in your Chrome Os is synced with the clouds. the advantage is that you can have your home pc any where any time. There wont be problems like backing up data, migrating user details etc. You will have every things as such as soon as you sync up your new pc. All of your data is secure and encrypted.

Chrome OS Media Browser

Forget the Slow BootUps: This is one are where most of the operating systems lags behind. When you want to quickly work with your pc you need to wait up for at least 30 seconds or more to start working with. Google has seriously take care of this issue and its is known that the Google Chrome Os can boot up blazing fast. They are so obsessed with it that they're asking the hardware manufacturers to use specific materials just for speeding things up.

Every Thing is the Web and No App Installations: This is some thing that can make many people hate it. There wont be any software installations like in the other operating systems. There wont be any Photoshop, Microsoft Office, Adobe AIR. Instead every thing will be web apps. However there will be support for plugin/extensions support like in the Chrome Browser.

Chrome OS Application Menu

Chrome OS is Free to Use (Open Source): Like the linux operating systems chrome os will be open source. People are free to modify the code to suit their requirements and for now they can contribute the submissions back to the project.

No More Driver Supports: According to Google the new os is going to support only specific platforms. No more moving parts will be used. That means it wont run on regular PC's with physical hard drives, it needs SSDs. There will be specific requirements like screen sizes, full sized keyboards, above average touchpads etc.

According to Google the new Os is expected to ship in about a year. The Google Chrome Os will be great for Netbooks but not for the desktops.

So, What Do You Think about the New Chrome OS? Show Off Your reactions though comments.

Labels: ,

Sunday, November 8, 2009

Find The Drivers That Crashed Your System with WhoCrash

System crash is something 90% of windows users will experience in a while. There can be many reasons for it. Some may take the pain to find them correctly and fix the system while some other just ignore the problem and some just try to find it but fails.Find The Drivers That Crashed Your System with WhoCrash Most of the system crashes are due to the driver conflicts that occur in your system. It might take a lot of effort to find them correctly and fix them as for a beginner. The pain's no more here is a utility that will help you to precisely find out which driver is behind the system crash.

WhoCrashed is a powerful crash dump analysis tool that can help you in finding the drivers that have crashed the system.
Normally, debugging skills and a set of debugging tools are required to do post-mortem crash dump analysis. By using this utility you do not need any debugging skills to be able to find out what drivers are causing trouble to your computer.
This program can be the helping hand of a beginner as its very simple to use.


Just by opening WhoCrashed and clicking on the Analyze option will quickly give you the results. In most cases it can pinpoint the offending drivers which have been causing misery on your computer system in the past. It does post-mortem crashdump analysis and presents all gathered information in a comprehensible way.
Find The Drivers That Crashed Your System with WhoCrash

Who crash works with Windows 7/Vista/XP/2008/2003/2000 (x86 and x64)editions.

Download WhoCrash and Find The Drivers That Crashed Your System


Labels: ,

Saturday, November 7, 2009

3 Ways To Remove / Uninstall Nod32 Completely From Your PC

These days many people face the problem of removing the antivirus or internet security software's from their system completely.  May new security suites and antivirus software's emerge and people slip on to them for many reasons.  Recently i installed the Eset Nod32 Smart Security in my windows 7  system and later i thought of uninstalling it but even after trying many times the uninstall of nod32 was not complete. The software went irremovable from the system.  After trying a lot i was able to remove nod32 from the system. Are you too facing a similar situation like Eset Nod32 Uninstaller not working, Nod32 cant be removed etc? Here are 3 ways to Uninstall/ Remove Nod32 from the System completely


3 Ways To Remove or Uninstall Nod32 Completely From Your PC

Method 1 : Doing the Usual Uninstall of Nod32


First of all try running the uninstall tool of nod32 with administrative privileges. For this right click Ese Uninstall tool from start menu and select Run as Administrator in Vista/ Windows 7. Else follow the below step.


  • Go to the Control Panel and select Add or Remove Programs and run the Nod32 uninstaller from there. For Windows 7 Users  type this in the Address Bar of Windows Explorer. Control Panel\All Control Panel Items\Programs and Features it will directly take you to the Add or Remove Programs area.


  • Right Click Eset Smart Security / Eset Antivirus and choose Change and choose Remove and continue with the uninstallation Process.


If This normal uninstall or removal of eset nod32 didnt work then try Method No. 2


Method 2 : Uninstalling Nod32 with the Nod32 Removal Tool


The removal tool for nod32 is made for situations where you cant uninstall the software by normal methods.


  • Download Eset Nod32 Removal Tool .


  • Right Click the Nod32 Removal Tool icon and choose Run as Administrator in Vista/ Windows 7. XP Users just need to run the tool.


  • Now Restart Your Computer for the changes to take effect. In most cases this method will uninstall nod32 from your system completely.


If Method 2 also fails for you then try the Last,  Method No. 3


Method 3: Manually Removing Nod32


You should try this method iff the above two method fails. (Here i assume you have installed your operating system in the C drive if not change the drive letter accordingly).


  1. Start Your Computer in Safe Mode.


  2. Type Regedit in the start Menu (Xp users press [win] + [R] and type regedit).


  3. Delete the Following keys one by one.

    • HKEY_CURRENT_USER\Software\ESET


    • HKEY_LOCAL_MACHINE\Software\ESET


    • HKEY_LOCAL_MACHINE\Software\Microsoft\Windows\CurrentVersion\Run\egui


  4. (For XP Users) browse to C:\Windows\inf and delete the file INFCACHE.1 (Make sure Show Hidden Files andFolders option is enabled from the Folder Options)


  5. (For Vista and 7 Users) Browse to C:\Windows\System32\DriverStore and delete INFCACHE.1


  6. Now restart your computer.


  7. Next Remove the Following folders from your system.
      (For XP Users)

    • C:\Program Files\ESET


    • C:\Documents and Settings\All Users\Application Data\ESET


    • C:\Documents and Settings\%USER%\Application Data\ESET


      (For Vista and 7 Users)

    • C:\Program Files\ESET


    • C:\Users\All Users\ESET


    • C:\Users\All Users\Application Data\ESET


    • C:\ProgramData\ESET


  8. Also delete any other eset folders if found. Just do a search for Eset in windows search and you can find any other folder if it is there.


Now, Eset Nod32 will be removed / uninstalled completely from your system.


Labels: , ,