Tuesday, September 30, 2008

Convert your Headphones into a Microphone under 10 seconds!!!

Don't have a mic at home? don't worry your head phone can do the job.These days there will be hardly any body who doesn't own a pair of head phones. Now, here is a fantastic that people hardly know to covert their headphones into a mic!
  1. Connect your head phone to the pink jacket of the sound card.
  2. Now open any sound recorder software and start recording.
  3. Now take the head phone near to your mouth and speak loudly.
  4. You will notice the sound recorder recording tour noise.
Yes i didn't even took 10 sec right!. This trick will not give a perfect result.Also you have to speak much more louder than normal.Any way you can tell that you now have a microphone in your home.

Labels:

Monday, September 29, 2008

Dual Boot XP and Vista (Install Xp after vista)

Vista and XP both don't detect each other in boot.My friend informed me that the earlier way that i posted was not applicable to Windows Vista Home Basic.

Here is a way get it for all Vista Editions.

Conditions: You should have installed Windows Vista and need Xp to boot second, and when you do so , Vista wont be detected anymore, so you have to format your drives and install it again, or you have to repair Vista.

You can Dual Boot them without formatting your drives.

Assume that vista have been installed and you want to install Xp in Z:> (Z is the drive which you can choose) (may be C: etc.).

Your system now restart in XP and don't show Vista, don't panic! restart your system and boot from the Windows Vista DVD , and repair your current installation so that your VISTA will boot up now, and don't show Xp.
  • Insert your Vista DVD in the drive and then move to start > all programs >accessories>on the command prompt right click and select to run as the administrator.
Then type the following commands:

  1. Using Bootsect.exe can regain the Windows Vista Master boot record and the code for booting transfers the controls to the Windows BMP. For doing this, type the command: Drive:\ boot \ bootsect.exe –NT60 All .Here Drive stands for the location of Vista DVD.
  2. Using bcdedit.exe will create entry in boot.ini file. To do this, type the below commands at the command prompt.
  3. Here Z is the location of your drive where Vista is located.
  4. Z:\Windows\system32\Bcdedit –create {ntldr} –d “describes the previous windows installed. ”
  5. Here you can give any description for the previous windows version. For example, it can be "Windows XP Sp2” or “Windows Server 2003." on any thing you like.
  6. Drive:\Windows\system32\Bcdedit –set {ntldr} device partition=L:
  7. Here L: denotes the drive for the current(active) partition.
  8. Drive:\Windows\system32\Bcdedit –set {ntldr} path \ntldrDrive:\Windows\system32\Bcdedit –displayorder {ntldr} –addlast
  9. Now all you have to do is to just restart the system.
  10. You will now get the option to boot both Windows Vista and Windows XP.

Labels: , , ,

Sunday, September 28, 2008

Make a Folder Compelety Invisible in Windows

Do you want a folder to be completely hidden?.In windows even if we make a folder properties hidden it will be shown when we use the option 'search for hidden files and folder' while searching a file.But here is a trick that really make the folder invisible.So here's how you do it.
  1. Right click the place where you want the folder to be created and select create a new folder.
  2. Right click the newly created folder and select rename.
  3. Now clear the file name.But windows tells you that you cant create a folder without a file name.
  4. So clear the file name, while the name field still active press and hold alt and press 0160 (Num lock must be on).
  5. Now you will have a folder without a file name.
  6. Right click the nameless folder and go to the properties and select the customize tab.
  7. Now select the change icon.
  8. Look for the icon that has no image. That is a blank one. Select it and press OK.
  9. That's it there's your invisible folder.
  10. I recommend not to put it on your desktop as it may show up for a second while starting windows.
  11. It will be good enough to put it with a group of folders.
  12. For an enhanced hiding you can also make its property hidden.

Labels: , , ,

Tuesday, September 23, 2008

How to Speed up the Booting Process really well / How to start windows faster?

The common method used to determine system performance is the boot speed. Though this isn’t really right, people tend to have a fascination with boot speeds. Let’s take a look at some of the common tricks used to speed up the booting process.

1. Disable boot virus detection

Some motherboards come with the capability to scan the boot sector for virus infection. Boot sector viruses were prevalent some years and posed great danger to the hard drive partition table; however, the virus-writing community seems to have given up on this method of attack!.
And so, bot virus detection takes up precious boot time and slows down the bootup process. It is recommended to turn off this feature on your motherboard for faster boot speeds. To find
out how you can do so, check in the “Advanced BIOS features” section of your BIOS.

2. Change The Boot Sequence

Since Windows XP is generally installed via a CD-ROM, the boot sequence is set to CD-ROM first, and then the hard drive. By realigning the boot sequence, a few seconds can be chopped off the bootup time. Keep your OS-loaded hard drive as the primary boot device; this is generally denoted as “Hard Disk0”. Similarly, if, like most people, you hardly use your floppy drive, turn it off from the BIOS. As far as floppy drives are concerned, there is an option to scan the drive on bootup. Turn this feature off to save a couple of more seconds.

3. Switch off unnecessary hardware in the BIOS

New motherboards today have many integrated devices such as Ethernet controllers, FireWire, on board sound ,display and more.During the boot process, the BIOS will assign resources for these devices. But if you don't use such devices it is recommended to turn these off form the Bios. Also if you don't have a serial mouse,or don't use RAID configuration it is recommended to switch off these ports.

4. Disable the XP load screen


If you disable the load screen booting will get reduced by a few seconds or more.To disable it, open the “msconfig” utility and go to Start > Run, type msconfig and press Enter. In the coming window, click the ‘boot.ini’ tab. Check the /NO GUI BOOT option and press ‘Apply’. Restart windows to see the effect.

5. Disabling unwanted startup programs

You’ll generally see that a fresh installation of Windows XP is fast and responsive, and that as time progresses, the system becomes slower—blame it on the tons of applications you install. Today, most applications leave some portion of themselves running in the background as services. These services are launched during bootup without your knowing it. The bootup time slows down as the number of these automatically-launched services increases. Applications such as Winamp,Winrar,Winzip can be switched off to get a faster booting.
The easiest way to remove these unwanted services at startup is by using the “msconfig” utility. The ‘Startup’ tab in msconfig lists all the services that are launched at bootup. Each service has a check box, by unchecking which, you can stop that particular service from being launched at startup. You should get a feel of which services are required and which are not by looking at the file name and target directory. For example, you might see “winamp” listed, and you can guess that this is the Winamp agent. You probably don’t need it to run. Similarly, “realsched” is the RealNetworks scheduler, which you probably don’t need. Un-check the ones that you feel are not required, and select ‘Apply’.
The ‘Start\Programs\Start’ directory in Windows XP is the place the OS uses to launch application shortcuts at bootup. Clearing this folder will cause the programs to not launch at bootup. This folder also happens to be the tar- get of most spyware and adware. Windows XP does not put any system-critical files in this Folder, so even if you’re not sure of the application a particular Shortcut refers to, The Start up tab in MSCONFIG just delete it.

6. Remove unwanted fonts

During bootup, Windows XP scans the ‘Fonts’ directory and loads them for the system to use. Windows XP by default installs fonts required for its operation as well as those for use in other applications such as Word, Notepad, IE, etc. Of these default fonts, most people hardly use more than 10. The remaining fonts simply sit there and occupy system resources, slowing down the bootup process as well. A simple way to address this situation is to move unused fonts to a separate directory. Create a new folder, say ‘C:\Fonts_backup’. Go to Start >Control panel > Fonts. In the ‘Fonts’ folder that opens, select all the fonts. Drag and drop them into the newly-created ‘Fonts_backup’ folder. When you do so, the display will turn to gibberish don’t worry. XP will install the basic fonts, the ones required for proper display, in the ‘Fonts’ folder.

Now that the system has the bare minimum fonts, hand-pick the fonts you always use, such as Times New Roman, Arial, Tahoma, Verdana, etc. from the backup folder and copy them to the ‘Fonts’ folder. If you removed a significant number of fonts, your system should boot faster.

Labels: , , ,

Unlock Vista's hidden boot screen

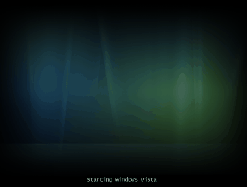
Bored with the vista's regular boot screen of windows vista?.There is another boot screen in Windows Vista bundled with it that we can unlock.
Here is the boot screen.


To unlock it follows the steps.
  1. Select run from the start menu.
  2. Type msconfig.
  3. Under the boot tab in the boot options click no gui boot.
  4. Close and restart the system.
You can see the new boot screen.No get the old boot screen back repeat step 3.That is click again on no gui boot.

Labels: ,

Monday, September 15, 2008

Get Vista's Ready Boost feature in XP

Windows Vista features a technology called the 'Ready Boost' which uses flash memory,SD cards,USB 2.0 drives or any flash storage device as disk cache or as a drive.This feature boost's reading and writing up to 80-100 times faster than the hard drives.This feature is integrated in Windows Vista by default.

Windows XP users also can enjoy this feature with a small software called eboostr.This software is available at a small price.So rather than upgrading to Vista it is worthy to go for this if your aim is Ready Boost.This application improves the system responsiveness and speeds up system booting and application launches.This software is compatible with all Ready Boost compatible USB drives.

Download eboostr


Labels: , , , , ,

Friday, September 12, 2008

Experience Windows Vista Ultimate SP1 without Installing

Do you want to experience Windows Vista without installing it?. Virtual Techlabs are providing an opportunity to experience Windows Vista Ultimate with SP1. All you need to do is to register by giving your email and other information.It is completely virtual. So it will never affect your system.


They recommend using internet explorer 6 to experience all of its features.

Go for Windows Vista Ultimate SP1 test drive

You can also experience Microsoft Office 2007.

Test drive Office 2007

The test drive requires good connection speed.I mean a broadband connection.

Labels: , ,

Wednesday, September 10, 2008

Make Keyboard Shortcuts to Eject and load DVD/CD drives

If your drive is positioned away from you no need to stretch your hand to reach it.Just use the shortcuts.In fact this will surely make your work a lot easier and faster. Here is a very useful trick that will enable you to open and close your drives using just keyboard shortcuts.
Just follow the steps below.
  • Download tooler from here.Its just a few KB.
  • Start the program and create shortcuts to eject and close CD/DVD drives.
  • I recommend not to create the shortcuts on the desktop as it could be annoying instead go for the Programs menu.
  • Then click start then on programs you can see the shortcuts here.
  • Right click the shortcut and see its properties.There you can see an option called ' Shortcut key.Assign a shortcut for it. Like Ctrl+F9 for example to Eject.
  • Just do the same for the shortcut to load the drive and assign a shortcut like Ctrl+F10.
  • That's it done.Now on pressing Ctrl+F9 will Eject he drive and on pressing Ctrl+F10 will load the drive.
  • Feels very comfortable now right!.

Labels: , , ,

Monday, September 8, 2008

Get the Aero Effect of Vista in Windows XP

I know many XP users who have seen Windows Vista Aero interface will never forget it.It needs good hardware requirements and Windows Vista(except Basic and starter editions).So although you have Vista installed you wont get the eye candy due to hardware limitations .

But there is a way to get the glass window borders like in vista on XP or Vista basic.There is a software that requires very little hardware requirements for getting it.It is called True Transparency.It changes the normal window borders to glass as in Vista.

Download True Transparency

Now to get the 3D flip effect in windows a software called Winflip.It can give the 3D flip effect you see on Vista.It can be activated by pressing the windows button and the tab button.Hold the buttons and scroll through the open windows.

Download WinFlip

Now to see the small thumbnails of open windows like in vista. The software is Visual Task Tips. It requires very little memory to run.To get the preview of a window hold the mouse pointer over the window on the taskbar.

Download Visual task tips

The best of the best is that the above mentioned software's are free.

To get a desktop almost similar to Xp there is a transformation pack that change the complete look of Windows XP to Windows Vista it is about 22.3 mb.But it contains the above mentioned programs and a vista theme and more.If you want an interface just like vista go for it.

Download Vista Mizer

After installing it select the dark XP theme from windows it will give the look almost similar to Windows Vista.

Hope everybody liked the tutorial.

Labels: , , ,

Boot Windows Vista and XP 2X/4X faster

If you have a multicore CPU you will be surprised if you check the booting speed after turning this setting on.This article is just for people running Windows Vista and have multicore CPU(Quad core or dual core or any multicore CPU).Here's how to reduce your boot time by nearly half or 1/4 th.

  1. Press the start button.On the search area type msconfig.
  2. On the boot tab press the Advanced Options button .
  3. Select the Number of Processors option.
  4. Select the number of processors you want to run during the booting process.Click OK .
  5. Reboot your computer.
You are done.

One of my friends asked me whether this trick is applicable for Xp. Yes it is applicable for Xp too .FOR XP USERS.
  1. Open msconfig then select the boot.ini then open the advanced options.
  2. You will see /NUMPROC option.
  3. Select it and apply the number of processors you have.
  4. Restart the system.
You notice the increase the speed in booting.If you want to calculate the boot time.Download the small 1kb script from below.Then run it before you apply the setting and after applying the setting.You will notice the decrease in boot time.
Download boot time calculator.

Labels: , , ,

Recover forgotten Administrative password in Windows XP

Most windows users forget their administrative passwords.Most of them end in reinstalling windows and lose their data as well.There are several ways to recover the forgotten password.Below are some methods i have found which can help you to recover the forgotten administrative passwords in Windows XP.
  • Download live cd version of ophcrack.
  • ophcrack is an open source software which uses rainbowtable methods to crack LM and NTLM hashes.
  • Download the iso file form the site.
  • Burn the file to a dvd/cd.
  • Boot from the dvd/cd.
  • Voila!! you are about to recover the password from nt/lm hashes.
  • Depending upon the complexity of your password,the recovery depends.
Download Ophcrack

There are other methods also.Try a new method given below.
  • Boot from your windows xp cd first.
  • Then press enter to setup windows now.
  • accept the license agreement by pressing F8.
  • in the next screen select to repair windows.
  • the setup checks your disks and start copying files.
  • soon after copying windows reboots.
  • Don't ever press any key when the message "press any key to boot from cd/dvd " appears.If you do you have to start from the beginning.
  • The setup will automatically continues highlighting 'installing windows'.
  • Soon after you see the installing devices option highlighted press shift+F10.
  • Yes!! you have created a loop hole in windows.
  • A command prompt window will appear then.
  • Type NUSRMGR.CPL.You will see the control panel.
  • Now take the account you want and change the password as you prefer.
  • If you want to logon without a password the type control userpasswords2 at the command prompt
  • then choose to log on without being asked for password.
  • continue with the repair process.
  • After the repair is complete you will be able to logon with the new password if you have given it or without the password.

Labels: , ,

Recover BIOS/CMOS password

Here are some methods to recover your BIOS password.
  • Remove the small battery seen in the mother board.
  • Turn on the system without the battery.
  • Your password will be reset.
  • All your changed bios setting and system time will be set to default.
  • Now turn the system off.
  • Put the battery again.
  • If you are not willing to remove the battery, try resetting the clear CMOS jumper on the motherboard.
If you don't want the methods mentioned above go for a BIOS password recovery tool like Pc CMOS cleaner.This is an .iso file which you need to burn to a disc and boot from it.It can reset /reveal your BIOS password.

Download CMOS Cleaner.

There are other tools like !BIOS which can recover BIOS passwords but this software sometimes causes errors.If you prefer to use it then use it at your own risk.

Labels: , ,

Get free GPRS (for Airtel Users)

I recently, came to know about a way to get unlimited Airtel GPRS free for live Airtel users.This is done with the help of teashark or Ucweb.Follow the steps below to get unlimited GPRS service in your mobile.
  1. First download Teashark browser.
  2. Install it.
  3. Select Airtel live as the connection point.
  4. If Teashark browser don't work download and install Ucweb.
  5. Ucweb features an inbuild download manager,search function,email service and also page saving options.
  6. Airtel wont charge you .
Download Teashark Browser

Download UCWeb Browser

Labels: ,

Repair Unaccessible Pendrives under two minutes

When you plug in your pen drive or mp3 player you are unable to access it and suddenly your system stops responding .Then it is due to the bad sectors in your pen drive that is due to memory pool corruption.I can give you a simple step to recover your drive.

  • Plug in your pen drive or mp3 player.
  • Don't access it .
  • Now restart the system with the device plugged in your drive.
  • During the booting process the 'check disk ' utility runs and scan your drive do not skip it wait for it to complete.
  • After the system boots up you will be able to access your drive.

Note: If you have any virus on your pen drive it can affect your system. So your pen drive should be virus free.

Labels: , ,

8 Smart and Simple Tips to Extend Your Printers Life / Get the Best out of Your Printer

8 Short Tips to Extend Your Printers Life Here are some tricks for you to use your printer efficiently. Mainly i have concentrated on on ink jet printers since inkjet printer is the most widely used one. Most of the time when people buy a printer they wont use it the right way, so they encounter many problems with their printer soon like ink clogging, ink got dried on the cartridge head etc. But if we take some necessary simple and easy steps we can surely avoid such situations and extend or printers life. Here are some short and helpful tips will surely help in getting the best out of your printer.

  • Use only genuine ink cartridges from the right company to prevent clogging, leaks and bleeding.
  • Make sure you set your printer driver settings correctly.
  • If you match your printer setting,paper type and ink you will get the best result.
  • Handle photographic papers by the edge only.
  • Using glossy papers to print is more cheap than plain papers as plain papers draws more ink,while glossy papers do not.It can also give you a fine and neat print.
  • Soon after the print don't touch the print out.Make sure the print out is dry else it will cause smudging.
  • Using a bond paper behind a heavy sheet can improve the feed.
  • Update the printer drivers regularly.


I decided to make this post short beacuse i dont think it needs any explanation and these are simple things that every body could understand easily and i cares about my readers valuable time. Hope every body liked the Tips.

Labels:

Check For Dead pixels before buying an LCD monitor

Dead pixels are the pixels that don't work.It appears as if some dust particles had stuck permanently on your monitor.Before you buy an LCD monitor check for it.You can this dead pixels appear only when you switch on your monitor.These are impossible to fix in most cases.

To check for dead pixels in your monitor

* download this small utility called DPT.
* Before buying your monitor take this utility with you.Its only 221kb.
* Ask the dealer to run this software on the monitor you choose.
* The software can check whether dead pixels are there.If you find any, you can choose the one free from defects.

Download DPT

If you have bought the monitor and later you find it you can ask for replacement if it is under warranty.

Labels: ,

Boost your USB/ Pendrive Speed/Increase the Speed of your Pendrive / USB

You may have noticed slow copy speeds with some pen drives. Here is a trick which help in increasing the speed or giving a speed boost to your pendrive.

  • Plug in your USB Drive.
  • Then Open My Computer> right-click on your USB Drive >click Properties.
  • Select your USB drive Under Hardwares and choose Properties.
  • You will see a dialog box saying " Optimize for quick removal".This option is selected by default.
  • Select "Optimize for Performance"option.
  • Now, remove USB drive and plug it again.
  • Copy some files from the drive to your system or vice-versa. You can notice the speed increase.

This trick may some times create write errors.But it will come in handy while copying files larger than a size of 1GB.

Labels: , ,

Speed up and maintain your hard disk

Here are some guidelines to speed up your hard drives and maintain it.
  • Use disk cleaners like ccleaner regularly.
  • Dont ever bring magnetic materials near your hard drive.
  • Never install unnecessary programs in your hard drives.These can really affect the boot time and hard drive performance.
  • Avoid pressing reset button if the hard drive is in the writing state as this can damage the head of the hard disk.
  • Use a good Hard disk defragment tool.Remember to defragment your hard drives at least once in 15 days.Use a hard disk defragmenting tool other than the one in windows , because the defragmenting tool in windows takes a lot of time to complete its operation.Moreover it cant defragment files according to our needs.Instead use tools like perfect disk 2008.If you want a free disk defragment tool go for tools like auslogics disk defrag.

There are several tweaks to speed up hard disk's, but these will work only for the time being.After some days you will notice the speed degrading gradually .So instead defragment your hard disks regularly to keep them running at maximum speed every day.

Labels:

5 Excellent Ways To Get the Best Out of your Scanner

Here are some useful tips for your scanner.

Selecting the scanning area:
Always preview the document and select just the area to be scanned, instead of scanning the entire document. This will reduce the scanning time as well as the file size, especially when scanning at high resolutions.

Resist scanning at high resolutions:
If you intend to scan your documents only to view them onscreen, scanning at a resolution between 100 and 150 dpi is enough, as monitors can only display 72 dots per inch (dpi). Scanning documents at higher resolutions will only result in a larger file size. If you are scanning a document for faxing or OCR ing, 200 to 300 dpi is sufficient; for printing photos, 300 to 600 dpi is more than enough. For photo scanning, keep the setting at the maximum colour depth that your scanner supports.

Use the De screen option
When you scan content from magazines or newspapers, you will notice a lot of moyer (converging and diverging lines) on the scanned image. The best way to reduce this pattern is to use the De screen option in the scanner software. If your scanner software does not have a De screen option, you can use an image editing software.

Image formats:
Select an image format depending on where you will be using the image. If you will be using it for the Web or for animation, save it in JPEG or GIF— these compressed formats save a lot of hard disk space. Ont the other hand, if you are scanning the image for print, TIFF is the best format, as it compresses the image with hardly any loss in image quality.

Correct ghost images:
A ghost image occurs when the scanner picks up images from the back of the page. This can usually be corrected by changing the brightness and contrast settings. Experiment to find the best settings for your scanner. Another simple way to correct this is to place a thick white paper over the document being scanned. Adjust brightness,

Contrast and sharpness:
Many a time, the scanned image turns out to be dull. This can be easily fixed through the TWAIN driver (if your scanner supports it) or using image editing software, where you can adjust the contrast and
brightness levels.

Adjust brightness, contrast and sharpness:
Many times, the scanned image turns out to be dull. This can be easily fixed through the TWAIN driver (if your scanner supports it) or using image editing software, where you can adjust he contrast and brightness levels.

Labels: